HP J9650A User Manual
HP J9650A Manual
 |
View all HP J9650A manuals
Add to My Manuals
Save this manual to your list of manuals |
HP J9650A manual content summary:
- HP J9650A | User Manual - Page 1
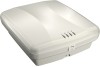
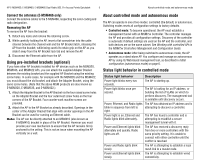
visit www.hp.com/networking/support for the latest documentation including the MSM3xx / MSM4xx Access Points Management and Configuration Guide and the MSM7xx Controllers Management and Configuration Guide. Hardware overview ➀ ➁ ➂ Front view 1: Status Lights (Left to right) Power, Ethernet, Radio - HP J9650A | User Manual - Page 2
HP E-MSM430, E-MSM460, E-MSM466 Dual Radio 802.11n Access Points Quickstart 2 Important information to read before installing Package contents The AP, AP Bracket, Padlock Bracket, two sets of AP Bracket T-bar clips with screws, two mounting screws with wall anchors, retention screw (4-40x1/4"), - HP J9650A | User Manual - Page 3
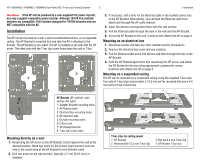
HP E-MSM430, E-MSM460, E-MSM466 Dual Radio 802.11n Access Points Quickstart 3 Installation Caution: If the AP will be powered by a user-supplied PoE power injector, use only a gigabit-compatible power injector. Although 10/100 PoE-enabled switches are compatible, PoE injectors designed for 10/100 - HP J9650A | User Manual - Page 4
HP E-MSM430, E-MSM460, E-MSM466 Dual Radio 802.11n Access Points Quickstart 4 Installation 1. Slide one of the T-bar clips into the AP Bracket T-bar slot. Screw it into place using two of the four provided self-tapping screws. Select the screw holes marked according to the width of - HP J9650A | User Manual - Page 5
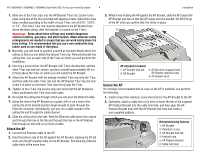
MSM430, E-MSM460, E-MSM466 Dual Radio 802.11n Access Points Quickstart 5 About controlled mode and autonomous mode Connect the antennas (E-MSM466 only) Connect the antenna cables to the E-MSM466, respecting the color-coding and radio designation. Removing the AP To remove the AP from the bracket - HP J9650A | User Manual - Page 6
HP E-MSM430, E-MSM460, E-MSM466 Dual Radio 802.11n Access Points Quickstart 6 Initial configuration (autonomous mode) After the discovery process is complete, and the AP has established a secure management tunnel to a controller, the Power light remains on and the Ethernet and Radio lights blink - HP J9650A | User Manual - Page 7
HP E-MSM430, E-MSM460, E-MSM466 Dual Radio 802.11n Access Points Quickstart 7 Initial configuration (autonomous mode) D. Log in 1. Wait until the Power light stops blinking and remains on. 2. On the Login page, specify admin for both Username and Password and then select Login. 3. Click through - HP J9650A | User Manual - Page 8
HP E-MSM430, E-MSM460, E-MSM466 Dual Radio 802.11n Access Points Part Numbers E-MSM430 J9651A (WW), J9650A (AM), J9652A J9659A Power-Level Setting Guide (for MSM Products) available from www.hp.com/networking/support. For MIMO antenna installation information, refer to the respective Antenna Guide
-
 1
1 -
 2
2 -
 3
3 -
 4
4 -
 5
5 -
 6
6 -
 7
7 -
8
 |
 |
In
The E-MSM430, E-MSM460, and E-MSM466 are Wi-Fi Alliance
authorized Wi-Fi CERTIFIED 802.11n/a/b/g products. The Wi-Fi
CERTIFIED Logo is a certification mark of the Wi-Fi Alliance.
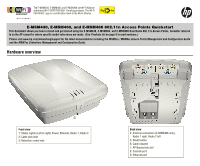
E-MSM430, E-MSM460, and E-MSM466 802.11n Access Points Quickstart
This Quickstart shows you how to install and get started using the E-MSM430, E-MSM460, and E-MSM466 Dual Radio 802.11n Access Points, hereafter referred
to as the AP except for where specific model references are made. (See
Products list
on page 8 for part numbers.)
Please visit www.hp.com/networking/support for the latest documentation including the
MSM3xx / MSM4xx Access Points Management and Configuration Guide
and the
MSM7xx Controllers Management and Configuration Guide
.
Hardware overview
➀
➁
➅
➇
➈
➆
➆
➆
➆
➃
➄
➃
➂
Front view
1: Status Lights (Left to right) Power, Ethernet, Radio 1, Radio 2
2: Cable lock hole
3: Retention screw hole
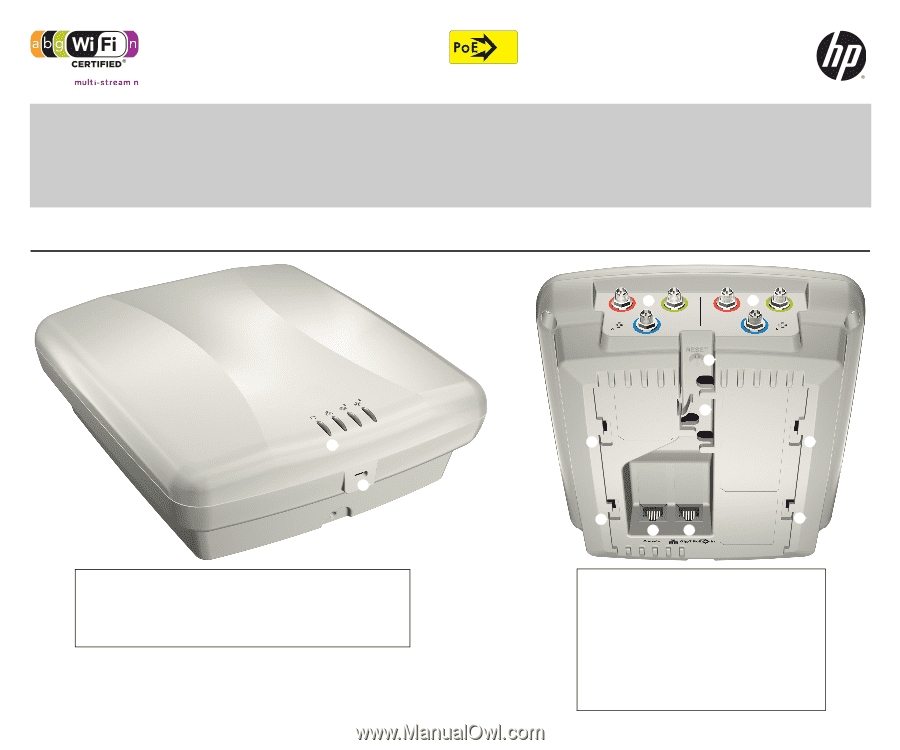
Back view
4: Antenna connectors (E-MSM466 only),
Radio 1 right, Radio 2 left
5: Reset button
6: Cable channel
7: AP Bracket tab slot
8: Console port
9: Ethernet port