HP J9650A User Manual - Page 2
Package contents, Ports, Radios and antennas, Reset button, Important information to read before - poe
 |
View all HP J9650A manuals
Add to My Manuals
Save this manual to your list of manuals |
Page 2 highlights
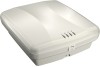
HP E-MSM430, E-MSM460, E-MSM466 Dual Radio 802.11n Access Points Quickstart 2 Important information to read before installing Package contents The AP, AP Bracket, Padlock Bracket, two sets of AP Bracket T-bar clips with screws, two mounting screws with wall anchors, retention screw (4-40x1/4"), Adapter Bracket, and documentation. Ports • Ethernet port: Auto-sensing 10/100/1000 BaseT Ethernet port with RJ-45 connector. The port supports Power over Ethernet (PoE) 802.3af. • Console port: Standard console (serial) port with RJ-45 connector. See Console Ports in the MSM3xx / MSM4xx Access Points Management and Configuration Guide. Note that there is no need to use the Console port for initial configuration. The CLI Reference Guide is available online. Warning: Never connect the Console port to an Ethernet switch or PoE power source. This may damage the AP. Connect it only to other serial ports using an RJ-45 to Serial Port adapter. Radios and antennas Each AP features two radios, providing 802.11n/a on Radio 1 and 802.11n/a/b/g on Radio 2. For maximum performance, the E-MSM460 and E-MSM466 both support 3x3 MIMO three-spatial-stream 802.11n. The E-MSM430 only supports 2x3 MIMO two-spatial-stream 802.11n. The E-MSM430 and the E-MSM460 each contain two 3-element, dual-band, MIMO antennas. The E-MSM466 includes no integrated antennas. It provides three antenna connectors for each radio, color-coded red, green, and blue. When connecting the antenna cables, be sure to respect the color-coding. See E-MSM466 available antennas on page 8. Reset button The Reset button is accessible via a hole on the bottom of the AP, labeled as 5 on page 1. Insert a paper clip into the Reset button hole. Press and quickly release the button to reset the AP. To reset the AP to factory defaults, press the button until the status lights blink three times, then release. Important information to read before installing Warning: PROFESSIONAL INSTALLATION REQUIRED. For indoor installation only. Prior to installing or using the AP, consult with a professional installer trained in RF installation and knowledgeable in local regulations including building and wiring codes, safety, channel, power, indoor/outdoor restrictions, and license requirements for the intended country. It is the responsibility of the end user to ensure that installation and use comply with local safety and radio regulations. Surge protection and grounding: When connecting antennas installed outdoors to the E-MSM466, make sure that proper lightning surge protection and grounding precautions are taken according to local electrical code. Failure to do so may result in personal injury, fire, equipment damage, or a voided warranty. The HP hardware warranty provides no protection against damage caused by static discharge or a lightning strike. Cabling: You must use the appropriate cables, and where applicable, surge protection, for your given region. Cat 5e (or better) cabling is required. Plenum installation: The AP can be installed in a plenum. The AP is suitable for use in environmental air space in accordance with Section 300-22(C) of the National Electrical Code, and Sections 2-128, 12-010(3) and 12-100 of the Canadian Electrical Code, Part 1, CSA C22.1. It should be installed in a similar orientation as in a ceiling installation. However, it is left to a qualified installer to determine how to install/secure the AP in a plenum in an appropriate and safe manner. Plenum-rated cables and attachment hardware must be used. Country of use: In some regions, you are prompted to select the country of use during setup. After the country has been set, the AP will automatically limit the available wireless channels, ensuring compliant operation in the selected country. Entering the incorrect country may result in illegal operation and may cause harmful interference to other systems. Safety: Take note of the following safety information during installation. • If your network covers an area served by more than one power distribution system, make sure all safety grounds are securely interconnected. • Network cables may occasionally be subject to hazardous transient voltages (caused by lightning or disturbances in the electrical power grid). • Handle exposed metal components of the network with caution. • The AP is powered-on when connected to a PoE power source. • The AP and all interconnected equipment must be installed indoors within the same building (except for outdoor antennas), including all PoE-powered network connections, as described by Environment A of the IEEE 802.3af standard. See also Other regulatory information on page 8. Powering the AP The AP can be powered by: • A 10/100 or 10/100/1000 PoE-enabled switch. Various PoE-enabled switches are available from HP. • An HP 1-Port Power Injector (J9407A).
-
 1
1 -
 2
2 -
 3
3 -
 4
4 -
 5
5 -
 6
6 -
 7
7 -
 8
8
 |
 |
