HP LaserJet Pro 100 HP LaserJet Pro 100 Color MFP M175 - Quick Reference Guide
HP LaserJet Pro 100 Manual
 |
View all HP LaserJet Pro 100 manuals
Add to My Manuals
Save this manual to your list of manuals |
HP LaserJet Pro 100 manual content summary:
- HP LaserJet Pro 100 | HP LaserJet Pro 100 Color MFP M175 - Quick Reference Guide - Page 1
LASERJET PRO 100 COLOR MFP M175 Quick Reference Guide - HP LaserJet Pro 100 | HP LaserJet Pro 100 Color MFP M175 - Quick Reference Guide - Page 2
includes the HP Smart Install installation software for Windows operating systems. The software uses the USB cable to install USB, network, or wireless connections. 1. Connect the USB cable that came with the product to a computer and the product. 2. Follow the onscreen instructions. Disconnect the - HP LaserJet Pro 100 | HP LaserJet Pro 100 Color MFP M175 - Quick Reference Guide - Page 3
then press the OK button. 4. Follow the instructions on the HP Web Services Info Sheet to enable or remove HP Web Services. Use the product control panel to find the product e-mail address. 1. Press the Setup button. 2. Use the arrow buttons to select the HP Web Services menu, and then press the OK - HP LaserJet Pro 100 | HP LaserJet Pro 100 Color MFP M175 - Quick Reference Guide - Page 4
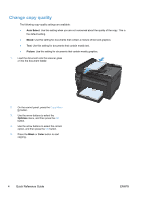
, and then press the OK button. 4. Use the arrow buttons to select the correct option, and then press the OK button. 5. Press the Black or Color button to start copying. 4 Quick Reference Guide ENWW - HP LaserJet Pro 100 | HP LaserJet Pro 100 Color MFP M175 - Quick Reference Guide - Page 5
Scan by using HP Scan software (Windows) 1. Double-click the HP Scan icon on the computer desktop. 2. Select a scanning shortcut, and adjust the settings if necessary. 3. Click Scan. NOTE: Click Advanced Settings to gain access to more options. Click Create New Shortcut to create a customized set of - HP LaserJet Pro 100 | HP LaserJet Pro 100 Color MFP M175 - Quick Reference Guide - Page 6
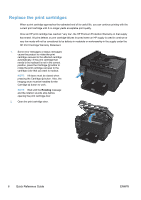
in the correct position, press the Cartridge button to rotate the print cartridge carousel to the cartridge color that you want to replace. NOTE: All doors must be closed when pressing the Cartridge button. Also, the imaging drum must be installed for the Cartridge button to work. NOTE: Wait until - HP LaserJet Pro 100 | HP LaserJet Pro 100 Color MFP M175 - Quick Reference Guide - Page 7
by the center handle and remove the protective plastic shield. NOTE: Do not touch the print cartridge roller. Fingerprints on the roller can cause print-quality problems. 7. Remove the sealing tape from the print cartridge. Place the tape in the printcartridge box to return for recycling. ENWW - HP LaserJet Pro 100 | HP LaserJet Pro 100 Color MFP M175 - Quick Reference Guide - Page 8
. After you have replaced the print cartridges, the product calibrates. NOTE: When printing, if you receive the status alert message Wrong Cartridge in Slot, remove the print cartridge from the specified slot and compare the color label on the print cartridge to the color label in the slot - HP LaserJet Pro 100 | HP LaserJet Pro 100 Color MFP M175 - Quick Reference Guide - Page 9
Check the scanner glass for dirt and smudges Over time, specks of debris might collect on the scanner glass and white plastic backing, which can affect performance. Use the following procedure to clean the scanner glass and white plastic backing. 1. Use the power switch to turn off the product, and - HP LaserJet Pro 100 | HP LaserJet Pro 100 Color MFP M175 - Quick Reference Guide - Page 10
service agreements. Special paper guidelines This product supports printing on special media. Use the following guidelines to obtain satisfactory results. When using special paper or print media, be sure to set the type and size in the printer driver to obtain the best results. CAUTION: HP LaserJet - HP LaserJet Pro 100 | HP LaserJet Pro 100 Color MFP M175 - Quick Reference Guide - Page 11
are approved for use in color laser printers. ● Do not use transparent print media not approved for laser printers. ● Place transparencies on than the printers and meets the recommended media weight specifications for specification for this this product. product unless it is HP paper that - HP LaserJet Pro 100 | HP LaserJet Pro 100 Color MFP M175 - Quick Reference Guide - Page 12
by changing the settings on the Color tab in the printer driver. Change the color theme for a print job 1. On the File menu in the software program, click Print. 2. Click Properties or Preferences. 3. Click the Color tab. 4. Select a color theme from the Color Themes drop-down list. ● Default (sRGB - HP LaserJet Pro 100 | HP LaserJet Pro 100 Color MFP M175 - Quick Reference Guide - Page 13
Change the color options Change the color options settings for the current print job from the color tab of the printer driver. 1. On the File menu in the software program, click Print. 2. Click Properties or Preferences. 3. Click the Color tab. 4. Click the Automatic or Manual setting. ● Automatic - HP LaserJet Pro 100 | HP LaserJet Pro 100 Color MFP M175 - Quick Reference Guide - Page 14
when uniform and smooth area fills are important. Detail is useful for text and graphics that require sharp distinctions among lines or colors, or images that contain a pattern or a high level of detail. Select this option when sharp edges and small details are important. Neutral Grays ● The - HP LaserJet Pro 100 | HP LaserJet Pro 100 Color MFP M175 - Quick Reference Guide - Page 15
Clean the paper path from the product control panel 1. Press the Setup button. 2. Use the arrow buttons to select the Service menu, and then press the OK button. 3. Use the arrow buttons to select the Cleaning Page item, and then press the OK button. 4. Load plain - HP LaserJet Pro 100 | HP LaserJet Pro 100 Color MFP M175 - Quick Reference Guide - Page 16
Manually print on both sides (duplex) with Windows 1. Load paper face-up in the input tray. 2. On the File menu in the software program, click Print. 3. Select the product, and then click the Properties or Preferences button. 16 Quick Reference Guide ENWW - HP LaserJet Pro 100 | HP LaserJet Pro 100 Color MFP M175 - Quick Reference Guide - Page 17
4. Click the Finishing tab. 5. Select the Print on Both Sides (Manually) check box. Click the OK button to print the first side of the job. 6. Retrieve the to print the second side of the job. If at the product, press the OK button. ENWW Manually print on both sides (duplex) with Windows 17 - HP LaserJet Pro 100 | HP LaserJet Pro 100 Color MFP M175 - Quick Reference Guide - Page 18
© 2011 Hewlett-Packard Development Company, L.P. www.hp.com Edition 1, 4/2011 Part number: CE865-90934 Windows ® is a such products and services. Nothing herein should be construed as constituting an additional warranty. HP shall not be liable for technical or editorial errors or omissions contained
-
 1
1 -
 2
2 -
 3
3 -
 4
4 -
 5
5 -
 6
6 -
 7
7 -
8
-
9
-
10
-
11
-
12
-
13
-
14
-
15
-
16
-
17
-
18
 |
 |
LASERJET PRO 100 COLOR MFP M175
Quick Reference Guide