HP Nw9440 HP Compaq nx9420 and nx9440 Notebook PC - Maintenance and Service Gu - Page 134
LED Board, LED Board Spare Part Number Information
 |
UPC - 882780782174
View all HP Nw9440 manuals
Add to My Manuals
Save this manual to your list of manuals |
Page 134 highlights
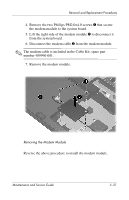
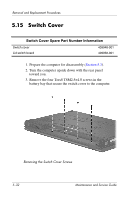
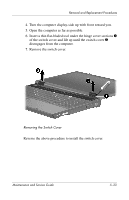
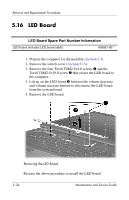
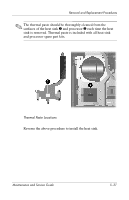
Removal and Replacement Procedures 5.16 LED Board LED Board Spare Part Number Information LED board (includes LED board cable) 409957-001 1. Prepare the computer for disassembly (Section 5.3). 2. Remove the switch cover (Section 5.15). 3. Remove the four Torx8 T8M2.5×4.0 screws 1 and the Torx8 T8M2.5×19.0 screw 2 that secure the LED board to the computer. 4. Lift up on the LED board 3 between the volume decrease and volume increase buttons to disconnect the LED board from the system board. 5. Remove the LED board. Removing the LED Board Reverse the above procedure to install the LED board. 5-34 Maintenance and Service Guide
-
 1
1 -
2
-
3
-
4
-
5
-
6
-
7
-
8
-
9
-
10
-
11
-
12
-
13
-
14
-
15
-
16
-
17
-
18
-
19
-
20
-
21
-
22
-
23
-
24
-
25
-
26
-
27
-
28
-
29
-
30
-
31
-
32
-
33
-
34
-
35
-
36
-
37
-
38
-
39
-
40
-
41
-
42
-
43
-
44
-
45
-
46
-
47
-
48
-
49
-
50
-
51
-
52
-
53
-
54
-
55
-
56
-
57
-
58
-
59
-
60
-
61
-
62
-
63
-
64
-
65
-
66
-
67
-
68
-
69
-
70
-
71
-
72
-
73
-
74
-
75
-
76
-
77
-
78
-
79
-
80
-
81
-
82
-
83
-
84
-
85
-
86
-
87
-
88
-
89
-
90
-
91
-
92
-
93
-
94
-
95
-
96
-
97
-
98
-
99
-
100
-
101
-
102
-
103
-
104
-
105
-
106
-
107
-
108
-
109
-
110
-
111
-
112
-
113
-
114
-
115
-
116
-
117
-
118
-
119
-
120
-
121
-
122
-
123
-
124
-
125
-
126
-
127
-
128
-
 129
129 -
 130
130 -
 131
131 -
 132
132 -
 133
133 -
 134
134 -
 135
135 -
 136
136 -
 137
137 -
 138
138 -
 139
139 -
140
-
141
-
142
-
143
-
144
-
145
-
146
-
147
-
148
-
149
-
150
-
151
-
152
-
153
-
154
-
155
-
156
-
157
-
158
-
159
-
160
-
161
-
162
-
163
-
164
-
165
-
166
-
167
-
168
-
169
-
170
-
171
-
172
-
173
-
174
-
175
-
176
-
177
-
178
-
179
-
180
-
181
-
182
-
183
-
184
-
185
-
186
-
187
-
188
-
189
-
190
-
191
-
192
-
193
-
194
-
195
-
196
-
197
-
198
-
199
-
200
-
201
-
202
-
203
-
204
-
205
-
206
-
207
-
208
-
209
-
210
-
211
-
212
-
213
-
214
-
215
-
216
-
217
-
218
-
219
-
220
-
221
-
222
-
223
-
224
-
225
-
226
-
227
-
228
-
229
-
230
-
231
-
232
-
233
-
234
-
235
-
236
-
237
-
238
-
239
-
240
-
241
-
242
-
243
-
244
-
245
-
246
-
247
-
248
-
249
-
250
-
251
-
252
-
253
-
254
-
255
-
256
-
257
-
258
-
259
-
260
-
261
-
262
-
263
-
264
-
265
-
266
 |
 |

5–34
Maintenance and Service Guide
Removal and Replacement Procedures
5.16
LED Board
1. Prepare the computer for disassembly (
Section 5.3
).
2. Remove the switch cover (
Section 5.15
).
3. Remove the four Torx8 T8M2.5×4.0 screws
1
and the
Torx8 T8M2.5×19.0 screw
2
that secure the LED board to
the computer.
4. Lift up on the LED board
3
between the volume decrease
and volume increase buttons to disconnect the LED board
from the system board.
5. Remove the LED board.
Removing the LED Board
Reverse the above procedure to install the LED board.
LED Board Spare Part Number Information
LED board (includes LED board cable)
409957-001