HP Nw9440 HP Compaq nx9420 and nx9440 Notebook PC - Maintenance and Service Gu - Page 142
Due to the adhesive quality of the thermal pad located between
 |
UPC - 882780782174
View all HP Nw9440 manuals
Add to My Manuals
Save this manual to your list of manuals |
Page 142 highlights
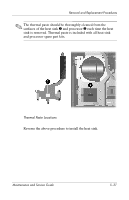
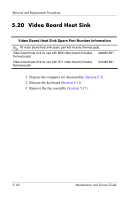
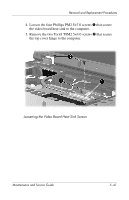
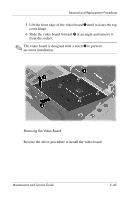
Removal and Replacement Procedures 6. Lift the rear edge of the top cover hinge 1 until it rests at an angle. 7. Lift the front edge of the video board heat sink 2 until it clears the top cover hinge, and then slide the video board heat sink forward and remove it. ✎ Due to the adhesive quality of the thermal pad located between the video board heat sink and the video board, it may be necessary to move the heat sink from side to side to detach the video board heat sink. Removing the Video Board Heat Sink 5-42 Maintenance and Service Guide
-
 1
1 -
2
-
3
-
4
-
5
-
6
-
7
-
8
-
9
-
10
-
11
-
12
-
13
-
14
-
15
-
16
-
17
-
18
-
19
-
20
-
21
-
22
-
23
-
24
-
25
-
26
-
27
-
28
-
29
-
30
-
31
-
32
-
33
-
34
-
35
-
36
-
37
-
38
-
39
-
40
-
41
-
42
-
43
-
44
-
45
-
46
-
47
-
48
-
49
-
50
-
51
-
52
-
53
-
54
-
55
-
56
-
57
-
58
-
59
-
60
-
61
-
62
-
63
-
64
-
65
-
66
-
67
-
68
-
69
-
70
-
71
-
72
-
73
-
74
-
75
-
76
-
77
-
78
-
79
-
80
-
81
-
82
-
83
-
84
-
85
-
86
-
87
-
88
-
89
-
90
-
91
-
92
-
93
-
94
-
95
-
96
-
97
-
98
-
99
-
100
-
101
-
102
-
103
-
104
-
105
-
106
-
107
-
108
-
109
-
110
-
111
-
112
-
113
-
114
-
115
-
116
-
117
-
118
-
119
-
120
-
121
-
122
-
123
-
124
-
125
-
126
-
127
-
128
-
129
-
130
-
131
-
132
-
133
-
134
-
135
-
136
-
 137
137 -
 138
138 -
 139
139 -
 140
140 -
 141
141 -
 142
142 -
 143
143 -
 144
144 -
 145
145 -
 146
146 -
 147
147 -
148
-
149
-
150
-
151
-
152
-
153
-
154
-
155
-
156
-
157
-
158
-
159
-
160
-
161
-
162
-
163
-
164
-
165
-
166
-
167
-
168
-
169
-
170
-
171
-
172
-
173
-
174
-
175
-
176
-
177
-
178
-
179
-
180
-
181
-
182
-
183
-
184
-
185
-
186
-
187
-
188
-
189
-
190
-
191
-
192
-
193
-
194
-
195
-
196
-
197
-
198
-
199
-
200
-
201
-
202
-
203
-
204
-
205
-
206
-
207
-
208
-
209
-
210
-
211
-
212
-
213
-
214
-
215
-
216
-
217
-
218
-
219
-
220
-
221
-
222
-
223
-
224
-
225
-
226
-
227
-
228
-
229
-
230
-
231
-
232
-
233
-
234
-
235
-
236
-
237
-
238
-
239
-
240
-
241
-
242
-
243
-
244
-
245
-
246
-
247
-
248
-
249
-
250
-
251
-
252
-
253
-
254
-
255
-
256
-
257
-
258
-
259
-
260
-
261
-
262
-
263
-
264
-
265
-
266
 |
 |

5–42
Maintenance and Service Guide
Removal and Replacement Procedures
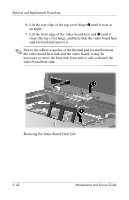
6. Lift the rear edge of the top cover hinge
1
until it rests at
an angle.
7. Lift the front edge of the video board heat sink
2
until it
clears the top cover hinge, and then slide the video board heat
sink forward and remove it.
✎
Due to the adhesive quality of the thermal pad located between
the video board heat sink and the video board, it may be
necessary to move the heat sink from side to side to detach the
video board heat sink.
Removing the Video Board Heat Sink