HP Omni 27-1054 Wall Mounting Guide - Page 8
You might have to exert force to remove the back cover from the computer. There might
 |
View all HP Omni 27-1054 manuals
Add to My Manuals
Save this manual to your list of manuals |
Page 8 highlights
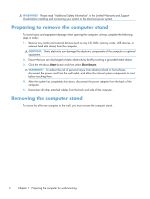
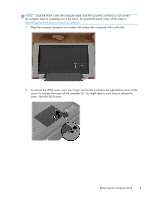
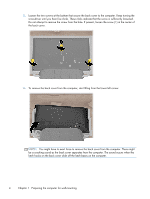
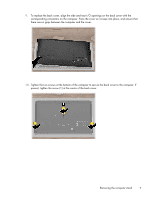
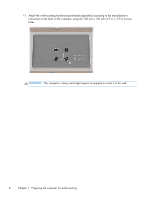
3. Loosen the two screws at the bottom that secure the back cover to the computer. Keep turning the screwdriver until you hear five clicks. These clicks indicate that the screw is sufficiently loosened. Do not attempt to remove the screw from the hole. If present, loosen the screw (1) at the center of the back cover. 4. To remove the back cover from the computer, start lifting from the lower left corner. NOTE: You might have to exert force to remove the back cover from the computer. There might be a cracking sound as the back cover separates from the computer. The sound occurs when the latch hooks on the back cover slide off the latch bases on the computer. 4 Chapter 1 Preparing the computer for wall-mounting
-
 1
1 -
2
-
 3
3 -
 4
4 -
 5
5 -
 6
6 -
 7
7 -
 8
8 -
 9
9 -
 10
10 -
 11
11 -
 12
12 -
 13
13 -
14
-
15
-
16
-
17
-
18
-
19
 |
 |
3.
Loosen the two screws at the bottom that secure the back cover to the computer. Keep turning the
screwdriver until you hear five clicks. These clicks indicate that the screw is sufficiently loosened.
Do not attempt to remove the screw from the hole. If present, loosen the screw (1) at the center of
the back cover.
4.
To remove the back cover from the computer, start lifting from the lower left corner.
NOTE:
You might have to exert force to remove the back cover from the computer. There might
be a cracking sound as the back cover separates from the computer. The sound occurs when the
latch hooks on the back cover slide off the latch bases on the computer.
4
Chapter 1
Preparing the computer for wall-mounting