HP PSC 2100 HP PSC 2100 Series all-in-one - (United Kingdom) Reference Guide - Page 32
Do not touch the copper contacts or ink nozzles. - ink cartridges
 |
View all HP PSC 2100 manuals
Add to My Manuals
Save this manual to your list of manuals |
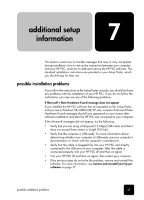
Page 32 highlights
hp psc 2100 series 2 After the carriage stops moving, lift the latch to release the print cartridge, then pull it toward you out of its slot. 3 If you are removing the black print cartridge in order to install the photo print cartridge, store it in the print cartridge protector. 4 Remove the new print cartridge from its packaging and, being careful to touch only the black plastic, gently remove the plastic tape. Caution! Do not touch the copper contacts or ink nozzles. 5 Push the new print cartridge into the appropriate slot until it clicks into place. The tri-color print cartridge goes on the left and the black or photo print cartridge goes on the right. 28 maintain your hp psc
-
 1
1 -
2
-
3
-
4
-
5
-
6
-
7
-
8
-
9
-
10
-
11
-
12
-
13
-
14
-
15
-
16
-
17
-
18
-
19
-
20
-
21
-
22
-
23
-
24
-
25
-
26
-
 27
27 -
 28
28 -
 29
29 -
 30
30 -
 31
31 -
 32
32 -
 33
33 -
 34
34 -
 35
35 -
 36
36 -
 37
37 -
38
-
39
-
40
-
41
-
42
-
43
-
44
-
45
-
46
-
47
-
48
-
49
-
50
-
51
-
52
-
53
-
54
-
55
-
56
-
57
-
58
-
59
-
60
-
61
-
62
-
63
-
64
-
65
-
66
 |
 |

maintain your hp psc
28
hp psc 2100 series
2
After the carriage stops moving, lift the latch to release the print
cartridge, then pull it toward you out of its slot.
3
If you are removing the black print cartridge in order to install the
photo print cartridge, store it in the print cartridge protector.
4
Remove the new print cartridge from its packaging and, being careful
to touch only the black plastic, gently remove the plastic tape.
Caution!
Do not touch the copper contacts or ink nozzles.
5
Push the new print cartridge into the appropriate slot until it clicks into
place.
The tri-color print cartridge goes on the left and the black or photo
print cartridge goes on the right.