HP PageWide XL 4700 Assembly Instructions 2 - Page 2
Turn off the printer from the main switch
 |
View all HP PageWide XL 4700 manuals
Add to My Manuals
Save this manual to your list of manuals |
Page 2 highlights
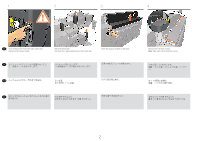
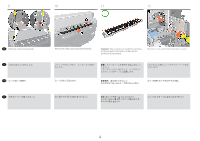
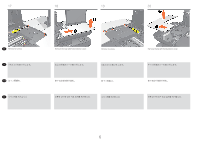
1 2 3 4 EN Turn off the printer from the main switch and disconnect the power cable. Remove the basket. Remove the 1 upper lateral cover from each side. Open the output module on the back. JA 1 ZHCN 1 KO 1 Remove the 10 black screws. Note: Take care not to drop the screws. 10 卸下 10 10 2
-
 1
1 -
 2
2 -
 3
3 -
 4
4 -
 5
5 -
 6
6 -
 7
7 -
 8
8 -
9
-
10
-
11
-
12
-
13
-
14
-
15
-
16
-
17
-
18
-
19
-
20
-
21
-
22
-
23
-
24
-
25
-
26
-
27
-
28
 |
 |

2
ZHCN
EN
JA
KO
Open the output module on the back.
背面の排紙モジュールを開きます。
打开背面的输出模块。
뒷면의 출력 모듈을 엽니다.
Remove the basket.
Remove the 1 upper lateral cover from each side.
バスケットを取り出します。
1上部側面カバーを各側から取り外します。
取下纸筐。
取下每侧的 1 个上侧盖。
바스켓을 제거합니다.
양쪽에서 상단의 측면 덮개 1개를 제거합니다.
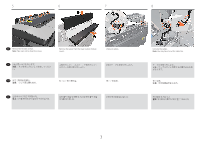
Remove the 10 black screws.
Note:
Take care not to drop the screws.
10本の黒いネジを外します。
注記:
ネジを落とさないよう注意してくださ
い。
卸下 10 颗黑色的螺钉。
注意:
小心不要让螺钉掉落。
검은색 나사 10개를 제거합니다.
참고:
나사를 떨어뜨리지 않도록 주의하십시오.
Turn off the printer from the main switch and
disconnect the power cable.
メインスイッチでプリンタの電源をオフにし
て、電源ケーブルを取り外します。
从主开关关闭打印机,然后拔下电源线。
메인 스위치에서 프린터 전원을 끄고 전원 케이블을
분리합니다.
2
1
3
4