HP Pavilion 11-ad100 Maintenance and Service Guide - Page 62
Swing the display panel assembly, from the display back cover.
 |
View all HP Pavilion 11-ad100 manuals
Add to My Manuals
Save this manual to your list of manuals |
Page 62 highlights
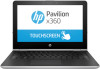
a. Insert a case utility tool (1) or similar thin, plastic tool between the top edges of the display panel assembly and the display back cover. b. Release the top edge of the display panel assembly (2) from the display back cover. c. Swing the display panel assembly (3) forward until it rests on the keyboard. d. Detach the two pieces of tape (1) that secure the TouchScreen board cable to the TouchScreen board. 54 Chapter 5 Removal and replacement procedures
-
 1
1 -
2
-
3
-
4
-
5
-
6
-
7
-
8
-
9
-
10
-
11
-
12
-
13
-
14
-
15
-
16
-
17
-
18
-
19
-
20
-
21
-
22
-
23
-
24
-
25
-
26
-
27
-
28
-
29
-
30
-
31
-
32
-
33
-
34
-
35
-
36
-
37
-
38
-
39
-
40
-
41
-
42
-
43
-
44
-
45
-
46
-
47
-
48
-
49
-
50
-
51
-
52
-
53
-
54
-
55
-
56
-
 57
57 -
 58
58 -
 59
59 -
 60
60 -
 61
61 -
 62
62 -
 63
63 -
 64
64 -
 65
65 -
 66
66 -
 67
67 -
68
-
69
-
70
-
71
-
72
-
73
-
74
-
75
-
76
-
77
-
78
-
79
-
80
-
81
-
82
-
83
-
84
-
85
-
86
-
87
-
88
-
89
 |
 |

a.
Insert a case utility tool
(1)
or similar thin, plastic tool between the top edges of the display panel
assembly and the display back cover.
b.
Release the top edge of the display panel assembly
(2)
from the display back cover.
c.
Swing the display panel assembly
(3)
forward until it rests on the keyboard.
d.
Detach the two pieces of tape
(1)
that secure the TouchScreen board cable to the TouchScreen board.
54
Chapter 5
Removal and replacement procedures