HP Pavilion zd8000 HP Pavilion zd8000 Notebook PC - Maintenance and Service Gu - Page 96
LED Board
 |
View all HP Pavilion zd8000 manuals
Add to My Manuals
Save this manual to your list of manuals |
Page 96 highlights
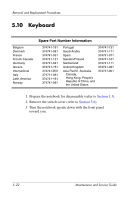
Removal and Replacement Procedures 5.9 LED Board Spare Part Number Information LED board (includes cable) 378771-001 1. Prepare the notebook for disassembly (refer to Section 5.3). 2. Remove the switch cover (refer to Section 5.8). 3. Release the zero insertion force (ZIF) connector 1 to which the LED board cable is connected and disconnect the cable. 4. Remove the PM2.0×4.0 screw 2 that secures the LED board to the top cover. 5. Lift the left side of the LED board 3 until the board disengages from the alignment pins 4 on the top cover. Releasing the LED Board 5-20 Maintenance and Service Guide
-
 1
1 -
2
-
3
-
4
-
5
-
6
-
7
-
8
-
9
-
10
-
11
-
12
-
13
-
14
-
15
-
16
-
17
-
18
-
19
-
20
-
21
-
22
-
23
-
24
-
25
-
26
-
27
-
28
-
29
-
30
-
31
-
32
-
33
-
34
-
35
-
36
-
37
-
38
-
39
-
40
-
41
-
42
-
43
-
44
-
45
-
46
-
47
-
48
-
49
-
50
-
51
-
52
-
53
-
54
-
55
-
56
-
57
-
58
-
59
-
60
-
61
-
62
-
63
-
64
-
65
-
66
-
67
-
68
-
69
-
70
-
71
-
72
-
73
-
74
-
75
-
76
-
77
-
78
-
79
-
80
-
81
-
82
-
83
-
84
-
85
-
86
-
87
-
88
-
89
-
90
-
 91
91 -
 92
92 -
 93
93 -
 94
94 -
 95
95 -
 96
96 -
 97
97 -
 98
98 -
 99
99 -
 100
100 -
 101
101 -
102
-
103
-
104
-
105
-
106
-
107
-
108
-
109
-
110
-
111
-
112
-
113
-
114
-
115
-
116
-
117
-
118
-
119
-
120
-
121
-
122
-
123
-
124
-
125
-
126
-
127
-
128
-
129
-
130
-
131
-
132
-
133
-
134
-
135
-
136
-
137
-
138
-
139
-
140
-
141
-
142
-
143
-
144
-
145
-
146
-
147
-
148
-
149
-
150
-
151
-
152
-
153
-
154
-
155
-
156
-
157
-
158
-
159
-
160
-
161
-
162
-
163
-
164
-
165
-
166
-
167
-
168
-
169
-
170
-
171
-
172
-
173
-
174
-
175
-
176
-
177
-
178
-
179
-
180
-
181
-
182
-
183
-
184
-
185
-
186
-
187
-
188
-
189
 |
 |

5–20
Maintenance and Service Guide
Removal and Replacement Procedures
5.9
LED Board
1. Prepare the notebook for disassembly (refer to
Section 5.3
).
2. Remove the switch cover (refer to
Section 5.8
).
3. Release the zero insertion force (ZIF) connector
1
to which
the LED board cable is connected and disconnect the cable.
4. Remove the PM2.0×4.0 screw
2
that secures the LED board
to the top cover.
5. Lift the left side of the LED board
3
until the board
disengages from the alignment pins
4
on the top cover.
Releasing the LED Board
Spare Part Number Information
LED board (includes cable)
378771-001