HP Photosmart A630 Basics Guide - Page 21
Insert or replace the print cartridge, User Guide - ink cartridge
 |
View all HP Photosmart A630 manuals
Add to My Manuals
Save this manual to your list of manuals |
Page 21 highlights
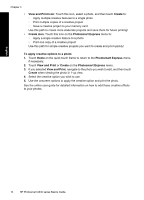
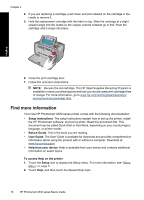
English • Make sure the print quality setting is optimum for the paper type you are using. For best results, use the Normal print quality setting with HP Advanced Photo paper. If you are using other types of photo or plain paper, use the Best setting. For more information on this subject, download the comprehensive User Guide at www.hp.com/support. • Your photos are instantly dry, and can be handled immediately after they are printed. However, HP recommends that you leave the printed surface of your photos exposed to the air for 3 minutes after printing, to allow the colors to fully develop before you stack them with other photos or place them in albums. Insert or replace the print cartridge Use the HP 110 Tri-color Inkjet print cartridge to print black-and-white and color photos. HP Vivera Inks deliver true-to-life photo quality and exceptional fade resistance, resulting in vivid colors that last. HP Vivera Inks are specially formulated and scientifically tested for quality, purity, and fade resistance. CAUTION: Check that you are using the correct print cartridges. Also, note that HP does not recommend modifying or refilling HP cartridges. Damage that results from modifying or refilling HP cartridges is not covered by the HP warranty. To insert or replace a print cartridge 1. Make sure the power is on and you have removed the cardboard from inside the printer. 2. Open the print cartridge door of the printer. 3. Remove the bright pink tape from the cartridge. NOTE: Do not touch the copper-colored contacts on the print cartridge. Insert or replace the print cartridge 17
-
 1
1 -
2
-
3
-
4
-
5
-
6
-
7
-
8
-
9
-
10
-
11
-
12
-
13
-
14
-
15
-
 16
16 -
 17
17 -
 18
18 -
 19
19 -
 20
20 -
 21
21 -
 22
22 -
 23
23 -
 24
24 -
 25
25 -
 26
26 -
27
-
28
-
29
-
30
-
31
-
32
-
33
-
34
-
35
-
36
-
37
-
38
-
39
-
40
-
41
-
42
-
43
-
44
-
45
-
46
-
47
-
48
-
49
-
50
-
51
-
52
-
53
-
54
-
55
-
56
-
57
-
58
-
59
-
60
-
61
-
62
-
63
-
64
-
65
-
66
-
67
-
68
-
69
-
70
-
71
-
72
-
73
-
74
-
75
-
76
-
77
-
78
-
79
-
80
-
81
 |
 |