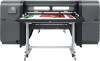
HP Scitex FB550 Rigid Media Guide
HP Scitex FB550 Manual
 |
View all HP Scitex FB550 manuals
Add to My Manuals
Save this manual to your list of manuals |
HP Scitex FB550 manual content summary:
- HP Scitex FB550 | Rigid Media Guide - Page 1
Scitex FB550 and FB750 Printers Rigid Media Guide - HP Scitex FB550 | Rigid Media Guide - Page 2
to change without notice. The only warranties for HP products and services are set forth in the express warranty statements accompanying such products and services. Nothing herein should be construed as constituting an additional warranty. HP shall not be liable for technical or editorial errors - HP Scitex FB550 | Rigid Media Guide - Page 3
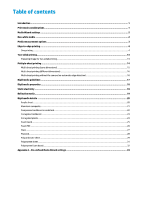
Table of contents Introduction ...1 Print mode considerations ...1 Media Wizard settings ...2 Non-white media ...2 Media measurement options...3 Edge-to-edge printing ...4 Overprinting ...4 Two-sided printing...13 Preparing image for two-sided printing ...13 Multiple-sheet printing ...14 Multi-sheet - HP Scitex FB550 | Rigid Media Guide - Page 4
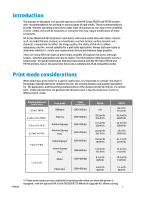
Introduction The purpose of this guide is to provide operators of the HP Scitex FB550 and FB750 printers with recommendations for printing on various types of rigid media. These recommendations provide the best operating instructions under most circumstances, but, due to the variability of print - HP Scitex FB550 | Rigid Media Guide - Page 5
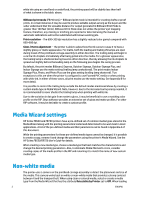
printer's jet mapping feature, therefore, any missing or misfiring jets reported or detected using the manual printhead carriage assembly in either direction. The trailing lamp will begin to cure the ink using the printer's Media Wizard. See the HP Scitex FB550/FB750 User's Guide for details. - HP Scitex FB550 | Rigid Media Guide - Page 6
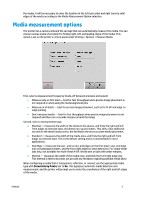
the media, it will be necessary to enter the location of the left (user side) and right (service side) edges of the media according to the Media Measurement Option selection. Media measurement options The printer has a camera onboard the carriage that can automatically measure the media. You can - HP Scitex FB550 | Rigid Media Guide - Page 7
section on page 6. With the Standard or Maximal media measurement method, the printer will detect if the media is loaded askew and give the option to in the "Media Measurement Options" section on page 6. Overprinting The FB550 and FB750 (as does the FB500 and FB700) allows overprinting on rigid - HP Scitex FB550 | Rigid Media Guide - Page 8
add extra pixels to accomplish overprinting. The job must be resized prior to sending it through the RIP. For best results follow the instructions below: 1. Configure printer for Save Only: (Go to Printing > Jobs > Settings > Job Storage Mode) and select Save Only as show in the image below. ENWW - HP Scitex FB550 | Rigid Media Guide - Page 9
2. Set Print Position to Centered: (Go to "Printing > Options > Print Position and Eject Settings") and set the print position to Centered as shown below. 3. Size the job slightly larger than the media dimensions depending on a variety of factors such as the type of media and its square-ness. A - HP Scitex FB550 | Rigid Media Guide - Page 10
RIPPING procedure is properly explained in detail below for both Onyx and Caldera: Onyx • Configure the Page Size and Placement Strategy. • Select your printer from the RIP Queue and select the Change... button from the upper right hand corner of the screen. • Select the appropriate Media Group and - HP Scitex FB550 | Rigid Media Guide - Page 11
• Open the file in the Job Editor. • Select the appropriate Media and Printmode. • Go to Preview and Size and select the proper Maximum Print Area (sheet or roll) and Size. If needed, set the job slightly larger than the media dimensions, depending on the square-ness of the media. After setting the - HP Scitex FB550 | Rigid Media Guide - Page 12
the square-ness of the media. • Confirm X and Y in Image size and position are set to 0.00. • Select Print to send the job to the printer. NOTE: there are other paths to adding overprinting to the file via the RIP (the Borderless media option in Onyx and the Bleed option in - HP Scitex FB550 | Rigid Media Guide - Page 13
info as you can see below. 6. Load the media and Print the stored job. WARNING: To prevent a build-up of ink on the belt, clean immediately with isopropyl alcohol (IPA). If ink is allowed to continue to cure, it will be necessary to soak the area with IPA before it can be - HP Scitex FB550 | Rigid Media Guide - Page 14
Full bleed printing (maximum printer width) When loading rigid media for edge-to-edge Create the maximum media width size sheet/roll in the RIP. Maximum width dimensions for the different products are: - FB550: 64.6 inches / 1640.8 mm - FB750: 98.89 inches / 2511.8 mm Follow the following steps to - HP Scitex FB550 | Rigid Media Guide - Page 15
size, enter the maximum width according to printer width (shown above) and click OK. NOTE: keep margins and offset to 0. Onyx - Go to Configure printer. - Add a new sheet/roll in Page Sizes. - Set the sheet/roll size, enter maximum width according to printer width (stated above) and click OK. NOTE - HP Scitex FB550 | Rigid Media Guide - Page 16
Two-sided printing Two-sided printing is only available for jobs stored in the printer. The procedure for loading media for two-sided printing is the same as may be used if the media is square. CAUTION: The ink on side 1 may not be fully cured. Use caution when reloading it to print side 2, - HP Scitex FB550 | Rigid Media Guide - Page 17
the built-in media alignment pins for quick positioning of the sheets across the printer's width. Align the left side of each sheet with one of the pins have the number of sheets you intend to print across the width of the printer in position to be loaded. Sheets must not be more than 3 inches (7.6 - HP Scitex FB550 | Rigid Media Guide - Page 18
, Output Yes Yes No No No Output See the user's guide for general instructions on configuring and loading rigid media. Multi-sheet printing the same color set and resolution. Once the first job is selected, the printer displays jobs with a color set or resolution mismatch with a red border. - HP Scitex FB550 | Rigid Media Guide - Page 19
, reflective, or clear) or loading short media. In these media types that don't use the camera to measure the edges the printer uses dimensions entered by the user. This assumes the sheets are properly spaced and lined up against the alignment bar and alignment pins. The alignment pins must be used - HP Scitex FB550 | Rigid Media Guide - Page 20
support. Optional Extension Tables are available to support longer media. Maximum media length Standard tables Optional extension tables Two sets of extension tables FB550 belt. Ensure that the tables are latched securely to the printer to establish a proper grounding path for any residual static - HP Scitex FB550 | Rigid Media Guide - Page 21
printer and media storage areas. l. Clean the static elimination ionizer bar every 3 months according to the instructions in the HP Scitex FB550/FB750 User's Guide by static. o. For extreme static problems, careful use of an antistatic spray media. Note that the ink-adhesion properties of some media - HP Scitex FB550 | Rigid Media Guide - Page 22
being reflected back to the printhead nozzles where it could cure ink, plugging the nozzles. p. Select, from the control panel, Ink > Maintenance > Set Auto will not be imaged. • Perform a manual cleaning of the printheads at the end of each day when reflective materials have been used. ENWW - HP Scitex FB550 | Rigid Media Guide - Page 23
Saturated or Photo Plus - Saturated. • Indoor Signage Plus or higher quality for applications that will be viewed through the media and either a white ink overflood is used or white backer is applied over the printed surface. Flip the image in the RIP software for view-through applications. • Photo - HP Scitex FB550 | Rigid Media Guide - Page 24
media, it is necessary to enter the location of the left (user side) and right (service side) edges of the media according to the Media Measurement Option when loading or lifting sheets off the table as the media and ink can be easily scratched. Known incompatibility • Avoid using aluminum composite - HP Scitex FB550 | Rigid Media Guide - Page 25
camera. If so, create a copy of the Card Stock media using the Media Wizard and change the Detectable by Printer option to No. • Use the lowest possible UV lamp power setting to cure the ink. • Use a Card Stock media profile from the RIP software. • Some materials are more porous and absorb the - HP Scitex FB550 | Rigid Media Guide - Page 26
may strike the carriage. Recommended print modes • Depending on application, ink coverage and image content, all print modes may print acceptably. of the Card Stock media using the Media Wizard and change the Detectable by Printer option to No. • Use the Warped Media option when loading non-flat - HP Scitex FB550 | Rigid Media Guide - Page 27
problems with ink adhesion. This material tends to hold static charge; avoid sliding the media from the stack or carrying across carpeted surfaces. Review and follow the steps in the Static Electricity chapter of this guide. Ensure that media tables are attached and secured to the printer printhead - HP Scitex FB550 | Rigid Media Guide - Page 28
. If so, create a copy of the Foam Board media using the Media Wizard and change the Detectable by Printer option to No. • Use the lowest possible UV lamp power setting to cure the ink. • Media is heat-sensitive. It may require a higher vacuum setting, faster print modes, higher- than-standard head - HP Scitex FB550 | Rigid Media Guide - Page 29
on the input table about 5 minutes to allow the IPA to evaporate and the static to dissipate. Recommended print modes • Depending on application, ink coverage and image content, all print modes may print acceptably. Printing • Select Foam PVC when configuring and loading these media. • Use a Foam - HP Scitex FB550 | Rigid Media Guide - Page 30
such as HP PT40 Specialty Glass Scitex Primer - part number CD571A. (user side) and right (service printhead height from its nominal 0.085 inch (2.2 mm) setting. Output handling • Use clean, cotton gloves to avoid fingerprints. • Take care when loading or lifting sheets off the table as media and ink - HP Scitex FB550 | Rigid Media Guide - Page 31
a clean environment with the same or similar temperature and humidity as the printer. Changes in temperature or humidity will cause the material to warp. Media these media. • Some surfaces are more porous and absorb the ink giving a washed out appearance. Use the RIP software's Saturated Rendering - HP Scitex FB550 | Rigid Media Guide - Page 32
primer, such as HP PT70 Specialty Polycarbonate Scitex Primer - part number CD574A. Review and follow the steps in the Static Electricity chapter of this guide. Ensure that media tables are attached and secured to the printer location of the left (user side) and right (service side) edges of the - HP Scitex FB550 | Rigid Media Guide - Page 33
• Depending on the end use application, a post treatment may be necessary to minimize risk of surface damage. 30 ENWW - HP Scitex FB550 | Rigid Media Guide - Page 34
Review and follow the steps in the Static Electricity chapter of this guide. Ensure that media tables are attached and secured to the printer to these media. • Use the lowest possible UV lamp power setting to cure the ink. • Media is heat-sensitive, specifically thinner sheets (less than 0.015 inch - HP Scitex FB550 | Rigid Media Guide - Page 35
Review and follow the steps in the Static Electricity chapter of this guide. Ensure that media tables are attached and secured to the printer media, which can cause contact with the printhead carriage assembly. • It may also possible UV lamp power setting to cure the ink. • Use 6 inch (15 cm) leading - HP Scitex FB550 | Rigid Media Guide - Page 36
Feed method Sheet Media Detectable Use weight by printer rollers Conductive Light No Yes Yes Vacuum fan level HP UV Premium Photobase Paper No Medium Calendered vinyl, Cast vinyl Textile Roll1 - Yes Yes No Medium HP Heavy Textile Banner 1) Available when the optional HP Scitex FB550
-
 1
1 -
 2
2 -
 3
3 -
 4
4 -
 5
5 -
 6
6 -
 7
7 -
8
-
9
-
10
-
11
-
12
-
13
-
14
-
15
-
16
-
17
-
18
-
19
-
20
-
21
-
22
-
23
-
24
-
25
-
26
-
27
-
28
-
29
-
30
-
31
-
32
-
33
-
34
-
35
-
36
 |
 |

Scitex FB550 and FB750 Printers
Rigid Media Guide