HP Vectra VT 6/xxx HP Vectra VT 6/xxx, User's Guide for Minitower models - Page 60
Moving the Power Supply
 |
View all HP Vectra VT 6/xxx manuals
Add to My Manuals
Save this manual to your list of manuals |
Page 60 highlights
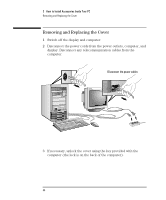
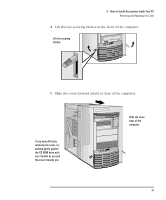
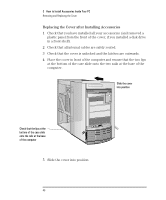
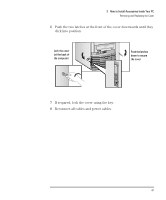
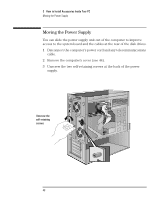
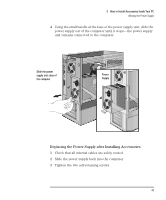
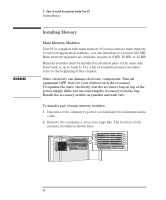
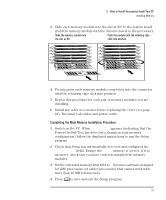
3 How to Install Accessories Inside Your PC Moving the Power Supply Moving the Power Supply You can slide the power supply unit out of the computer to improve access to the system board and the cables at the rear of the disk drives. 1 Disconnect the computer's power cord and any telecommunications cable. 2 Remove the computer's cover (see 44). 3 Unscrew the two self-retaining screws at the back of the power supply. Unscrew the self-retaining screws 48 English
-
 1
1 -
2
-
3
-
4
-
5
-
6
-
7
-
8
-
9
-
10
-
11
-
12
-
13
-
14
-
15
-
16
-
17
-
18
-
19
-
20
-
21
-
22
-
23
-
24
-
25
-
26
-
27
-
28
-
29
-
30
-
31
-
32
-
33
-
34
-
35
-
36
-
37
-
38
-
39
-
40
-
41
-
42
-
43
-
44
-
45
-
46
-
47
-
48
-
49
-
50
-
51
-
52
-
53
-
54
-
 55
55 -
 56
56 -
 57
57 -
 58
58 -
 59
59 -
 60
60 -
 61
61 -
 62
62 -
 63
63 -
 64
64 -
 65
65 -
66
-
67
-
68
-
69
-
70
-
71
-
72
-
73
-
74
-
75
-
76
-
77
-
78
-
79
-
80
-
81
-
82
-
83
-
84
-
85
-
86
-
87
-
88
-
89
-
90
-
91
-
92
-
93
-
94
-
95
-
96
-
97
-
98
-
99
-
100
-
101
-
102
-
103
-
104
-
105
-
106
-
107
-
108
-
109
-
110
-
111
-
112
-
113
-
114
-
115
-
116
-
117
-
118
-
119
-
120
-
121
-
122
-
123
-
124
-
125
-
126
-
127
-
128
-
129
-
130
-
131
-
132
-
133
-
134
-
135
-
136
-
137
-
138
-
139
-
140
-
141
-
142
-
143
-
144
-
145
-
146
-
147
-
148
-
149
-
150
-
151
-
152
-
153
-
154
-
155
-
156
-
157
-
158
-
159
-
160
-
161
-
162
-
163
-
164
-
165
-
166
-
167
-
168
 |
 |

3
How to Install Accessories Inside Your PC
Moving the Power Supply
48
English
Moving the Power Supply
You can slide the power supply unit out of the computer to improve
access to the system board and the cables at the rear of the disk drives.
1
Disconnect the computer’s power cord and any telecommunications
cable.
2
Remove the computer’s cover (see 44).
3
Unscrew the two self-retaining screws at the back of the power
supply.
Unscrew the
self-retaining
screws