HP Xw4600 HP xw4600 Workstation - Service and Technical Reference Guide - Page 95
Removing the battery, Installing the battery, WARNING, CAUTION,
 |
UPC - 883585516483
View all HP Xw4600 manuals
Add to My Manuals
Save this manual to your list of manuals |
Page 95 highlights
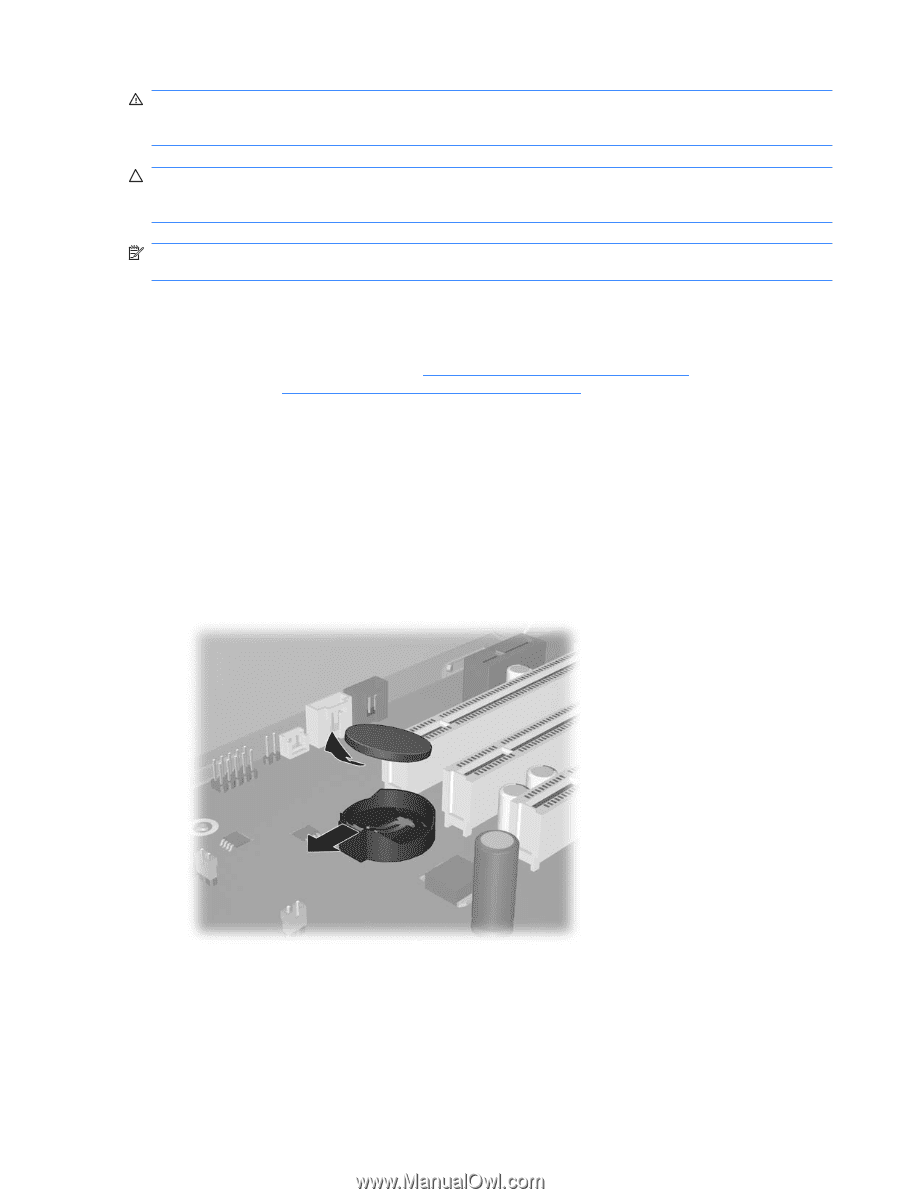
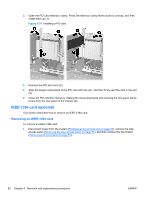
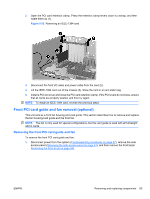
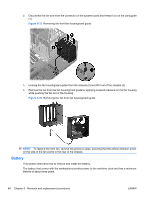
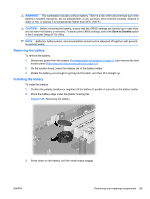
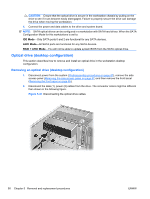
WARNING! This workstation includes a lithium battery. There is a risk of fire and chemical burn if the battery is handled improperly. Do not disassemble, crush, puncture, short external contacts, dispose in water or fire, or expose it to temperatures higher than 60°C (140°F). CAUTION: Before removing the battery, ensure that the CMOS settings are backed up in case they are lost when the battery is removed. To back up the CMOS settings, select the Save to Diskette option in the Computer Setup (F10) Utility. NOTE: Batteries, battery packs, and accumulators should not be disposed of together with general household waste. Removing the battery To remove the battery: 1. Disconnect power from the system (Predisassembly procedures on page 57) and remove the side access panel (Removing the side access panel on page 61). 2. On the system board, press the release tab of the battery holder. 3. Rotate the battery just enough to get beyond the latch, and then lift it straight up. Installing the battery To install the battery: 1. Confirm the polarity (positive or negative) of the battery to position it correctly in the battery holder. 2. Place the battery edge under the plastic housing tab. Figure 5-35 Removing the battery 3. Press down on the battery until the metal snaps engage. ENWW Removing and replacing components 85
-
 1
1 -
2
-
3
-
4
-
5
-
6
-
7
-
8
-
9
-
10
-
11
-
12
-
13
-
14
-
15
-
16
-
17
-
18
-
19
-
20
-
21
-
22
-
23
-
24
-
25
-
26
-
27
-
28
-
29
-
30
-
31
-
32
-
33
-
34
-
35
-
36
-
37
-
38
-
39
-
40
-
41
-
42
-
43
-
44
-
45
-
46
-
47
-
48
-
49
-
50
-
51
-
52
-
53
-
54
-
55
-
56
-
57
-
58
-
59
-
60
-
61
-
62
-
63
-
64
-
65
-
66
-
67
-
68
-
69
-
70
-
71
-
72
-
73
-
74
-
75
-
76
-
77
-
78
-
79
-
80
-
81
-
82
-
83
-
84
-
85
-
86
-
87
-
88
-
89
-
 90
90 -
 91
91 -
 92
92 -
 93
93 -
 94
94 -
 95
95 -
 96
96 -
 97
97 -
 98
98 -
 99
99 -
 100
100 -
101
-
102
-
103
-
104
-
105
-
106
-
107
-
108
-
109
-
110
-
111
-
112
-
113
-
114
-
115
-
116
-
117
-
118
-
119
-
120
-
121
-
122
-
123
-
124
-
125
-
126
-
127
-
128
-
129
-
130
-
131
-
132
-
133
-
134
-
135
-
136
-
137
-
138
-
139
-
140
-
141
-
142
-
143
-
144
-
145
-
146
-
147
-
148
-
149
-
150
-
151
-
152
-
153
-
154
-
155
-
156
-
157
-
158
-
159
-
160
-
161
-
162
-
163
-
164
-
165
-
166
-
167
-
168
-
169
-
170
-
171
-
172
-
173
-
174
-
175
-
176
-
177
-
178
-
179
-
180
-
181
 |
 |