Hitachi 42V715 Owners Guide
Hitachi 42V715 - 42" Rear Projection TV Manual
 |
View all Hitachi 42V715 manuals
Add to My Manuals
Save this manual to your list of manuals |
Hitachi 42V715 manual content summary:
- Hitachi 42V715 | Owners Guide - Page 1
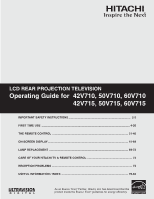
LCD REAR PROJECTION TELEVISION Operating Guide for 42V710, 50V710, 60V710 42V715, 50V715, 60V715 IMPORTANT SAFETY INSTRUCTIONS 2-3 FIRST TIME USE ...4-20 THE REMOTE CONTROL 21-40 ON-SCREEN DISPLAY...41-68 LAMP REPLACEMENT ...69-72 CARE OF YOUR HITACHI TV & REMOTE CONTROL 73 RECEPTION PROBLEMS ... - Hitachi 42V715 | Owners Guide - Page 2
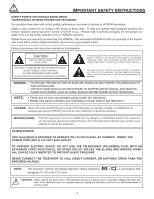
no user serviceable parts inside the television. • Model and serial numbers are indicated on back side of the television. CAUTION: Adjust only those controls that are covered in the instructions, as improper changes or modifications not expressly approved by HITACHI could void the user's authority - Hitachi 42V715 | Owners Guide - Page 3
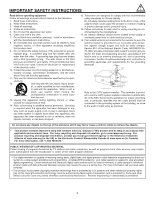
only with a dry cloth. 7. Do not block any ventilation openings. Install in accordance with the manufacturer's instructions. 8. Do not install near any heat (NEC SECTION 810-21) GROUNDING CONDUCTORS POWER SERVICE GROUNDING ELECTRODE SYSTEM (NEC ART 250 PART H) Note to the CATV system installer: - Hitachi 42V715 | Owners Guide - Page 4
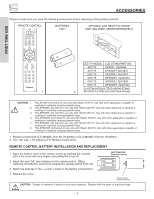
disposing of the packing material. REMOTE CONTROL BATTERIES ("AA") OPTIONAL LCD REAR PTV STAND (NOT INCLUDED, ORDER SEPARATELY) FIRST TIME USE GUIDE C.C. 1. LCD TV MODEL LCD STAND/PART NO. 42V710 SP42W / H520449 42V715 SPX42W / QJ01541 50V710 SP50WS / QJ01601 50V715 SPX50WT / QJ01603 - Hitachi 42V715 | Owners Guide - Page 5
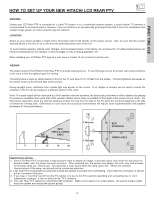
use, the picture may darken, the color may look unusual, or the lamp "goes out," (burns out). You may hear a "pop" sound when the lamp "goes out." These are common characteristics of the lamp, and should not be considered defective. 2. LCD Rear PTV incorporates an advanced cooling fan system to - Hitachi 42V715 | Owners Guide - Page 6
picture. 12345 6789 D-SUB MINI 9-Pin Cable This cable is used to connect to the RS232C input located on the rear panel so you can control some of your TV functions from an external home control the TV antenna terminal, and connect the cables to the antenna mixer. Consult your dealer or service store - Hitachi 42V715 | Owners Guide - Page 7
channel appears in the top right corner of the TV screen. These buttons also serve as the cursor down pictures (see pages 9 and 25-27). ቨ IR RECEIVER sensor The screen area acts as the IR receiver (remote sensor). When using the remote control, point it towards the screen for best response. ቩ POWER - Hitachi 42V715 | Owners Guide - Page 8
up the TV screen. Make sure to turn off the Power when you do not watch the LCD Rear Projection Television for longer lamp life. ቫ TEMP indicator This light is off during normal operation. If this indicator is lit, the optic unit is too hot. If this indicator is blinking, the cooling fan has stopped - Hitachi 42V715 | Owners Guide - Page 9
INPUT The side or front panel Photo Input Jack is provided to view digital still pictures from your digital camera using a USB cable and displaying them on the TV screen. PHOTO INPUT MODELS: 50V710/50V715 60V710/60V715 PHOTO INPUT MODELS: 42V710/42V715 First, connect your digital camera to the - Hitachi 42V715 | Owners Guide - Page 10
can only be displayed as a main picture. ANT B cannot be displayed as a sub-picture. NOTE: You may ask your local cable company whether DTV services are available. ባ Audio/Video Inputs 1, 2, 3 and 4 By using the INPUTS button and CURSOR PAD of the remote control you can select each video source. Use - Hitachi 42V715 | Owners Guide - Page 11
the way to your television screen. Use the HDMI input are available for HDMI input. ቨ Optical Out (Digital Audio) This jack provides control systems which are commercially available. Please see your dealer regarding these "non Hitachi" home control systems (see page 67 to activate this input). ቫ TV - Hitachi 42V715 | Owners Guide - Page 12
service is available before requesting a CableCARD (also known as Point of Deployment (POD) module). Connect a coaxial cable to ANT A terminal of the Rear (MONO) TV AS CENTER CableCARD HDMIIN1SERT THIS END OPTICAL OUT Digital screen. Acquiring Data. Please wait. In order to start cable service - Hitachi 42V715 | Owners Guide - Page 13
REAR PANEL CONNECTIONS TYPICAL FULL-FEATURE SETUP FIRST TIME USE DVD Player VIDEO L AUDIO R AUDIO TO HI-FI PR PR (MONO) (MONO) (MONO) (MONO) TV AS CENTER CableCARD (Top of card faces right) OPTICAL OUT Digital Audio Upgrade Card Apparatus Claims of U.S. Patent Nos. 4,631,603; 4,577,216; 4, - Hitachi 42V715 | Owners Guide - Page 14
TIPS ON REAR on page 13). Refer to your VCR operating guide for more information on line input-output connections. TV's PB input and the components CR output to the TV's PR input. • You may use composite video signal for Input 1~Input 5. • It may be necessary to adjust TINT to obtain optimum picture - Hitachi 42V715 | Owners Guide - Page 15
diagram for speaker placement. ᕃ The television's internal speakers will act as center speaker (select Audio-Internal Speakers-TV of a separate audio amplifier. REAR PANEL OF TELEVISION ANT A ANT (MONO) (MONO) TV AS CENTER CableCARD (Top of card faces right) OPTICAL OUT Digital Audio Upgrade - Hitachi 42V715 | Owners Guide - Page 16
, or HDTV Set Top Box to your TV set is dependent on the model and features of each component. Check the owner's manual of each L AUDIO R AUDIO TO HI-FI PR PR (MONO) (MONO) (MONO) (MONO) TV AS CENTER OPTICAL OUT Digital Audio Upgrade Card Apparatus Claims of U.S. Patent Nos. 4,631,603; 4,577,216 - Hitachi 42V715 | Owners Guide - Page 17
PR PR (MONO) (MONO) (MONO) (MONO) TV AS CENTER CableCARD (Top of card faces right) OPTICAL OUT Digital Audio Upgrade Card Apparatus Claims of U.S. Patent Completely insert the connection cord plugs when connecting to rear panel jacks. The picture and sound that is played back will be abnormal - Hitachi 42V715 | Owners Guide - Page 18
PR PR (MONO) (MONO) (MONO) (MONO) TV AS CENTER CableCARD (Top of card faces right) OPTICAL OUT Digital Audio Upgrade Card Apparatus Claims of U.S. Patent Completely insert the connection cord plugs when connecting to rear panel jacks. The picture and sound that is played back will be abnormal - Hitachi 42V715 | Owners Guide - Page 19
PR PR (MONO) (MONO) (MONO) (MONO) TV AS CENTER OPTICAL OUT Digital Audio Upgrade Card Apparatus Claims of U.S. Patent HDTV STB NOTES: 1. Completely insert the connection cord plugs when connecting to rear panel jacks. The picture controls the HDMI interface so proper set-up of device user settings - Hitachi 42V715 | Owners Guide - Page 20
HDTV set top box to the INPUT (Y) jack, as shown on the TV HDTV set top box to the INPUT (PR) jack. 4. Connect the cable from the AUDIO OUT R of the Laserdisc/DVD player or HDTV or HDTV HDTV (MONO) TV AS CENTER CableCARD (Top of card faces right) OPTICAL OUT Digital rear panel jacks. The picture - Hitachi 42V715 | Owners Guide - Page 21
THE REMOTE CONTROL THE REMOTE CONTROL In addition to controlling all the functions on your HITACHI Projection TV, the new remote control is designed to operate different types of VCRs, CATV (Cable TV) converters, set-top-box, satellite receiver, DVD players, and other audio/video equipment with one - Hitachi 42V715 | Owners Guide - Page 22
THE REMOTE TO CONTROL YOUR LCD REAR PTV ቢ ባ ቤ ብ ቦ ቧ ቩ ቨ GUIDE ቫ ቪ ቭ ቮ ቯ ቱ C.C. ተ ቲ ታ ታ ቴ ት THE REMOTE CONTROL ቢ POWER button Press this button to turn the TV set on or off when the remote is in TV mode. (See page 21 for instructions on how to set the remote control to TV mode - Hitachi 42V715 | Owners Guide - Page 23
REMOTE TO CONTROL YOUR LCD REAR PTV ቧ ASPECT button Press this button to quickly change the picture format ASPECT ratio. Depending on the input signal format received, the picture in the lighted area of the picture will age mode to display 16:9 sources like HDTV and DVD's preserving the original 16 - Hitachi 42V715 | Owners Guide - Page 24
THE REMOTE CONTROL HOW TO USE THE REMOTE TO CONTROL YOUR LCD REAR PTV ቨ DAY/NIGHT button Press this button to toggle between Day and Night picture mode settings. Select Day for day time viewing with more brightness and contrast to compete with room light. Select Night for night time viewing with - Hitachi 42V715 | Owners Guide - Page 25
TO USE THE REMOTE TO CONTROL YOUR LCD REAR PTV ተ INPUTS button When the remote control is in TV mode, press this 1 Input 2 Move SEL Sel Select to access your pictures from a digital camera connected to the Photo Input in the front panel of the TV (see page 26). Select to choose Antenna B. Select - Hitachi 42V715 | Owners Guide - Page 26
HOW TO USE THE REMOTE TO CONTROL YOUR LCD REAR PTV PHOTO INPUT This feature is useful for viewing digital still pictures from your digital camera using the Photo Input in the side panel (Models 42V710, 42V715) or the front panel (Models 50V710, 60V710, 50V715, 60V715) of the TV. Photo Input Ant B - Hitachi 42V715 | Owners Guide - Page 27
REMOTE TO CONTROL YOUR LCD REAR on a main directory with a "dcim" file name format. 2. Supported image types are up to 3072 x 2304; JPEG format should conform with File System). 3. This TV set displays only digital pictures from digital cameras which meet DCF Standard. Pictures that were copied, edited - Hitachi 42V715 | Owners Guide - Page 28
REMOTE CONTROL HOW TO USE THE REMOTE TO CONTROL YOUR LCD REAR PTV ቱ INFO button Press this button when you want to check the channel being received, the picture DIGITAL CHANNELS TV Time 3:32PM Picture Source Ant A 122-1 Channel ID KPBS-DT Program Language Engl Broadcast Rating TV-Y INFO - Hitachi 42V715 | Owners Guide - Page 29
REMOTE CONTROL HOW TO USE THE REMOTE TO CONTROL YOUR LCD REAR the TV power is turned off at a volume level 31 or greater, the volume level will default to 30 when the TV is turned mode when (FAV) is displayed and the displayed channel is GREEN. Press it again to return to your regular tuned channels - Hitachi 42V715 | Owners Guide - Page 30
THE REMOTE CONTROL PICTURE-IN-PICTURE (PIP) Your HITACHI LCD Rear PTV incorporates Two Tuner technology designed for improved viewing enjoyment. This Two Tuner feature allows you to view antenna inputs on both the main picture and sub-picture simultaneously, with separate tuning control for each. - Hitachi 42V715 | Owners Guide - Page 31
burn, occasionally move the sub-picture using the CURSOR PAD. Main Picture Sub Picture SPLIT MODE PICTURE-IN-PICTURE Split Mode PIP displays the main picture and sub-picture evenly on the screen. Main Picture Sub Picture THE REMOTE CONTROL SURF MODE PICTURE-IN-PICTURE Surf Mode PIP automatically - Hitachi 42V715 | Owners Guide - Page 32
800-555-1212 SPLIT FREEZE Press the PAUSE button to freeze the picture you are currently viewing (only the right sub-picture will freeze). Press the EXIT button to return to normal viewing. Main Picture Sub Picture THE REMOTE CONTROL STROBE FREEZE Press the PAUSE button to freeze three frames of - Hitachi 42V715 | Owners Guide - Page 33
indicator light will flash 3 times if the code was accepted. 5. Aim the remote at the cable box and press the POWER button. The remote will turn TV buttons These buttons are for operating the TV. ባ GUIDE ቢ ባ C.C. ባ ቢ ቢ THE REMOTE CONTROL MY CABLE BOX CODE IS: NOTE: Refer to instruction manual - Hitachi 42V715 | Owners Guide - Page 34
transmit the chosen pre-coded set-topbox/satellite codes. ባ EXCLUSIVE TV buttons These buttons are for operating the TV. ባ GUIDE ቢ ባ C.C. ባ ቢ ቢ THE REMOTE CONTROL MY SATELLITE RECEIVER/STB CODE IS: NOTE: Refer to instruction manual of the set-top-box/satellite receiver for operation of the - Hitachi 42V715 | Owners Guide - Page 35
procedure as stated above. ቢ ባ GUIDE ቢ ቢ PRECODED DVD Buttons These buttons transmit the chosen precoded DVD codes. ባ EXCLUSIVE TV Buttons These buttons are for operating the TV. ባ C.C. ባ ቢ THE REMOTE CONTROL MY DVD PLAYER CODE IS: NOTE: Refer to instruction manual of the DVD player for - Hitachi 42V715 | Owners Guide - Page 36
/PVR Buttons These buttons transmit the chosen precoded VCR/PVR codes. ባ EXCLUSIVE TV Buttons These buttons are for operating the TV. ቢ ቢ ባ GUIDE ቢ C.C. ባ ቢ ቢ THE REMOTE CONTROL MY VCR/PVR CODE IS: NOTE: Refer to instruction manual of the VCR/PVR for operation of the buttons exclusively for the - Hitachi 42V715 | Owners Guide - Page 37
batteries are removed from the remote control. After replacing the batteries repeat the entire programming procedure as stated above. 4. CD precode library is included in the AMP mode. Default device for this mode is Hitachi Audio/Video Receiver (AVR/AMP). 5. INPUT, GUIDE, Channel (up/down), Volume - Hitachi 42V715 | Owners Guide - Page 38
" BUTTON TO ACCESS THE SPECIFIED INPUT OF THE TV INPUT ACCESS This optional feature allows the user of the remote control to setup it's ENTER (ENT) button to access the specified input of the TV. Setup for this feature is applicable to the remote control's normal mode only and only applies to the - Hitachi 42V715 | Owners Guide - Page 39
CABLE, SATELLITE, DVD AND AUDIO CODES FOR REMOTE CONTROL THE REMOTE CONTROL VCR BRAND CODE ABS 1972 Admiral 0048, 0209 Harwood 0072 Headquarter 0046 Hewlett Packard 1972 Hitachi 0000, 0041, 0042, 0105 Howard Computers 1972 Hughes Network Systems 0042 iBuy Power 1972 JVC 0067, 0041, 0008 - Hitachi 42V715 | Owners Guide - Page 40
DVD AND AUDIO CODES FOR REMOTE CONTROL THE REMOTE CONTROL NSC 0063 Novaplex 0618 Oak . . . . 0891, 0110, 0189 Hewlett Packard 1181 Hitachi 0228 Integra 0135 JBL 0110 JVC 0074, 1263 KLH 1428 Kenwood KLH 0351 Magnavox 0325 Nikko 0376 Paramount Pictures 0317, 0351 RCA 0056 SSI 0317 - Hitachi 42V715 | Owners Guide - Page 41
(OSD) 1. Press MENU on the remote control to display the different features on your HITACHI LCD TV. 2. Press the CURSOR PAD to highlight a different feature. 3. Press EXIT on the remote control to quickly exit from a menu. GUIDE This part of the screen shows which selections are available. Video - Hitachi 42V715 | Owners Guide - Page 42
Digital Output DRC 4:3 Standard 4:3 Expanded 4:3 Zoom 1 4:3 Zoom 2 16:9 Standard 16:9 Zoom ON-SCREEN DISPLAY (OSD) Select between the two picture modes; Day and Night. Adjust contrast. Adjust brightness. Adjust color. Adjust tint. Adjust sharpness. Set this to High for less intense color with more - Hitachi 42V715 | Owners Guide - Page 43
TV Time Lock Movie Ratings TV Ratings Canadian Ratings (ENG) Canadian Ratings (FRN) Set the Clock Set Sleep Timer Set Day/Night Timer Set Event Timer Set Auto Power Off Menu Preference Screen Saver Set The Inputs Set Black Side Panel Set Closed Captions Set Monitor Out CableCARD Info Set AV Control - Hitachi 42V715 | Owners Guide - Page 44
Tint Sharpness Color Temperature Black Enhancement Contrast Mode Auto Color Noise Reduction Color Management (Set User Colors) Auto Movie Mode (TV/Cinema Detection) Day 100% 50% 50% 50% 50% High High Dynamic Off Low Off Off Night 90% 50% 30% 50% 30% Standard Off Normal Off Low Off Off Reset Reset - Hitachi 42V715 | Owners Guide - Page 45
manner. 2. Contrast will decrease automatically if stationary images such as digital photos are left on the screen for more than 3 minutes. 3. It may be necessary to adjust TINT to obtain optimum picture quality when using the COMPONENT VIDEO Y-PBPR input jacks. 4. If you are using the COMPONENT - Hitachi 42V715 | Owners Guide - Page 46
Noise Reduction Auto Movie Mode Move SEL Select Off Low Off Video Color Management Set User Colors Magenta Red Yellow Green Cyan Blue Reset Phase 50% 50% 50% 50% 50% 50% Move SEL Return Gain 50% 50% 50% 50% 50% 50% Use the CURSOR PAD to highlight function. Press the SELECT button to select - Hitachi 42V715 | Owners Guide - Page 47
Green and Blue according to the user's preference in each of the four color temperature settings. Use TINT 50% Green 50% Color 50% Tint Reset picture without degrading picture quality. Set NOISE REDUCTION to OFF if the TV experiences picture blocking Hitachi Projection SCREEN DISPLAY 47 - Hitachi 42V715 | Owners Guide - Page 48
will control the left to right balance of the Projection TV internal speakers. Based on the principles of the human hearing system, SRS 3D technology delivers an exciting and realistic 3D Sound experience from just two external speakers or the two internal speakers found in your HITACHI Television - Hitachi 42V715 | Owners Guide - Page 49
secondary language, weather report, etc. The sources received will be displayed at the top right edge of the TV. The source you select will be displayed above the sources received. See example below for each selection when frequency sounds when listening at low volume levels. ON-SCREEN DISPLAY 49 - Hitachi 42V715 | Owners Guide - Page 50
functions below if your TV is connected to an amplifier/receiver with optical digital input with Dolby Digital or PCM decoder capabilities. Audio Treble 45% Bass 50% Balance L R Sound . NOTE: These functions are only available when viewing digital programs. ON-SCREEN DISPLAY 50 - Hitachi 42V715 | Owners Guide - Page 51
. For example, it will be useful for centering the picture area at both the top and bottom of the picture with 480i/480P signal. Adjustable range is -10 (video center is toward bottom of screen) to +10 (video center is toward top of screen). Press the CURSOR PAD ̆, ̄, to select menu item. Press - Hitachi 42V715 | Owners Guide - Page 52
A only". Auto Channel Scan This feature will automatically store active TV channels in Auto Channel Scan memory. Chan. Manager Set The Manager Auto Chan. Scan Ant A Auto Channel Scan Start Reset Ant B Auto Channel Scan Start Reset Move SEL Return NOTE: When a CableCARD is installed, - Hitachi 42V715 | Owners Guide - Page 53
will not be available (grayed out) when watching analog channels. Channel List This function allows you to review which channels are labeled (CH ID), which have been added to Channel Memory (SCAN), which are protected on channels agreed upon by you and your cable operator. ON-SCREEN DISPLAY 53 - Hitachi 42V715 | Owners Guide - Page 54
RATINGS is selected, various types of television programming based on a parental guide ratings will be blocked. Picture-in-Picture will also be blocked automatically (see page 56). Use CANADIAN RATINGS to block various types of movies and television programs based on the two rating systems used in - Hitachi 42V715 | Owners Guide - Page 55
NC-17, and X) will be blocked. Press EXIT to quit the menu or select MOVIE RATING to return to the previous menu. Motion Picture Ratings Chart G PG PG-13 , the TV will not block it. 2. Blocking "NOT RATED (NR)" programs may block emergency programming, sports, news, public service announcements, - Hitachi 42V715 | Owners Guide - Page 56
quit the menu or select TV RATINGS to return to the previous menu. TV Parental Guide Ratings Chart N/A TV-Y TV-Y7 TV-G TV-PG TV-14 TV-MA FV V S L Projection Television will immediately tune to an EAS channel as directed by the EAS message. Please be advised that if the EAS channel is blocked - Hitachi 42V715 | Owners Guide - Page 57
SEL Return Use the CURSOR PAD ̆ or ̄ to select the CANADIAN RATINGS (Eng) category that you want to block. Press SELECT to set the CANADIAN RATINGS (Eng) that you have selected. Once rating is selected, for example C8 language and explicit portrayals of nudity and/or sex. ON-SCREEN DISPLAY 57 - Hitachi 42V715 | Owners Guide - Page 58
Use the CURSOR PAD ̆ or ̄ to highlight the category that you want to block. Press SELECT to set the CANADIAN RATINGS (FRN) that you have selected. Once - Programming intended for a broad audience but contains light or occasional violence that could disturb young children. Viewing SCREEN DISPLAY 58 - Hitachi 42V715 | Owners Guide - Page 59
Set Day/Night Timer Set Event Timer Set Auto Power Off Move Select SEL Return Set The Clock The Clock Sleep Timer Set Day/Night Timer Set Event Timer Set Auto Power Off Timers Set The Clock Time Zone: PST MST CST TV will automatically calculate the clock adjustment for Daylight Saving. ON - Hitachi 42V715 | Owners Guide - Page 60
Timer Select this feature to activate and set your TV's Day/Night Picture Mode automatically. Timers Set The Clock Set Sleep Timer Set Day/Night Timer Set Event Timer Set Auto Power Off Timers Set Day/Night Timer Activate Day to select Day Mode Off and to set it's timer. ON-SCREEN DISPLAY 60 - Hitachi 42V715 | Owners Guide - Page 61
Projection TV viewing reservation of a program. If the clock is not set, you can not use this function and the screen below will appear. The message on the screen will disappear after 3 seconds, then the screen no remote control button is pressed after viewing reservation is activated, the TV will - Hitachi 42V715 | Owners Guide - Page 62
Event Timer Set Auto Power Off Timers Set Auto Power Off Automatic Power Saving Yes No Select yes to have the TV turn off Automatically when and it is 1 minute before the TV turns off automatically, the "OFF 0:01" icon will be displayed. 4. The Auto Power OFF feature will be cancelled when an - Hitachi 42V715 | Owners Guide - Page 63
SETUP Setup Select SETUP when setting your TV up for the first time. Use the CURSOR PAD ̆ or ̄ on the remote to highlight the function desired. Video Audio Aspect Chan. Manager Locks Timers Setup Move SEL Sel Setup Menu Preference Screen Saver Set The Inputs Set Black Side Panel Set Closed - Hitachi 42V715 | Owners Guide - Page 64
no picture can be seen behind menu screen), or select Shaded for a light background. Screen Saver Continuous on-screen displays such as video games, stock market quotations, computer generated graphics, and other fixed (non-moving) patterns can cause "temporary image retention" to the LCD Rear PTV - Hitachi 42V715 | Owners Guide - Page 65
to any of the five video inputs. Setup Menu Preference Screen Saver Set The Inputs Set Black Side Panel Set Closed Captions player OFF. This feature is now reset and will turn on your TV as described above. 2. When using Remote mode, any remote control button will substitute for your video input - Hitachi 42V715 | Owners Guide - Page 66
such as news reports or a TV program guide. This information covers the entire screen and viewing the TV program is not possible. Text may Service: [1 2 3 4 5 6] Language: [Unknown ] Font : [Default 1 2 3 4 5 6 7 8] Size : Standard Small Large Style : Standard High Visibility [HITACHI - Hitachi 42V715 | Owners Guide - Page 67
ANT A, ANT B, VID3-VID5) to a VCR or other A/V device. TV Tuner Out- Select TV Tuner Out to output the audio and video signals of the last watched control systems which are commercially available. Please see your dealer regarding these "non Hitachi" home control systems. ON-SCREEN DISPLAY 67 - Hitachi 42V715 | Owners Guide - Page 68
for your TV, Hitachi will notify . NOTE: Any power interruption during the TV tune channels (both Analog and Digital) quickly when first turning the TV picture. A small amount of electricity is used to continually monitor signals when this feature is selected. Setup CableCARD Info Set AV Control - Hitachi 42V715 | Owners Guide - Page 69
contact your authorized service center (see page 77-78). NOTES: • Contact your Hitachi dealer for a new lamp unit. Using other lamps may cause damage to the TV Set. LAMP TYPE: LM500 • When replacing the lamp, let it cool down completely, for approximately 30 to 45 minutes after the power has been - Hitachi 42V715 | Owners Guide - Page 70
power switch and unplug the power cord. LAMP REPLACEMENT 120V FRONT COVER CAUTION: THE LAMP IS VERY HOT AND MAY CAUSE FIRE OR SEVERE BURNS. WAIT AT LEAST 30~45 MINUTES TO ALLOW THE LAMP TO COOL BEFORE PROCEEDING WITH LAMP REMOVAL. 2. Remove the front cover from the TV , call "1-800-HITACHI." 70 - Hitachi 42V715 | Owners Guide - Page 71
MAY GET BURNED. HANDLE LAMP UNIT REMOVE SCREWS HANDLE 5. Replace with the new lamp. Place the removed lamp into the empty box of the replacement lamp. Do not touch the front glass of the new lamp or its receptacle. This may shorten the life of the lamp and reduce the picture quality. • Push the - Hitachi 42V715 | Owners Guide - Page 72
LAMP REPLACEMENT LAMP REPLACEMENT 6. Without installing the lamp cover, the power will be off and the Lamp Indicator will flash (see page 8). Be sure to install the lamp cover by re-engaging the two clips and tighten the screws before turning the power For more information, call "1-800-HITACHI." 72 - Hitachi 42V715 | Owners Guide - Page 73
screen too often. Do not subject the remote control to shocks such as dropping it on the floor, etc. Physical damage to the precision parts may result. Avoid placing the remote control run down, remote control operation will become erratic or possibly stop altogether. Replace the old batteries - Hitachi 42V715 | Owners Guide - Page 74
RECEPTION PROBLEMS • IGNITION NOISE: Black spots or horizontal streaks may appear, picture may flutter or drift. Usually caused by interference from automobile ignition systems, neon lamps, electrical drills, and other electrical appliances. • GHOSTS: Ghosts are caused by the television signal - Hitachi 42V715 | Owners Guide - Page 75
blurred © © ©©© © Lines or streaks in picture Poor reception on some channels Picture rolls vertically © ©©© © © ©©© © © © No color © © ©©© © Poor color © © ©©© ©© Dark Picture ©© © HITACHI Liquid Crystal Display incorporates advanced power surge protection technology designed to - Hitachi 42V715 | Owners Guide - Page 76
Picture Quality 1280 Line Horizontal Resolution • Remote (Controls many PVR/VCR brands, cable boxes, satellite boxes, and other audio equipment). • New Easy-to-Use (3-Language) On-Screen . Inputs: • Power Input AC 120V, 60Hz • Stand-by Power 0.6W • Power Consumption - Refer to rear panel at the - Hitachi 42V715 | Owners Guide - Page 77
has made every effort to assure you hours of trouble free operation from your unit. However, should you require service, a network of Hitachi Authorized Service Facilities has been established in all 50 states and Puerto Rico. Each facility will provide you with convenient and expedient assistance - Hitachi 42V715 | Owners Guide - Page 78
EST 9:00am - 7:00pm Saturday EST 9:00am - 5:00pm Look for your French Manual on the outside of the box. If the manual is missing, call 1-800-HITACHI (1-800-448-2244) for a copy. Pour de plus amples renseignements sur le service durant la période couverte par la garantie, sur le fonctionnement ou - Hitachi 42V715 | Owners Guide - Page 79
-in-Picture (PIP 30-32 Picture-outside-Picture (POP 30 Power Button 7 Power Indicator 8 R Remote Control Functions 21-40 Programming Codes 39-40 Installing Batteries 4 S Sharpness 45 Speakers 49 Connecting External Speakers 5, 15 T Temperature Indicator 8 Time 59 Timers 59-62 Tint 45 - Hitachi 42V715 | Owners Guide - Page 80
END USER LICENSE AGREEMENT FOR HITACHI DTV SOFTWARE IMPORTANT - READ CAREFULLY: This License Agreement is a legal agreement between you and Hitachi America, Ltd., Home Electronics Division ("HAL-HED"). By using this Hitachi digital television (the "DTV") and its software (the "Software"), you agree - Hitachi 42V715 | Owners Guide - Page 81
USER LICENSE AGREEMENT FOR HITACHI LAW. IN NO EVENT SHALL THE OpenSSL PROJECT, ITS CONTRIBUTORS, HAL-HED OR ANY OF NOT LIMITED TO, PROCUREMENT OF SUBSTITUTE GOODS OR SERVICES; LOSS OF USE, DATA, OR PROFITS; the Southern District of California. If any part of this License Agreement is unenforceable, the - Hitachi 42V715 | Owners Guide - Page 82
NOTES 82 - Hitachi 42V715 | Owners Guide - Page 83
NOTES 83 - Hitachi 42V715 | Owners Guide - Page 84
QR60543
-
 1
1 -
 2
2 -
 3
3 -
 4
4 -
 5
5 -
 6
6 -
 7
7 -
8
-
9
-
10
-
11
-
12
-
13
-
14
-
15
-
16
-
17
-
18
-
19
-
20
-
21
-
22
-
23
-
24
-
25
-
26
-
27
-
28
-
29
-
30
-
31
-
32
-
33
-
34
-
35
-
36
-
37
-
38
-
39
-
40
-
41
-
42
-
43
-
44
-
45
-
46
-
47
-
48
-
49
-
50
-
51
-
52
-
53
-
54
-
55
-
56
-
57
-
58
-
59
-
60
-
61
-
62
-
63
-
64
-
65
-
66
-
67
-
68
-
69
-
70
-
71
-
72
-
73
-
74
-
75
-
76
-
77
-
78
-
79
-
80
-
81
-
82
-
83
-
84
 |
 |

LCD REAR PROJECTION TELEVISION
Operating Guide for 42V710, 50V710, 60V710
42V715, 50V715, 60V715
IMPORTANT SAFETY INSTRUCTIONS
................................................................................
2-3
FIRST TIME USE
..................................................................................................................
4-20
THE REMOTE CONTROL
..................................................................................................
21-40
ON-SCREEN DISPLAY
........................................................................................................
41-68
LAMP REPLACEMENT
......................................................................................................
69-72
CARE OF YOUR HITACHI TV & REMOTE CONTROL
..........................................................
73
RECEPTION PROBLEMS
........................................................................................................
74
USEFUL INFORMATION / INDEX
......................................................................................
75-83
As an E
NERGY
S
TAR
®
Partner, Hitachi, Ltd. has determined that this
product meets the E
NERGY
S
TAR
®
guidelines for energy efficiency.