Hitachi DV-PF33U Owners Guide - Page 20
Recording Function
 |
View all Hitachi DV-PF33U manuals
Add to My Manuals
Save this manual to your list of manuals |
Page 20 highlights
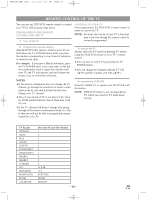
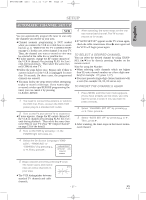
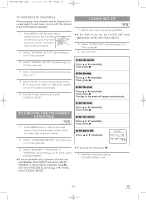
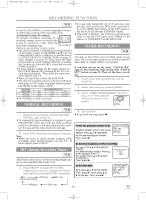
H9450UD(EN).qx33 03.1.22 7:19 PM Page 20 RECORDING FUNCTION VCR It may be UNLAWFUL to record copyrighted materi- al without the consent of the copyright owner. Accidental Erasure Prevention To prevent accidental recording on a recorded cassette, remove its record safe- ty tab. To record on it later, cover the hole with cellophane tape. Record safety tab Before recording, make sure: ¡The desired channel is selected by pressing Number on the remote control or CHANNEL (o/p). (If you connected the VCR to a cable box or satellite box as in "DVD/VCR TO TV CONNECTION" on page 13, select channel 3 on your TV. Then, select the chan- nel you want to record with the cable box or satellite box. In this case, you can ONLY record and view the SAME channel.) ¡If noise appears, change the RF output channel of the VCR to channel 4 by pressing PLAY for 3 sec- onds during playback. Then select the same chan- nel (CH4) on your TV. ¡There is a tape with a safety tab in the VCR. ¡The desired recording speed is selected in SP (stan- dard play) or SLP (super long play) mode by press- ing SPEED on the remote control. Tape Speed Recording/Playback Time Type of tape T60 T120 T160 SP mode 1 hour 2 hours 2-2/3 hours SLP mode 3 hours 6 hours 8 hours ¡TV STEREO or SAP is selected. NORMAL RECORDING ¡If a tape ends during IRT, the VCR will stop, eject the tape, and switch to the DVD mode automatically as the TIMER light blinks. (If the DVD power is off, the VCR will become STANDBY status). ¡When IRT is finished , the VCR turns off automatically. To use the VCR again, press TIMER on the remote, or STOP/EJECT on the DVD/VCR. TIMER RECORDING VCR You may set the VCR to start recording while you are away. You can set eight programs to record on specific days, daily or weekly within 1 year period. If you have not yet set the clock, "CLOCK SET" appears. If so, follow the steps [3] and [4] in "CLOCK SET" section on page 18. Then, set the timer recording. 1 Insert a tape with its safety tab into the DVD/VCR. 2 Select main menu by pressing MENU. 3 Select "TIMER PROGRAMMING" by press- ing K or L. Then, press B. TIMER PROGRAMMING The set up screen is displayed. PROG 12345678 DATE - START TIME END TIME CHANNEL REC SPEED VCR 1 Begin the recording by pressing RECORD. The REC Light comes on. ¡To temporarily stop recording or to resume it, press PAUSE/STEP. After the VCR has been in Pause mode for 5 minutes, it will stop automatically to protect the tape and the video head from damage. 2 Press STOP when the recording is completed. Note ¡When you wish to watch another program while recording, select desired channel on your TV. If noise appears press VCR/TV. IRT (Instant Recording Timer) VCR This feature allows you to set the recording length simply by pressing REC/IRT on the VCR. 3 Press REC/IRT to begin IRT. The REC, TIMER Light comes on. Change the recording length by pressing REC/IRT repeatedly. REC IRT(0:30) (Normal recording) IRT(1:00)..... 4 Set the timer. ¡To go back one step, press s. 1) Set the program number (1-8) Program number which is not set up flashes. Press K or L repeatedly for the desired program number. Then, press B. PROGRAM NUMBER 4 DATE - - / - - START TIME END TIME CHANNEL - - REC SPEED - - 2) Set the frequency of the recording For once: Press K or L to point to "ONCE". For daily (Monday~Friday): Press K or L to point to "DAILY". For weekly: Press K or L to point to "WEEKLY". Then, press B. PROGRAM NUMBER 4 ONCE DAILY WEEKLY 3) Set the date First, press K or L for the month. Then, press B. Next, press K or L for the day. Then, press B. ONE TIME PROGRAM PROGRAM NUMBER 4 DATE - - / - - START TIME END TIME CHANNEL - - REC SPEED - - IRT(8:00) IRT(7:30) - 20 - EN 1L25
-
 1
1 -
2
-
3
-
4
-
5
-
6
-
7
-
8
-
9
-
10
-
11
-
12
-
13
-
14
-
 15
15 -
 16
16 -
 17
17 -
 18
18 -
 19
19 -
 20
20 -
 21
21 -
 22
22 -
 23
23 -
 24
24 -
 25
25 -
26
-
27
-
28
-
29
-
30
-
31
-
32
-
33
-
34
-
35
-
36
-
37
-
38
-
39
-
40
-
41
-
42
-
43
-
44
 |
 |
