Honeywell HCCM474M User Manual - Page 34
Mounting a Lens - security camera
 |
View all Honeywell HCCM474M manuals
Add to My Manuals
Save this manual to your list of manuals |
Page 34 highlights
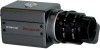
LENS INSTALLATION AND ADJUSTMENT, CONTINUED Mounting a Lens 1. Remove the lens mount cap from the camera. 2. Attach or remove the C-mount adapter depending on the lens to be used. 3. Attach the lens to the lens mount. Secure it so that it does not become loose. 4. If the lens has an auto-iris mechanism, connect the lens cable to the lens connector. NOTE: When removing the C-mount adapter: • If the adapter is attached so tightly that it is difficult to remove, use long-nosed pliers to remove it. Insert the tips of the pliers into the holes with no threads and turn to remove. • A screwdriver can also be used to remove a firmly attached adapter. Insert M3 screws into the holes so that the screwdriver has something to grip. REV. B 34 HCMU000878 12/29/03
-
 1
1 -
2
-
3
-
4
-
5
-
6
-
7
-
8
-
9
-
10
-
11
-
12
-
13
-
14
-
15
-
16
-
17
-
18
-
19
-
20
-
21
-
22
-
23
-
24
-
25
-
26
-
27
-
28
-
 29
29 -
 30
30 -
 31
31 -
 32
32 -
 33
33 -
 34
34 -
 35
35 -
 36
36 -
 37
37 -
 38
38 -
 39
39 -
40
-
41
 |
 |
