Hoover CH50100 Product Manual - Page 6
Warning - parts manual
 |
View all Hoover CH50100 manuals
Add to My Manuals
Save this manual to your list of manuals |
Page 6 highlights
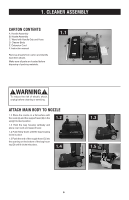
1. cleaner ASSEMBLY Carton contents A. Handle Assembly B. Nozzle Assembly C. Wand with Handle Grip and Hose D. Cleaner Body E. Extension Cord F. Instruction manual Remove all parts from carton and identify each item shown. Make sure all parts are located before disposing of packing materials. 1.1 A D E C F B ! WARNING ! To reduce the risk of electric shock, unplug before cleaning or servicing. attach main body to nozzle 1.2 Place the nozzle on a flat surface with the neck (A) and the support lever (B) in the 1.2 A B upright locked position. 1.3 Hold the bag housing vertically and place over neck and support lever. 1.4 Push firmly down until the bag housing locks in place 1.5 Push the end of the nozzle hose (C) into the opening on the bottom of the bag housing (D) until it clicks into place. 1.4 1.3 1.5 D C 6
-
 1
1 -
 2
2 -
 3
3 -
 4
4 -
 5
5 -
 6
6 -
 7
7 -
 8
8 -
 9
9 -
 10
10 -
 11
11 -
 12
12 -
13
-
14
-
15
-
16
-
17
 |
 |
