Hoover CH50100 Product Manual - Page 7
Cleaner Assembly Cont'd
 |
View all Hoover CH50100 manuals
Add to My Manuals
Save this manual to your list of manuals |
Page 7 highlights
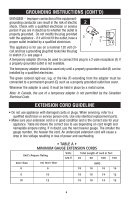
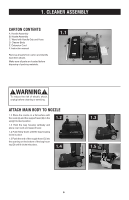
1. cleaner ASSEMBLY (cont'd) attach handle 1.6 Lift the handle lock button up and place the handle assembly down into the opening on top of the bag housing as far as it will go. 1.7 When the handle assembly has been pushed down as far as it can go, press the handle lock back down. As a precaution, pull up on handle to confirm it has been locked properly. 1.6 1.7 attach hose 1.8 Hold wand with handle grip and hose at a slight angle as you slide bottom end of wand into channel on back of bag housing. 1.9 As you are lowering the wand down into the channel, align the indicator graphic on the handle grip with the indicator graphic on the channel in the bag housing. 1.10 Push the opposite end of the hose (A) into the opening in the top of the cleaner body (B) until it clicks into place. 1.8 1.9 1.10 A B position tools 1.11 Make sure the crevice tool (A) and upholstery tool (B) are in their designated places on the back of the machine. Power cord assembly 1.12 This cleaner is equipped with a Quick-Change power cord (A). To connect the extension cord to the Quick-Change power cord, plug the socket end of extension cord into the 3-prong end of the Quick-Change cord. When completed, plug extension cord into properly grounded outlet to operate. If extension cord is damaged during use, simply replace with new extension cord (see Extension Cord Guideline on page 5). 7 1.11 A B 1.12 A A
-
 1
1 -
 2
2 -
 3
3 -
 4
4 -
 5
5 -
 6
6 -
 7
7 -
 8
8 -
 9
9 -
 10
10 -
 11
11 -
 12
12 -
13
-
14
-
15
-
16
-
17
 |
 |
