Hoover U5415-900 Owners Manual - Page 12
The agitator
 |
View all Hoover U5415-900 manuals
Add to My Manuals
Save this manual to your list of manuals |
Page 12 highlights
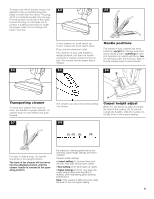
3-8 3-9 3-10 E D C Positioning belt and agitator Slip agitator through new belt (with lettering toward outside of cleaner) and position belt in belt guide (C). Push end of belt into opening in cleaner body. Reposition agitator making sure to align flat sides of projection (D) on belt end of agitator with flat sides of slot (E) in cleaner body. 3-11 Replacing bottom plate Place the three tabs on bottom plate into slots in front of cleaner body. Snap bottom plate into place over agitator. 3-12 Removing hood Remove hood by turning cleaner over and removing nozzle control knob on front of hood, grasp knob and pull up. 3-13 Place handle in operating position and turn cleaner over. Insert end of flat screwdriver into one of the four slots beside an arrow on bottom of cleaner. For slots nearest the rear wheels, push handle of screwdriver toward cleaner handle; for remaining two slots, pry outward to release latches. 3-14 Turn cleaner over and lift off hood. The agitator When to replace Disconnect cleaner from electrical outlet. When agitator brushes are worn, the agitator should be replaced. F Positioning belt onto pulley Stretch new belt onto motor pulley (F). Extra effort may be required to stretch new belt onto pulley. Turn agitator, making sure the belt is not pinched between agitator and cleaner body. The belt must rotate freely inside the belt guide. If agitator does not turn, remove bottom plate and reposition belt in belt guide. 3-15 Reposition hood Replace hood and nozzle control knob. To check condition of brushes, move edge of card across bottom plate while turning agitator. To maintain cleaning effectiveness, replace agitator if brushes do not touch card. Continued § 12
-
 1
1 -
2
-
3
-
4
-
5
-
6
-
 7
7 -
 8
8 -
 9
9 -
 10
10 -
 11
11 -
 12
12 -
 13
13 -
 14
14 -
 15
15
 |
 |
