Hoover U5415-900 Owners Manual - Page 7
How to use
 |
View all Hoover U5415-900 manuals
Add to My Manuals
Save this manual to your list of manuals |
Page 7 highlights
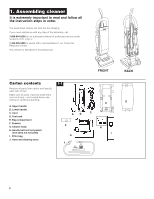
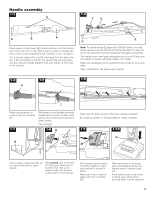
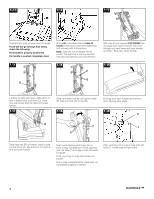
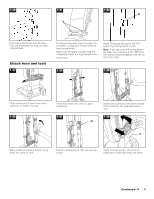
1-29 Y Z Slide crevice tool (Y) onto projection. Snap into place. Remove rectangular foam retainer (Z), if present, (part of protective packing material) located under the handle release lever. Discard foam retainer. 2. How to user The assembled cleaner will look like the drawing below. 2-1 1 2 14 13 12 11 3 15 4 4 5 19 6 8 7 10 9 CAUTION: When cleaner is turned on, the agitator brush roll will continue to rotate while cleaner handle is in upright position. Avoid tipping cleaner or setting it on furniture, fringed area rugs or carpeted stairs during tool use. Fill out and return the product registra- tion card included with your cleaner. 2 16 17 2 18 Cleaner description 1. Handle 2. Cord hooks: wrap cord around hooks for storage. The top hook can be rotated right or left for easy cord release. 3. Bag door latch 4. ON/OFF switch: located on side of handle. 5. Bag door 6. Stair cleaning handle: located on lower edge of bag. 7. Handle release lever: step on lever to lower handle to operating or low position. 8. Cleaner body 9. Nozzle control knob: slide knob to correct setting for height of carpet being cleaned. 10. Headlight (some models only) 11. Furniture guard: helps prevent cleaner from marking furniture. 12. Hose door: open door to connect hose to cleaner. 13. Hood 14. Hose 15. Tool rack 16. Dusting brush 17. Wand 18. Furniture nozzle 19. Crevice tool Operate cleaner only at voltage specified on bottom plate on bottom of cleaner. 7
-
 1
1 -
 2
2 -
 3
3 -
 4
4 -
 5
5 -
 6
6 -
 7
7 -
 8
8 -
 9
9 -
 10
10 -
 11
11 -
 12
12 -
13
-
14
-
15
 |
 |
