Hoover U5415-900 Owners Manual - Page 3
Assembling cleaner
 |
View all Hoover U5415-900 manuals
Add to My Manuals
Save this manual to your list of manuals |
Page 3 highlights
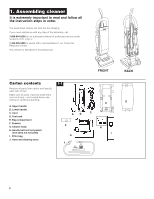
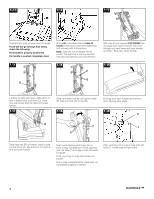
1. Assembling cleanerr It is extremely important to read and follow all the instruction steps in order. The assembled cleaner will look like this drawing. If you need assistance with any step of the assembly, call 1-800-944-9200 for an automated referral of authorized service outlet locations (U.S. only) or 1-330-499-9499 to speak with a representative in our Consumer Response Center. This cleaner is intended for househoId use. FRONT Carton contents 1-1 Remove all parts from carton and identify each item shown. Make sure all parts, especial small items such as F and I, are located before disposing of cardboard packing. A. Upper handle B. Lower handle C. Cord D. Tool-rack E. Bag compartment F. Bracket G. Cleaner body H. Handle bolt and nut packet (one extra nut included) I. Filter bag J. Hose and cleaning tools D AB C F G J H I BACK E 3
-
 1
1 -
 2
2 -
 3
3 -
 4
4 -
 5
5 -
 6
6 -
 7
7 -
 8
8 -
 9
9 -
10
-
11
-
12
-
13
-
14
-
15
 |
 |
