Hotpoint RGA724EKWH Installation Instructions - Page 31
Adjust The Oven Burner Air, Shutter If Necessary, Cont., Replace Oven Parts, Quality Of Flames
 |
UPC - 084691131717
View all Hotpoint RGA724EKWH manuals
Add to My Manuals
Save this manual to your list of manuals |
Page 31 highlights
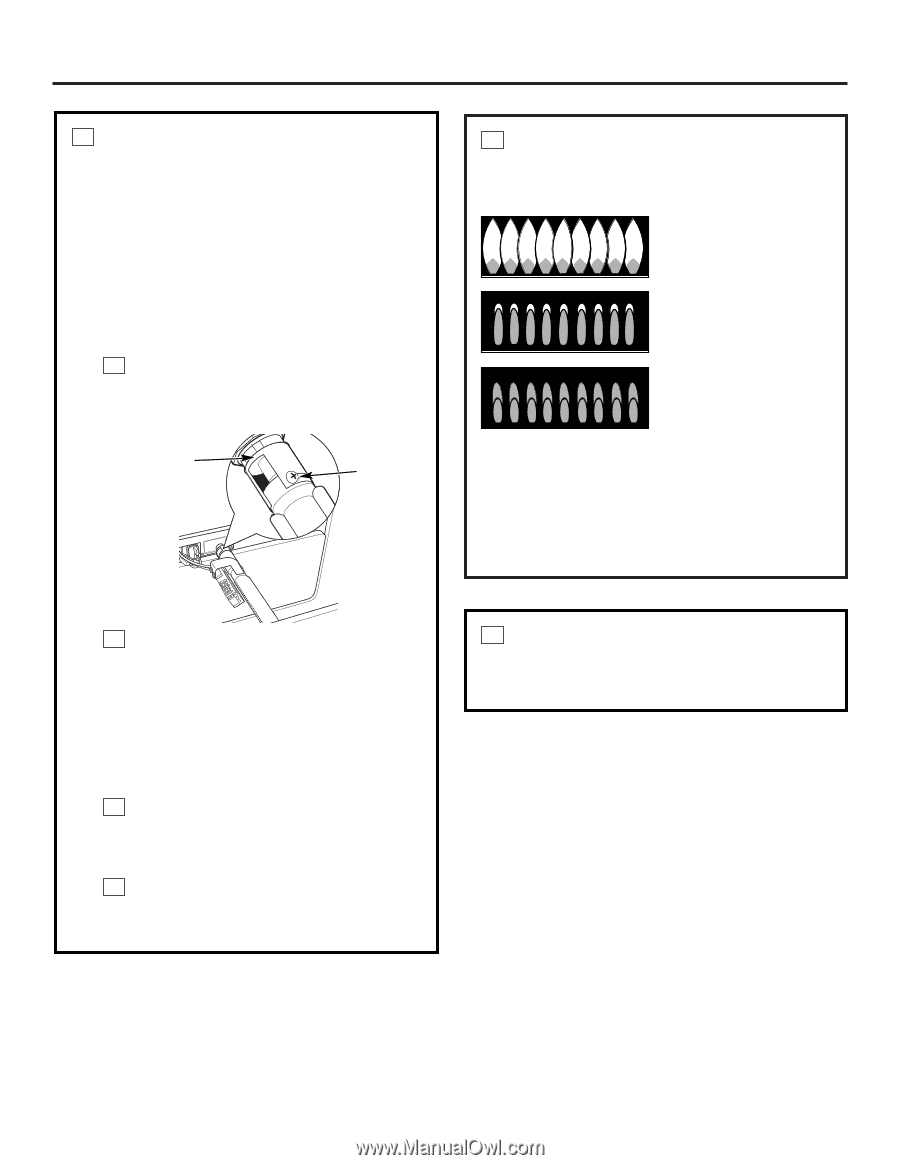
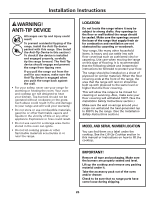
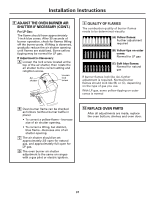
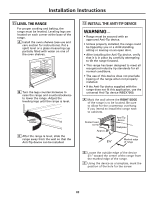
Installation Instructions 8 ADJUST THE OVEN BURNER AIR SHUTTER IF NECESSARY (CONT.) For LP Gas: The flame should have approximately 1-inch blue cones. After 30 seconds of burner operation, check for flames lifting off the burner ports. If lifting is observed, gradually reduce the air shutter opening until flames are stabilized. Some yellow tipping may be normal for LP gas. If Adjustment is Necessary: A Loosen the lock screw located at the top of the air shutter, then rotate the air shutter to the correct setting and retighten screw. Air shutter Loosen lock screw 9 QUALITY OF FLAMES The combustion quality of burner flames needs to be determined visually. (A) Yellow flames: Further adjustment required (B) Yellow tips on outer cones: Normal for LP gas (C) Soft blue flames: Normal for natural gas If burner flames look like (A), further adjustment is required. Normal burner flames should look like (B) or (C), depending on the type of gas you use. With LP gas, some yellow tipping on outer cones is normal B Oven burner flame can be checked as follows (without burner baffle in place): • To correct a yellow flame-Increase size of air shutter opening. • To correct a lifting, but distinct, blue flame-Decrease size of air shutter opening. C The air shutter should be set approximately 2/3 open for natural gas, and approximately full open for LP gas. D The oven burner air shutter adjustment is the same on ranges with a gas pilot or electric ignition. 10 REPLACE OVEN PARTS After all adjustments are made, replace the oven bottom, shelves and oven door. 31
-
 1
1 -
2
-
3
-
4
-
5
-
6
-
7
-
8
-
9
-
10
-
11
-
12
-
13
-
14
-
15
-
16
-
17
-
18
-
19
-
20
-
21
-
22
-
23
-
24
-
25
-
 26
26 -
 27
27 -
 28
28 -
 29
29 -
 30
30 -
 31
31 -
 32
32 -
 33
33 -
 34
34 -
 35
35 -
 36
36
 |
 |