Hotpoint RGA724EKWH Installation Instructions - Page 8
Using the gas surface burners., Surface Lighting Instructions for Electric Ignition Models - model #
 |
UPC - 084691131717
View all Hotpoint RGA724EKWH manuals
Add to My Manuals
Save this manual to your list of manuals |
Page 8 highlights
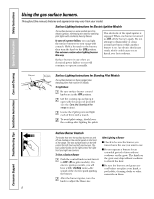
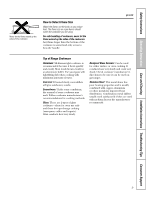
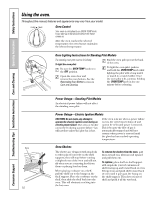
Consumer Support Troubleshooting Tips Installation Instructions Care and Cleaning Operating Instructions Safety Instructions Using the gas surface burners. Throughout this manual, features and appearance may vary from your model. Surface Lighting Instructions for Electric Ignition Models The surface burners on some models are lit by electric ignition, eliminating the need for standing pilot lights with constantly burning flames. In case of a power failure, you can light the surface burners on your range with a match. Hold a lit match to the burner, then turn the knob to the LITE position. Use extreme caution when lighting burners this way. The electrode of the spark igniter is exposed. When one burner is turned to LITE, all the burners spark. Do not attempt to disassemble or clean around any burner while another burner is on. An electric shock may result, which could cause you to knock over hot cookware. Surface burners in use when an electrical power failure occurs will continue to operate normally. Pilot port Surface Lighting Instructions for Standing Pilot Models The surface burners on these ranges have standing pilots that must be lit initially. To light them: Be sure surface burner control knobs are in the OFF position. Lift the cooktop up and prop it open with the prop rod provided (see the Care and cleaning of the range section). Locate the 2 pilot ports and light each of them with a match. To avoid pilot outage, slowly lower the cooktop after lighting the pilots. Surface Burner Controls The knobs that turn the surface burners on and off are located on the control panel on the front of the range. The two surface knobs on the left control the left front and left rear burners. The two surface knobs on the right control the right front and right rear burners. To Use a Surface Burner Push the control knob in and turn it to LITE (HI on pilot models). On electric ignition models, you will hear a little clicking noise-the sound of the electric spark igniting the burner. After the burner ignites, turn the knob to adjust the flame size. After Lighting a Burner I Check to be sure the burner you turned on is the one you want to use. I Do not operate a burner for an extended period of time without cookware on the grate. The finish on the grate may chip without cookware to absorb the heat. I Be sure the burners and grates are cool before you place your hand, a pot holder, cleaning cloths or other materials on them. 8
-
 1
1 -
2
-
 3
3 -
 4
4 -
 5
5 -
 6
6 -
 7
7 -
 8
8 -
 9
9 -
 10
10 -
 11
11 -
 12
12 -
 13
13 -
14
-
15
-
16
-
17
-
18
-
19
-
20
-
21
-
22
-
23
-
24
-
25
-
26
-
27
-
28
-
29
-
30
-
31
-
32
-
33
-
34
-
35
-
36
 |
 |