Insignia NS-19E450WA11 User Manual (English) - Page 9
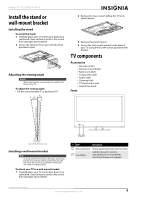
Install the stand or wall-mount bracket, Installing the stand, Adjusting the viewing angle,
 |
View all Insignia NS-19E450WA11 manuals
Add to My Manuals
Save this manual to your list of manuals |
Page 9 highlights
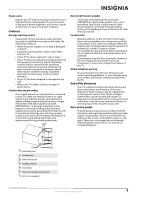
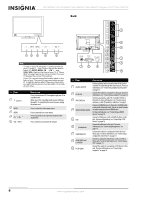
Insignia 19"/22" LED-LCD HD TV Install the stand or wall-mount bracket Installing the stand To install the stand: 1 Carefully place your TV screen face-down on a cushioned, clean surface to protect the screen from damages and scratches. 2 Secure the stand to the screen with the three provided screws. Adjusting the viewing angle Caution When adjusting the viewing angle, be careful not to tip over your TV. To adjust the viewing angle: • Tilt the screen forward 5° or backward 10°. -5 10o 2 Remove the two screws holding the TV to its stand column. 3 Remove the stand column. 4 Secure the wall-mount bracket to the back of your TV using the four M4 screws provided with bracket. TV components Accessories • Remote control • Remote control holder • Batteries (2 AAA) • Component cable • Audio cable • Cleaning cloth • TV stand and screws • Quick Setup Guide Front Installing a wall-mount bracket Note To avoid interference between the jacks, wall-mount bracket, and wall, the wall-mount bracket must be more than 40 mm thick, and the RF or VGA cable must have a 90-degree plug. To attach your TV to a wall-mount bracket: 1 Carefully place your TV screen face-down on a cushioned, clean surface to protect the screen from damages and scratches. 12 # Item Description 1 Remote control sensor Receives signals from the remote control. Do not block. 2 Power indicator Lights blue when your TV is turned on. Lights red when your TV is in standby mode. Turns off when the power cord is unplugged. www.insigniaproducts.com 5
-
 1
1 -
2
-
3
-
 4
4 -
 5
5 -
 6
6 -
 7
7 -
 8
8 -
 9
9 -
 10
10 -
 11
11 -
 12
12 -
 13
13 -
 14
14 -
15
-
16
-
17
-
18
-
19
-
20
-
21
-
22
-
23
-
24
-
25
-
26
-
27
-
28
-
29
-
30
-
31
-
32
-
33
-
34
-
35
-
36
-
37
-
38
-
39
-
40
-
41
-
42
-
43
-
44
-
45
-
46
-
47
-
48
-
49
-
50
-
51
-
52
 |
 |
