Invacare M94 Owners Manual - Page 52
Adjusting Seat Position on Seat Frame
 |
View all Invacare M94 manuals
Add to My Manuals
Save this manual to your list of manuals |
Page 52 highlights
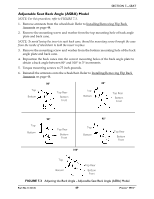
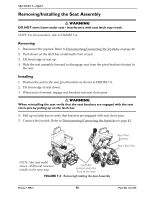
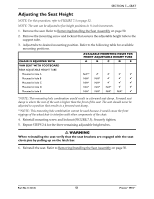
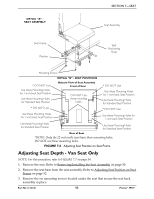
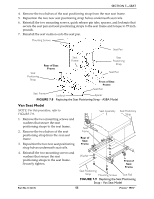
SECTION 7-SEAT Mounting Hole Rear Adjustable Height Tube A B C D E Support Tube Front Adjustable Height Tube Locknut Mounting Hole A B C D E Mounting Screws FIGURE 7.5 Adjusting the Seat Height Adjusting Seat Position on Seat Frame ASBA Model ƽ WARNING DO NOT attempt to adjust the seat position of the ASBA seat on the seat frame. This procedure MUST be performed by a qualified technician. Van Seat Model NOTE: For this procedure, refer to FIGURE 7.6 on page 53. 1. Remove the seat. Refer to Removing/Installing the Seat Assembly on page 50. 2. Remove the four mounting screws and washers securing the seat assembly to the seat frame. (Detail "A" of FIGURE 7.6) 3. Separate the seat assembly from the seat frame. 4. Refer to Detail "B" of FIGURE 7.6 to determine the correct mounting holes to achieve the desired seat position. 5. Align the seat assembly mounting holes determined in STEP 4 with the seat frame mounting holes determined in STEP 4. 6. Using the four mounting screws and washers, secure the seat assembly to the seat frame. Securely tighten. 7. Reinstall the seat. Refer to Removing/Installing the Seat Assembly on page 50. Pronto® M94™ 52 Part No 1122145
-
 1
1 -
2
-
3
-
4
-
5
-
6
-
7
-
8
-
9
-
10
-
11
-
12
-
13
-
14
-
15
-
16
-
17
-
18
-
19
-
20
-
21
-
22
-
23
-
24
-
25
-
26
-
27
-
28
-
29
-
30
-
31
-
32
-
33
-
34
-
35
-
36
-
37
-
38
-
39
-
40
-
41
-
42
-
43
-
44
-
45
-
46
-
 47
47 -
 48
48 -
 49
49 -
 50
50 -
 51
51 -
 52
52 -
 53
53 -
 54
54 -
 55
55 -
 56
56 -
 57
57 -
58
-
59
-
60
-
61
-
62
-
63
-
64
-
65
-
66
-
67
-
68
-
69
-
70
-
71
-
72
-
73
-
74
-
75
-
76
-
77
-
78
-
79
-
80
 |
 |
