JVC GR-D775 Software Guide - Page 7
Connecting Windows, Viewing the Contents of a, Memory Card Windows - camcorder
 |
UPC - 046838028595
View all JVC GR-D775 manuals
Add to My Manuals
Save this manual to your list of manuals |
Page 7 highlights
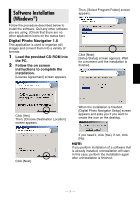
Connecting (Windows®) Connecting the USB cable Connect the USB cable to copy still image files in a memory card to the PC. Camcorder USB Cable To USB Connector PC To USB Connector 1 To assure safety, make sure all units are turned off before making any connections. 2 Use the USB cable to connect the camcorder to the PC. NOTES: ● It is recommended to use the AC Adapter as the power supply instead of the battery pack. ● When the USB cable is connected, turning on or off the camcorder or switching the VIDEO/MEMORY (DSC) mode on the camcorder causes malfunctions of the PC. ● If you connect the camcorder to the PC through a USB hub, compatibility issues between the hub and the PC may result in instability in the operation of the PC. If this happens, connect the camcorder directly to the PC, not through the hub. ● Do not use an extension USB cable. Viewing the Contents of a Memory Card (Windows®) 1 Make sure that there is a memory card in the camcorder. 2 Set the camcorder's VIDEO/ MEMORY Switch to "MEMORY". 3 Set the camcorder's Power Switch to "PLAY" while pressing down the Lock Button located on the switch. The camcorder turns on. 4 Connect the camcorder to the PC with a USB cable. (੬ pg. 6) On the camcorder's LCD monitor [USB] appears. 5 When using Windows® XP: The [Removable Disk] window appears on the PC's screen after a moment. Select [Open folders to view files using Windows Explorer] and click [OK]. NOTE: If the [Removable Disk] window does not appear, confirm the connection (੬ pg. 6) or perform the steps 1 and 2 below. When using Windows® 2000: 1 Double-click the [My Computer] icon on the desktop. The [Removable Disk] icon which represents the memory card in the camcorder appears in the [My Computer] window. -6-
-
 1
1 -
 2
2 -
 3
3 -
 4
4 -
 5
5 -
 6
6 -
 7
7 -
 8
8 -
 9
9 -
 10
10 -
 11
11 -
 12
12 -
13
-
14
-
15
-
16
-
17
-
18
-
19
-
20
-
21
-
22
-
23
-
24
-
25
-
26
 |
 |
