JVC JY-VS200U JY-VS200U User Manual -- Pages 66-95 (616KB)
JVC JY-VS200U - Professional Dv 1-ccd Camcorder Manual
 |
View all JVC JY-VS200U manuals
Add to My Manuals
Save this manual to your list of manuals |
JVC JY-VS200U manual content summary:
- JVC JY-VS200U | JY-VS200U User Manual -- Pages 66-95 (616KB) - Page 1
tape into the camcorder and set the refer to the VCR's instructions). To S-VIDEO IN DV input connector, an optional DV cable can be connected instead of an S-Video cable and audio/video cable. * Connect when an S-Video cable is not used. ** When connecting cables, open this cover. JY-VS200U - JVC JY-VS200U | JY-VS200U User Manual -- Pages 66-95 (616KB) - Page 2
the time code total time may not match the total program time exactly. ● Turning off the camcorder 's power erases all registered Edit-In and Edit-Out points. ● If you select Sepia or AE with special effects during Random Assemble Editing using a DV cable. JY-VS200U EN 66-95 67 01.3.12, 7:31 PM - JVC JY-VS200U | JY-VS200U User Manual -- Pages 66-95 (616KB) - Page 3
in the camcorder to the beginning of the scene you want to edit and press PAUSE (6). 12 Point the remote control towards the VCR' s remote sensor and press VCR REC STBY (q6), or manually engage the VCR R.A.EDIT ON/OFF VCR REC STBY CONTINUED ON NEXT PAGE JY-VS200U EN 66-95 68 01.3.12, 7:31 PM - JVC JY-VS200U | JY-VS200U User Manual -- Pages 66-95 (616KB) - Page 4
transition from Record-Pause to Record mode faster than others. Even if you begin editing for the camcorder and the VCR at exactly the same time, you may lose scenes you wanted, or find that recording. Remote sensor R.A.EDIT ON/OFF CONTINUED ON NEXT PAGE JY-VS200U EN 66-95 69 01.3.12, 7:31 PM - JVC JY-VS200U | JY-VS200U User Manual -- Pages 66-95 (616KB) - Page 5
Display USING THE REMOTE CONTROL UNIT (cont.) ADJUSTMENT OF VCR/CAMCORDER TIMING SYNCHRO - O . 1 4 Point the remote control at the camcorder 's remote sensor and press R.A.EDIT ON/OFF to make where the timing difference cannot be fully corrected. JY-VS200U EN 66-95 70 01.3.12, 7:31 PM - JVC JY-VS200U | JY-VS200U User Manual -- Pages 66-95 (616KB) - Page 6
portion, Audio Dubbing stops (੬ pg. 87). ● To perform Audio Dubbing with a video unit connected to the camcorder's AV connector, first set "S/AV INPUT" to "ON" in the Menu Screen (੬ pg. 41). You can hear sound from the video unit using optional headphones. JY-VS200U EN 66-95 71 01.3.12, 7:31 PM - JVC JY-VS200U | JY-VS200U User Manual -- Pages 66-95 (616KB) - Page 7
the remote control, then press PAUSE (6). "6w" and the Time Code (min.:sec.) appear and the camcorder enters InsertPause mode. 4 Press START/STOP to begin editing. •Confirm the insert at the time code you or a blank portion, Insert Edting stops ( ੬ pg. 87). JY-VS200U EN 66-95 72 01.3.12, 7:31 PM - JVC JY-VS200U | JY-VS200U User Manual -- Pages 66-95 (616KB) - Page 8
TROUBLESHOOTING EN73 If, after following the steps in the chart below , the problem still exists, please consult your nearest JVC dealer . The camcorder is a microcomputer-controlled device. External noise and interference (from a TV , a radio, etc.) might prevent it from functioning properly . - JVC JY-VS200U | JY-VS200U User Manual -- Pages 66-95 (616KB) - Page 9
not work. 16. The Black & White Fader does not work. TROUBLESHOOTING (cont.) POSSIBLE CAUSES 7. • The cassette is in the wrong position. • The battery's charge is low. 8. • The memory card is in the . 16. •Turn off Sepia and Mono- tone (੬ pg. 34, 36). JY-VS200U EN 66-95 74 01.3.12, 7:31 PM - JVC JY-VS200U | JY-VS200U User Manual -- Pages 66-95 (616KB) - Page 10
Edit-In and Edit-Out points, as they will all be erased (੬ pg. 34). •The camcorder automatically shuts off after 5 minutes have elapsed in the Record-Standby mode. Make sure you continue the Picture Wipe (੬ pg. 30, 34, 36). 20. ---- CONTINUED ON NEXT PAGE JY-VS200U EN 66-95 75 01.3.12, 7:31 PM - JVC JY-VS200U | JY-VS200U User Manual -- Pages 66-95 (616KB) - Page 11
28. Images stored in the memory card cannot be deleted. 29. The indicators and messages do not appear. TROUBLESHOOTING (cont.) POSSIBLE CAUSES 21. • The Picture Wipe or Dissolve functions are in use. • "WIDE MODE" to "ON" in the Menu Screen (੬ pg. 31, 41). JY-VS200U EN 66-95 76 01.3.12, 7:31 PM - JVC JY-VS200U | JY-VS200U User Manual -- Pages 66-95 (616KB) - Page 12
is not a defect of the camcorder. •When the LCD monitor's fluorescent light reaches the end of its service life, images on the LCD monitor become dark. Consult your nearest JVC dealer. 31. •The light "DIS" (੬ pg. 30, 34 - 37). 34. ---- CONTINUED ON NEXT PAGE JY-VS200U EN 66-95 77 01.3.12, 7:31 PM - JVC JY-VS200U | JY-VS200U User Manual -- Pages 66-95 (616KB) - Page 13
78 EN TROUBLESHOOTING (cont.) SYMPTOM 35. During recording, speaker volume is too great. 41. •Since the analog input mode is engaged, the camcorder is in the Record-Standby mode. 42. ---- 43. ---- CORRECTIVE ACTION 35. •Connect can cause damage (੬ pg. 80). JY-VS200U EN 66-95 78 01.3.12, 7:31 PM - JVC JY-VS200U | JY-VS200U User Manual -- Pages 66-95 (616KB) - Page 14
power off and on again, then operate it. 50. ---- 51. ---- 50. •Do not subject the camcorder to shock or excessive vibration during transport. •Turn the camcorder on and off. The lens cover closes. 51. •Push in the memory card a few more times (੬ pg. 13). JY-VS200U EN 66-95 79 01.3.12, 7:31 PM - JVC JY-VS200U | JY-VS200U User Manual -- Pages 66-95 (616KB) - Page 15
done only after the battery pack has been removed or other power units have been disconnected. ● Mold may form if the lens is left dirty. ● When using a cleaner or chemically treated cloth refer to the cautions of each product. BATT. RELEASE Switch 1 Hatch 2 Lens blower JY-VS200U EN 66-95 80 - JVC JY-VS200U | JY-VS200U User Manual -- Pages 66-95 (616KB) - Page 16
pg. 65 - 70 5 Multi Connector The Jack Box can be connected with this camcorder through this connector. Never touch it with your hand or hit it with a hard object; if the pins are damaged, the connectors will become unusable due to contact failure. JY-VS200U EN 66-95 81 01.3.12, 7:31 PM - JVC JY-VS200U | JY-VS200U User Manual -- Pages 66-95 (616KB) - Page 17
82 EN 8 R INDEX Controls, Connectors And Indicators 123o 4 rty E 90!@# $ OFF e Q W 5 6 7 PLAY i T Y %^ &u E p O Pa fg q I U) * hw JY-VS200U EN 66-95 82 s d( 01.3.12, 7:31 PM - JVC JY-VS200U | JY-VS200U User Manual -- Pages 66-95 (616KB) - Page 18
Refer to the separate "FOR OWNERS OF AN OPTIONAL PRINTER" instruction sheet. * Monitor Open Button [PUSH OPEN] .... ੬ pg. 18 ( • MENU Wheel [ , , PUSH pg. 28 • LCD Monitor Brightness Control pg. 18 ) Manual Focus Ring pg. 27 q Battery Release Button [BATT. RELEASE pg. 9 w OPEN/EJECT Switch pg - JVC JY-VS200U | JY-VS200U User Manual -- Pages 66-95 (616KB) - Page 19
72) 0 •SOUND 12 BIT: Displays the sound mode for approx. 5 seconds after turning on the camcorder. (੬ pg. 29) •L/R: Displays the microphone input level when recording starts. (੬ pg. 31) ! (੬ pg. 16) These indications also appear during DUAL mode. JY-VS200U EN 66-95 84 01.3.12, 7:31 PM - JVC JY-VS200U | JY-VS200U User Manual -- Pages 66-95 (616KB) - Page 20
, 21) @ Displays the brightness of the LCD monitor or the viewfinder. (੬ pg. 18) # Displays the date/time. (੬ pg. 11) $ Appears when the focus is adjusted manually . (੬ pg. 27) JY-VS200U EN 66-95 85 01.3.12, 7:31 PM - JVC JY-VS200U | JY-VS200U User Manual -- Pages 66-95 (616KB) - Page 21
the total number of stored files. (੬ pg. 44) 5 Displays the index number of the file. (੬ pg. 44) BR I GHT 10 / 24 54 3 DEC 25 '00 2 JY-VS200U EN 66-95 86 01.3.12, 7:31 PM - JVC JY-VS200U | JY-VS200U User Manual -- Pages 66-95 (616KB) - Page 22
the date/time is not set. (੬ pg. 11) ● Appears when the built-in clock (lithium) battery is discharged and the previously set date/time is erased. (੬ pg. 11) Appears if Audio Dubbing is a blank portion of a tape. (੬ pg. 72) JY-VS200U EN 66-95 87 CONTINUED ON NEXT PAGE 01.3.12, 7:31 PM - JVC JY-VS200U | JY-VS200U User Manual -- Pages 66-95 (616KB) - Page 23
an error indication appears, the camcorder turns of f automatically. Remove the power supply (battery, etc.) and wait a few minutes for the indication to clear. When it does, you can resume using the camcorder. If the indication remains, consult your nearest JVC dealer . JY-VS200U EN 66-95 88 01 - JVC JY-VS200U | JY-VS200U User Manual -- Pages 66-95 (616KB) - Page 24
JVC dealer. Plug adapter General Battery Precautions service life. .... fully charge and then fully discharge the battery every 6 months when storing the battery pack over a long period time. .... remove from charger the cassette bears the Mini DV mark. .... be JY-VS200U EN 66-95 89 01.3.12, 7:31 PM - JVC JY-VS200U | JY-VS200U User Manual -- Pages 66-95 (616KB) - Page 25
camcorder plays back for about 20 seconds, it stops automatically. Also refer to the cleaning cassette's instructions. If, after using the cleaning cassette, the problems still exist, consult your nearest JVC check-ups please consult your nearest JVC dealer. JY-VS200U EN 66-95 90 01.3.12, 7:31 PM - JVC JY-VS200U | JY-VS200U User Manual -- Pages 66-95 (616KB) - Page 26
consult your local JVC dealer . The camcorder is a microcomputer-controlled device. External noise and interference (from a TV, a radio, etc.) might prevent it from functioning properly. In such cases, first disconnect its power supply unit (battery pack, AC Power Adapter/Battery Charger, etc.) and - JVC JY-VS200U | JY-VS200U User Manual -- Pages 66-95 (616KB) - Page 27
Menu Screen, DSC pg. 16 Menu Screen, MANUAL pg. 29, 30 Menu Screen, MEMORY pg. 46 Menu Screen, SYSTEM pg. 31, 41 Menu Screen, VIDEO pg. 41 Microphone Level Indicator pg. 31 Monotone pg. 37 Motor Drive Mode pg. 20 MultiMediaCard pg. 13, 90 JY-VS200U EN 66-95 92 01.3.12, 7:31 - JVC JY-VS200U | JY-VS200U User Manual -- Pages 66-95 (616KB) - Page 28
V Video Echo pg. 37 W White Balance pg. 39 Wide Mode pg. 30 Wind Cut pg. 30 Wipe In/Out pg. 34, 35 Z Zooming pg. 22 JY-VS200U EN 66-95 93 01.3.12, 7:31 PM - JVC JY-VS200U | JY-VS200U User Manual -- Pages 66-95 (616KB) - Page 29
Camcorder : DC 6.3 V DC 7.2 V (Using AC Power Adapter/Charger) (Using battery pack) : Approx. 4.4 W : Approx. 5.3 W : ) : Mini DV cassette : SP: 18.8 mm/s LP: 12.5 mm/s : SP: 80 min. LP: 120 min. For Digital Still Camera Storage media (XGA), 30 (UXGA) JY-VS200U EN 66-95 94 01.3.12, 7:31 PM - JVC JY-VS200U | JY-VS200U User Manual -- Pages 66-95 (616KB) - Page 30
AV Video output Video input Audio output Audio input DV Input/output PHONE Headphone output MIC External microphone Power consumption Output Charge VTR Dimensions (W x H x D) Weight AC Power Adapter/Charger AA-V40U : AC 120 V`, 60 Hz : AC 110 V to 240 V`, JY-VS200U EN 66-95 95 01.3.12, 7:31 PM
-
 1
1 -
 2
2 -
 3
3 -
 4
4 -
 5
5 -
 6
6 -
 7
7 -
8
-
9
-
10
-
11
-
12
-
13
-
14
-
15
-
16
-
17
-
18
-
19
-
20
-
21
-
22
-
23
-
24
-
25
-
26
-
27
-
28
-
29
-
30
 |
 |
66
EN
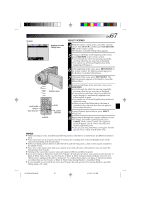
USING THE REMOTE CONTROL UNIT
(cont.)
DISPLAY
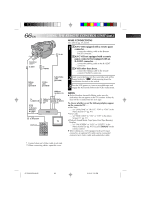
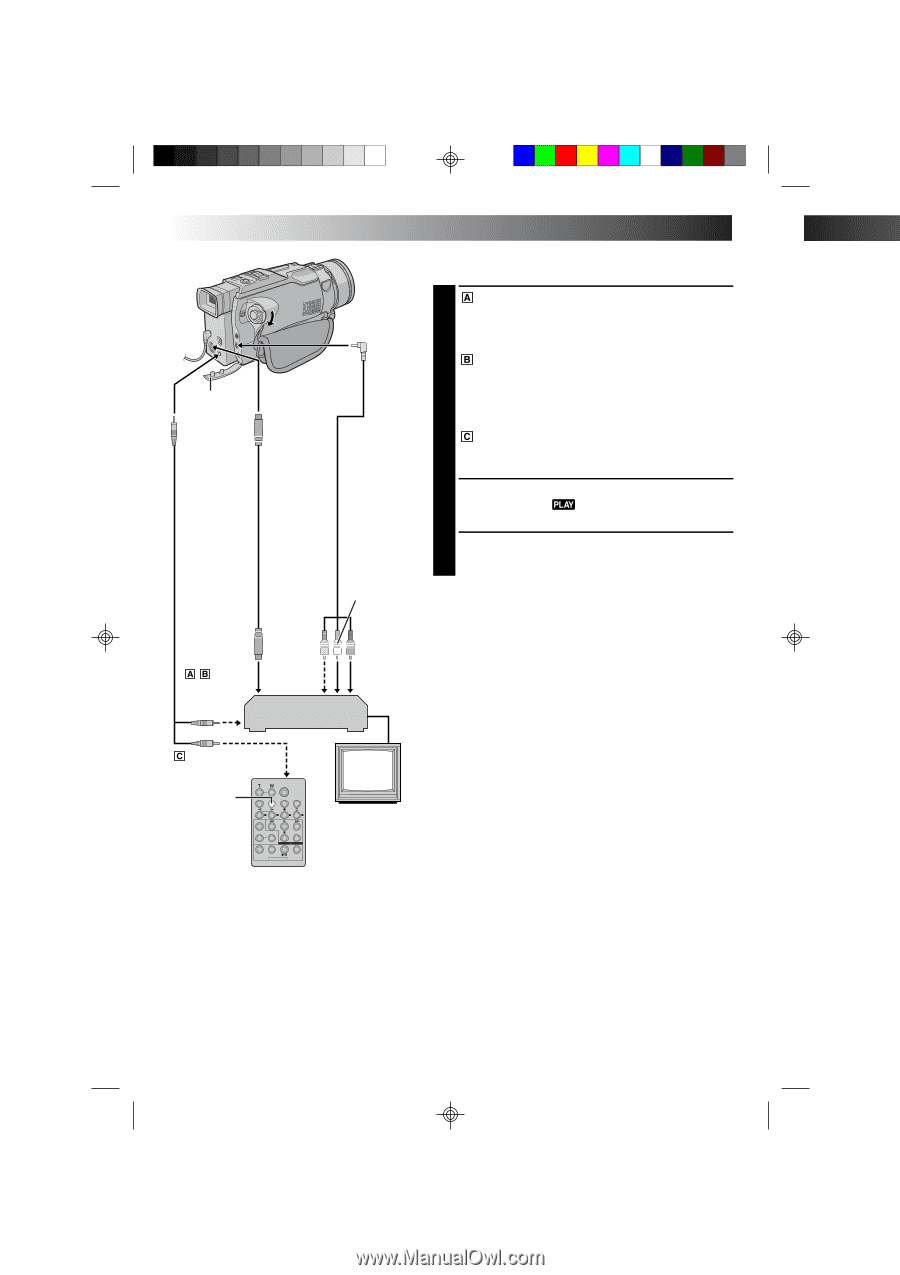
MAKE CONNECTIONS
Also refer to pg. 54 and 55.
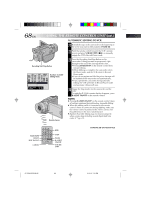
1
A JVC VCR equipped with a remote pause
connector . . .
... connect the editing cable to the Remote
PAUSE connector.
A JVC VCR not equipped with a remote
pause connector but equipped with an
R.A.EDIT connector . . .
... connect the editing cable to the R.A.EDIT
connector.
A VCR other than above . . .
... connect the editing cable to the remote
control’s PAUSE IN connector.
2
Insert a recorded tape into the camcorder and set the
Power Switch to “
” while pressing down the
Lock Button located on the switch.
3
Turn the VCR power on, insert a recordable tape and
engage the AUX mode (refer to the VCR’s instructions).
NOTES:
●
Before Random Assemble Editing, make sure the
indications do not appear on the TV monitor . If they do,
they will be recorded onto the new tape.
To choose whether or not the following displays appear
on the connected TV . . .
•Date/Time
.....
set “DATE/TIME” to “AUTO”, “ON” or “OFF” in the
Menu Screen (
±
pg. 41).
•Time Code
.....
set “TIME CODE” to “ON” or “OFF” in the Menu
Screen (
±
pg. 41).
•Playback Sound Mode, Tape Speed And Tape Running
Displays
.....
set “ON SCREEN” to “LCD” or “LCD/TV” in the
Menu Screen (
±
pg. 41). Or, press
DISPLAY
on the
remote control.
●
When editing on a VCR equipped with a DV input
connector, an optional DV cable can be connected
instead of an S-Video cable and audio/video cable.
To Remote
PAUSE or
R.A.EDIT
VCR
TV
White to
AUDIO L IN
Red to
AUDIO R
IN
To
S-VIDEO IN
To PAUSE IN
Editing
cable
(provided)
S-Video
cable
(provided)
Audio/Video
cable
(provided)
Yellow to
VIDEO
IN*
*
Connect when an S-Video cable is not used.
**
When connecting cables, open this cover .
Connector
cover**
To AV
To EDIT
To
S-VIDEO
JY-VS200U EN 66-95
01.3.12, 7:31 PM
66