JVC KW-AV60 Instruction Manual - Page 82
English, Espanol, Franc;:ais
 |
View all JVC KW-AV60 manuals
Add to My Manuals
Save this manual to your list of manuals |
Page 82 highlights
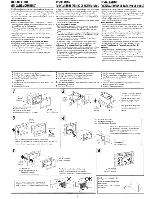
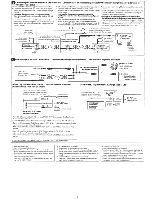
ENGLISH ESPANOL FRANc;:AIS Before connecting: Check the wiring in the vehicle carefully. Incorrect connection may cause serious damage to this unit. The leads of the power cord and those of the connector from the car body may be different in color. 1 Connect the colored leads of the power cord in the order specified in the illustration below. 2 Connect the antenna cord. J Finally connect the wiring harness to the unit. Antes de Ia conexi6n: Verifique atentamente el conexionado del vehfculo. Una conexi6n incorrecta podrfa producir darios graves en Ia unidad. Los cordones del cable de alimentaci6n y los del conector procedentes de Ia carroceria del autom6vil podrian ser de diferentes en color. Conecte los conductores de color del cable de alimentaci6n en el orden especificado en Ia ilustraci6n de abajo. 2 Conecte el cable de antena. J Por ultimo, conecte el cable de alimentaci6n a Ia unidad. Avant de commencer Ia connexlon: Vtrifiez attentivement le ctiblage du vihicule. Une connexion incorrecte peut endommager strieusement l'appareil. Le fil du cordon d'alimentation et ceux des connecteurs du chtissis de Ia voiture peuvent etre dif!Jrents en couleur. Connectez les fils co/oris du cordon d'alimentation dans l'ordre sp&ifli sur !'illustration ci-dessous. 2 Connectez le cordon d'antenne. J Finalement, connectez le faisceau de fils al'appareil. • The terminals and cables of all models are shown in the illustration • Los terminales y cables de todos los modelos se muestran en Ia for the purpose ofexplanation. ilustraci6n con fines explicativos. • Les prises et les ctibles de tousles modeles sont montris sur les illustrations dans un but explicatif. Light green Verdeclaro /' Vert clair r To parkingbrake (see page 3) AI freno de estacionamiento (consulte Ia pilgina 3) Au frein de stationnement (voir page 3) (see page 3/ consulte Ia pilgina 3 I voir page 3) Antenna terminal Terminal de Ia antena Borne de l'anterme 2 Rear ground terminaJ Terminal de tierra posterior Borne arriire de masse See each diagram on pages 4 - 6. Vea cad a uno de los diagramas en las p3ginas 4 - 6. a Rtjerez-vous chaque diagram me des pages 4 - 6. 10 A fuse I Fusib le de 10 A I Fusible 10 A 1.\.........: 1+ f ' G TometalaI.c bodyorchassa.softhecar Aun cuerpo metillico o chasis del autom6vil ~*4 i ! : (GND) Vers corps mttalliqu.e ou chdssis de Ia voitu.re : Ignition switch Interrupter de encendido lnterrupteur d'aflumage ~ Yellow *5 To a hve termmal tn the fuse block connecung to the car battery :::==:===B=A=IT=> }r Amarillo *5 ( (bypassmg the agmtlon swatch) (constant 12 V) } {t1\ A un term mal actiVO del bloque de fus1bles conectado a Ja batena del \f) ) autom6v1l (desv1ando el A une borne so us tensiOn dmuteprorrutep-tjuosr1dbeleecnocnennedc1tedeo)a(I1a2bVatcteorn~estdaentIeasv)o1ture (en denvant l'mterrupteur d'allumage) (12 v constant) ,?" Rojo r-c m To an accessory terminal in the fuse block \2) Aun terminal accesorio del bloque de fusib les (ACC) Vers borne accessoire du porte-fusible Blue ~~e~ To automatic antenna if any (250 rnA max.) @ 11 AIa antena automatica, si hubiere (250 mA max.) (ANT. CONT) A l'antenne automatique s'il yen a une (250 mA max.) Porte-fusible Blue with white stripe Azul con rayas blancas B/eu avec bande blanche r2\ To the remote lead of other equipment (200 rnA max.) AI conductor remoto del otro equipo (200 mA max.) (P. CONT) Au fil de telecommande d'un autre appareil (200 mA max.) Orange with white stripe Naranja con rayas blancas @6 ~=====avec=ba=nde=bl=anc=he =======> To car light control switch AI interruptordecontrol de las luces del autom6vil (ILLUMI) A l'interrupteur d'&/airage de la voiture Brown Marr6n (j) Marron 7 II To mobile phone system AI sistema de telefonocelular (MUTE) A. un systeme de telephone cellulaire Blue with yellow stripe Azul con rayas amarillas I a Bleuavec To the OE remote adapter *6 AI adaptador para control remota OE *6 Au adaptateur pour telt!commande au volant •6 ® White with black stripe Gray with black stripe Gray Green with black stripe Green Purple with black stripe Purple Blanco con rayas negras Gris con rayas negras Gris Verde con rayas negras Verde PUrpura con rayas negras PUrpura Blanc avec bande noire (-) (+) Blanc Gris avec bande noire (-) (+) Gris Vert avec bande noire (-) (+) Vert Violet avec bande noire Violet left speaker (front) Altavoz izquierdo (delantero) Enceinte gauche (avant) ~ Right speaker (front) Altavoz derecho (delantero) Enceinte droit (avant) ~ Leftspeaker(rear) Altavoz izquierdo (trasero) Enceinte gauche (arriere) ~ Right speaker (rear) ~ Altavoz derecho (trasero) Enceinte droit (arriere) Connecting to the steering wheel remote controller I Conexi6n al control remoto del volante de direcci6n I Connexion de Ia teh~commande de volant If your car is equipped with the steering wheel remote control1er, you can operate this unit using the controller. For connection, an exclusive remote adapter (not supplied) which matches your car is required. For details, consult the same car audio dealer as where the unit is purchased. Si su vehfculo esta equipado con control remoto en el volante de direcci6n, podra hacerfuncionar este receptor utilizando dicho control. Para Ia conexi6n, se requiere un adaptador remoto exclusivo (no suministrado) que sea adecuado para su autom6vil. Para los detalles, consulte con el concesionario car audio donde compr6 el receptor. Si votre voiture est munie d'une telicommande de volant, vous pouvez commander eel autoradio en utilisant la a tilecommande. Pour la connexion, un adaptateur de telecommande exclusif(non fourni) correspondant votre voiture est requis. Pour en savoir plus, consultez le revendeur autoradio aupres duquel vous avez achete cet autoradio. OE remote adapter ~>4,..7 Adaptador remoto OE *4 •7 ~ Adaptateurpourtilecommandeau volant'''' df-- 0 CONT~ remote:ller~;~ :ngwheel the car) KW-AOV648T/KW·AV688T KW·AV60BT/KW·AV60 Control remoto del volante de direcci6n (equipado en el veh;culol Telecommande de volant (install& dans Ia voiture) *2 Only for KW ·ADV64BT/KW·AV68BT/KW-AV60BT. *3 Only for KW ·ADV64BT/KW -AV60BT/KW-A V60. Not supplied for this unit. *5 Before checking the operation of this unit prior to installation, this lead must be connected, othenvise power cannot be turned on. Do not connect the lead directly to the battery. *6 Do not connect the lead to any device other than the OE remote adapter. Doing so may cause malfunction. *7 Alter the wire of the OE remote adapter to connect to the steering wheel remote lead. •2 S61o para KW·ADV64BT/KW·AV68BT/KW·AV60BT. '' S61o para KW·ADV64BT/KW-AV60BT/KW-AV60. *4 No suminlstrado con esta unidad. *S Antes de comprobar el funcionamiento de esta unidad previa a de Ia instalaci6n, es necesario conectar este cable, de lo contrario nose podra conectar Ia alimentaci6n. No conecte el conductor directamente a Ia baterfa. ~ No conecte el cable a ningUn otro dispositive que no sea el adaptador para control remota OE. De lo contrario podria provocar un mal funcionamiento. *7 Altere el cableado del adaptador para control remote OE para conectar al conductor remote del volante de dlrecci6n. 4 *2 Uniquement pour le KW-ADV64BT/KW-AV68BT/KW-AV60BT. *3 Uniquement pour le KW-ADV64BTJKW-AV68BTJKW-A V60. *4 Non fourni avec cet appareil. ,..5 Pour verifier le fonctionnement de cet appareil avant installation, ce fil doit erre raccorde, sinon l'appareil ne peut pas €tre mis sous tension. Ne connectez pas lefil directement aIa batterie. *6 Ne connectez pas ce fila aucun autre appareil que l'adaptateur de telecommande au volant. Cela pourrait causer un mauvais fonctionnemenr. *7 Modifiez le fil de l'adaptateur de telecommande au volant pour le connecte au fil de tCiecommande de volant.
-
 1
1 -
2
-
3
-
4
-
5
-
6
-
7
-
8
-
9
-
10
-
11
-
12
-
13
-
14
-
15
-
16
-
17
-
18
-
19
-
20
-
21
-
22
-
23
-
24
-
25
-
26
-
27
-
28
-
29
-
30
-
31
-
32
-
33
-
34
-
35
-
36
-
37
-
38
-
39
-
40
-
41
-
42
-
43
-
44
-
45
-
46
-
47
-
48
-
49
-
50
-
51
-
52
-
53
-
54
-
55
-
56
-
57
-
58
-
59
-
60
-
61
-
62
-
63
-
64
-
65
-
66
-
67
-
68
-
69
-
70
-
71
-
72
-
73
-
74
-
75
-
76
-
 77
77 -
 78
78 -
 79
79 -
 80
80 -
 81
81 -
 82
82 -
 83
83 -
 84
84 -
 85
85 -
 86
86 -
 87
87 -
88
-
89
-
90
-
91
-
92
-
93
-
94
 |
 |
