JVC KW-AV60 Instruction Manual - Page 83
external amplifiers and subwoofer
 |
View all JVC KW-AV60 manuals
Add to My Manuals
Save this manual to your list of manuals |
Page 83 highlights
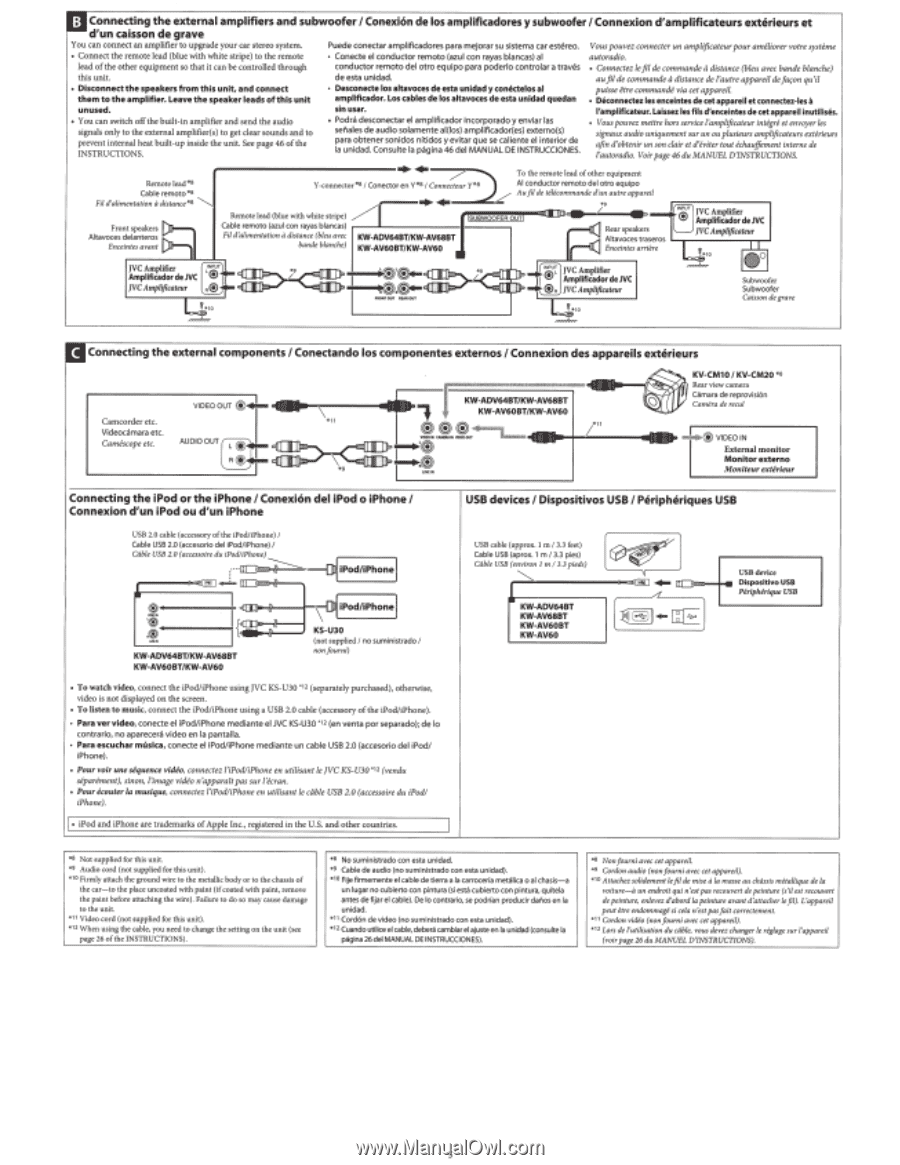
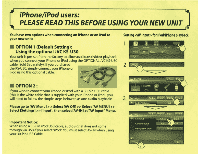
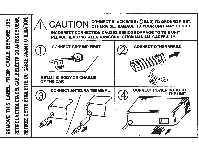
: Connecting the external amplifiers and subwoofer I Conexion de los amplificadores y subwoofer I Connexion d'amplificateurs exterieurs et d'un caisson de grave You can connect an amplifier to upgrade your car stereo system. Puede conectar amplificadores para mejorar su sistema car estereo. Vous pouvez connecter un amplificateur pour amtliorer votre systeme • Connect the remote lead (blue with white stripe) to the remote lead of the other equipment so that it can be controlled through this unit. • Conecte el conductor re mota (azul con raya s bl ancas) al auto radio. a conductor remota del otro equipo para poderlo controlar a tra ves • Connectez lefil de commande distance (bleu avec bande blanche) de esta unidad. au ftl de commande adistance de !'autre appareil de ja(on qu'il • Disconnect the speakers from this unit, and connect them to the amplifier. Leave the speaker leads of this unit unused. • Yo u can switch off the built-in amplifier and send the audio signals only to the external amplifier(s) to get clear sounds and to prevent internal heat built-up inside the unit. See page 46 of the INSTRUCTIONS. • Desconede los altavoces de esta unidad y conktelos al ampliflcador. Los cables de los altavoces de esta unldad quedan sin usar. • Podra desconectar el amplificador incorporado y enviar las seriales de audio solamente al(los) amplificador(es) externo(s) para obtener sonidos nftidos y evitar que se caliente el interior de Ia unidad. Consulte Ia pagina 46 del MANUAL DE INSTRUCCIONES. puisse etre commandi via cet appareil. a • oeconnectez les enceintes de cet appareil et connectez-les l'amplificateur. Laissez les fils d'encelntes de cet appareil inutilises. • Vous pouvez mettre hors service l'amplificateur intigri et envoyer les signaux audio uniquement sur un ou plusieurs amplificateurs extirieurs afin d'obtenir un son clair et d'iviter tout ichauffement interne de l'autoradio. Voir page 46 du MANUEL D'INSTRUCTIONS. Remote lead *8 Y-connector*8/ Conector en Y*8J Connecteur y*8 Cable remoto *8 Fil d'a/imentation adistance*8 "--..J Subwoofer Subwoofer Caisson de grave Camcorder etc. Videoc.:lmara etc. Camiscope etc. Connecting the iPod or the iPhone I Conexion del iPod o iPhone I Connexion d'un iPod ou d'un iPhone USB devices/ Dispositivos USB I Peripheriques USB USB 2.0 cable (accessory of the iPod/iPhone) I Cable USB 2.0 (accesorio del iPodliPhone) I Cable USB 2 0 (access01re du 1Pod!1Phone) ,. ·~--{O,IPod/iPhonel ,.---Oil]E>!~ -- ~~--- ~-----+I ~11---1-c\--1 iPod/iPhonel ··~i l {i:7 KW-ADV648T/KW-AV68BT KS - U 3 0 (not supplied I no sumini strado I nonfourni) KW-AV60BT/KW-AV60 • To watch video, connect the iPod/iPhone using JVC KS-U30 *12 (separately purchased), otherwise, video is not displayed on the screen. • To listen to music, connect the iPodliPhone using a USB 2.0 cable (accessory of the iPod!iPhone). • Para ver video, conecte el iPod/ iPhone mediante el JVC KS·U30 *12 (en venta par separado); de Ia contrario, no apareceril video en Ia pantalla. • Para escuchar mUsica, conecte el iPodl iPhone mediante un cable USB 2.0 (accesor io del iPod/ iPhone). .,2 • Pour voir une sequence video, connectez l'iPod/iPhone en utilisant le JVC KS-U30 (vendu siparement), sinon, l'image video n'apparait pas sur l'ecran. • Pour &outer la musique, connectez I'iPod!iPhone en utilisant le cdble USB 2.0 (accessoire du iPod! iPhone). II · iPod and iPhone are trademarks of Apple Inc., registered in the U.S. and other countries. I USB cable {approx. 1 m I 3.3 feet) Cable USB (aprox. 1 m I 3.3 pies) Cable USB (environ 1m /3.3 pieds) A KW·ADV64BT KW-AV68BT KW· AV60BT KW-AV60 .. m=~-+ USB device Disposltlvo USB Piriphirique USB *8 Not supplied for this unit. •9 Audio cord (not supplied for this unit). •10 Firmly attach the ground wire to the metallic body or to the chassis of the car-to the place uncoated with paint (if coated with paint, remove the paint before attaching the wire). Failure to do so may cause damage to the unit. •11 Video cord (not supplied for this unit). •12 When using the cable, you need to change the setting on the unit (see page 26 of the INSTRUCTIONS). *8 No sumi nistrado con esta unidad . *9 Cable de audio (no sumin istrado con esta unidad}. *10 Fije firmemente el cable de tierra a Ia carroceria metillica o al chasis-a un Iuga r no cu bierto con pintura (siesta cubierto con pintura, quitela antes de fijar el cable}. De lo contra rio, se podrian producir daflos e n Ia unidad. *11 Cord6n de vid eo (no sumini strado con esta unidad). *12 Cuando utilice el cable, debera cambiarel ajuste en Ia unidad (consulte Ia pagina 26 del MANUAL DE INSTRUCCION ES). *S Non fourni avec cet appareil. *9 Cordon audio (non fourni avec cet appareil). *10 Attachezso/idement lefil de mise aIa masse au chclssis metallique de Ia voiture- il un endroit qui n'est pas recouvert de peinture (s'il est recouvert de peinture, enlevez d'abord Ia peinture avan t d'attacher le fil). L'appareil peut etre endommage si cela n'est pas fait correctement. *11 Cordon video (non fourni avec cet appareil). *12 Lors de /'utilisation du cable, vous devez changer le riglage sur l'apparei/ (voi r page 26 du MANUEL D'INSTRUCTIONS).
-
 1
1 -
2
-
3
-
4
-
5
-
6
-
7
-
8
-
9
-
10
-
11
-
12
-
13
-
14
-
15
-
16
-
17
-
18
-
19
-
20
-
21
-
22
-
23
-
24
-
25
-
26
-
27
-
28
-
29
-
30
-
31
-
32
-
33
-
34
-
35
-
36
-
37
-
38
-
39
-
40
-
41
-
42
-
43
-
44
-
45
-
46
-
47
-
48
-
49
-
50
-
51
-
52
-
53
-
54
-
55
-
56
-
57
-
58
-
59
-
60
-
61
-
62
-
63
-
64
-
65
-
66
-
67
-
68
-
69
-
70
-
71
-
72
-
73
-
74
-
75
-
76
-
77
-
 78
78 -
 79
79 -
 80
80 -
 81
81 -
 82
82 -
 83
83 -
 84
84 -
 85
85 -
 86
86 -
 87
87 -
 88
88 -
89
-
90
-
91
-
92
-
93
-
94
 |
 |