JVC KW-Z1000W Quick Start Guide America - Page 24
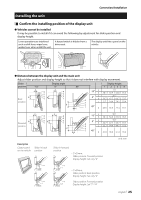
Installation procedure, Connection/Installation, Distance between
 |
View all JVC KW-Z1000W manuals
Add to My Manuals
Save this manual to your list of manuals |
Page 24 highlights
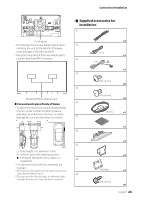
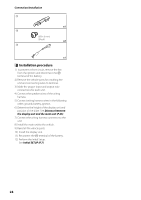
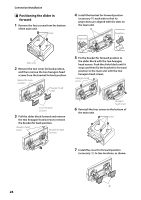
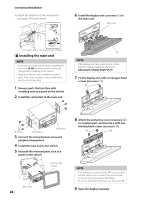
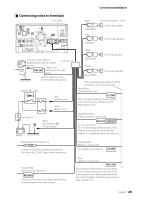
Connection/Installation = x1 ~ (Ø3 x 6 mm) (Black) x2 ! x1 ÑÑInstallation procedure 1) To prevent a short circuit, remove the key from the ignition and disconnect the ¤ terminal of the battery. 2) Remove the vehicle parts for installing the unit and connecting wires to terminal. 3) Make the proper input and output wire connections for each unit. 4) Connect the speaker wires of the wiring harness. 5) Connect wiring harness wires in the following order; ground, battery, ignition. 6) Determine the height of the display unit and position of the slider. See Distance between the display unit and the main unit (P.25). 7) Connect the wiring harness connector to the unit. 8) Install the main unit to the vehicle. 9) Reinstall the vehicle parts. 10) Install the display unit. 11) Reconnect the ¤ terminal of the battery. 12) Perform the Initial Setup. See Initial SETUP (P.7). 24
-
 1
1 -
2
-
3
-
4
-
5
-
6
-
7
-
8
-
9
-
10
-
11
-
12
-
13
-
14
-
15
-
16
-
17
-
18
-
 19
19 -
 20
20 -
 21
21 -
 22
22 -
 23
23 -
 24
24 -
 25
25 -
 26
26 -
 27
27 -
 28
28 -
 29
29 -
30
-
31
-
32
-
33
-
34
-
35
-
36
-
37
-
38
-
39
-
40
-
41
-
42
-
43
-
44
-
45
-
46
-
47
-
48
-
49
-
50
-
51
-
52
-
53
-
54
-
55
-
56
-
57
-
58
-
59
-
60
-
61
-
62
-
63
-
64
-
65
-
66
-
67
-
68
-
69
-
70
-
71
-
72
-
73
-
74
-
75
-
76
-
77
-
78
-
79
-
80
-
81
-
82
-
83
-
84
-
85
-
86
-
87
-
88
-
89
-
90
-
91
-
92
-
93
-
94
-
95
-
96
-
97
-
98
-
99
-
100
-
101
-
102
-
103
-
104
 |
 |
