JVC KW-Z1000W Quick Start Guide America - Page 33
Appendix, Note for specifications
 |
View all JVC KW-Z1000W manuals
Add to My Manuals
Save this manual to your list of manuals |
Page 33 highlights
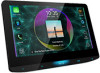
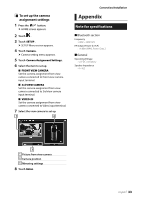
ÑÑTo set up the camera assignment settings 1 Press the [ ]/[ ] button. hhHOME screen appears. 2 Touch [ ]. 3 Touch [SETUP]. hhSETUP Menu screen appears. 4 Touch [Camera]. hhCamera setting menu appears. 5 Touch [Camera Assignment Settings]. 6 Select the item to set up. ■■[FRONT VIEW CAMERA] Set the camera assignment from view camera connected to Front view camera input terminal. ■■[3rd VIEW CAMERA] Set the camera assignment from view camera connected to 3rd view camera input terminal. ■■ [VIDEO-IN] Set the camera assignment from view camera connected to Video input terminal. 7 Select the view camera to set up. 1 2 Connection/Installation Appendix Note for specifications ■■Bluetooth section Frequency : 2.402 - 2.480 GHz RF Output Power (E.I.R.P.) : +4 dBm (MAX), Power Class 2 ■■General Operating Voltage : 12 V DC car battery Speaker Impedance : 4 - 8 Ω 3 1 Picture from view camera 2 Camera position 3 Mirroring settings 8 Touch [Enter]. English 33
-
 1
1 -
2
-
3
-
4
-
5
-
6
-
7
-
8
-
9
-
10
-
11
-
12
-
13
-
14
-
15
-
16
-
17
-
18
-
19
-
20
-
21
-
22
-
23
-
24
-
25
-
26
-
27
-
 28
28 -
 29
29 -
 30
30 -
 31
31 -
 32
32 -
 33
33 -
 34
34 -
 35
35 -
 36
36 -
 37
37 -
 38
38 -
39
-
40
-
41
-
42
-
43
-
44
-
45
-
46
-
47
-
48
-
49
-
50
-
51
-
52
-
53
-
54
-
55
-
56
-
57
-
58
-
59
-
60
-
61
-
62
-
63
-
64
-
65
-
66
-
67
-
68
-
69
-
70
-
71
-
72
-
73
-
74
-
75
-
76
-
77
-
78
-
79
-
80
-
81
-
82
-
83
-
84
-
85
-
86
-
87
-
88
-
89
-
90
-
91
-
92
-
93
-
94
-
95
-
96
-
97
-
98
-
99
-
100
-
101
-
102
-
103
-
104
 |
 |
