JVC LT-42WX70 Instructions - Page 152
Select Menu Language and, 1 Select Place of Installation and press the [OK] button.
 |
View all JVC LT-42WX70 manuals
Add to My Manuals
Save this manual to your list of manuals |
Page 152 highlights
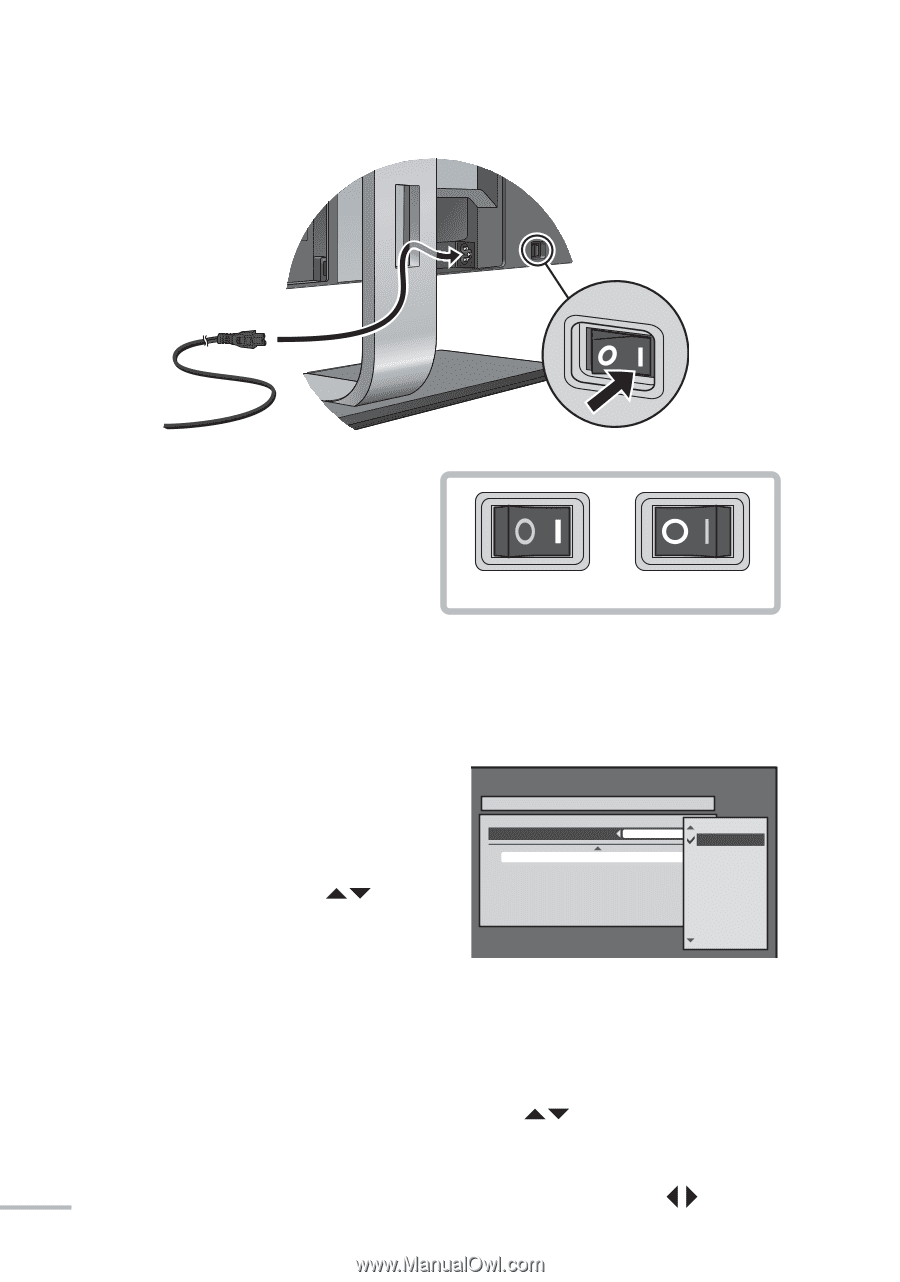
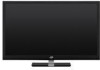
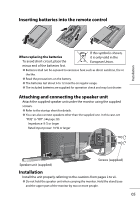
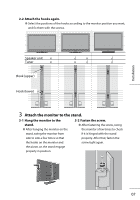
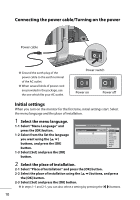
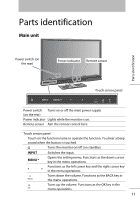
Connecting the power cable/Turning on the power Power cable ● Ground the earth plug of the power cable to the earth terminal of the AC outlet. ● When several kinds of power cord are provided in the package, use the one which fits your AC outlet. Power switch Power on Power off Initial settings When you turn on the monitor for the first time, initial settings start. Select the menu language and the place of installation. 1 Select the menu language. 1-1 Select "Menu Language" and press the [OK] button. 1-2 Select from the list the language you want using the [ ] buttons, and press the [OK] button. 1-3 Select [Set] and press the [OK] button. Interactive Plug-in Menu Menu Language English(EU) Previous 2/4 English(EU) Set English(US) Suomi Français(EU) Français(US) Deutsch Magyar Next 2 Select the place of installation. 2-1 Select "Place of Installation" and press the [OK] button. 2-2 Select the place of installation using the [ ] buttons, and press the [OK] button. 2-3 Select [Set] and press the [OK] button. ● In steps 1-1 and 2-1, you can also select a setting by pressing the [ ] buttons. 10
-
 1
1 -
2
-
3
-
4
-
5
-
6
-
7
-
8
-
9
-
10
-
11
-
12
-
13
-
14
-
15
-
16
-
17
-
18
-
19
-
20
-
21
-
22
-
23
-
24
-
25
-
26
-
27
-
28
-
29
-
30
-
31
-
32
-
33
-
34
-
35
-
36
-
37
-
38
-
39
-
40
-
41
-
42
-
43
-
44
-
45
-
46
-
47
-
48
-
49
-
50
-
51
-
52
-
53
-
54
-
55
-
56
-
57
-
58
-
59
-
60
-
61
-
62
-
63
-
64
-
65
-
66
-
67
-
68
-
69
-
70
-
71
-
72
-
73
-
74
-
75
-
76
-
77
-
78
-
79
-
80
-
81
-
82
-
83
-
84
-
85
-
86
-
87
-
88
-
89
-
90
-
91
-
92
-
93
-
94
-
95
-
96
-
97
-
98
-
99
-
100
-
101
-
102
-
103
-
104
-
105
-
106
-
107
-
108
-
109
-
110
-
111
-
112
-
113
-
114
-
115
-
116
-
117
-
118
-
119
-
120
-
121
-
122
-
123
-
124
-
125
-
126
-
127
-
128
-
129
-
130
-
131
-
132
-
133
-
134
-
135
-
136
-
137
-
138
-
139
-
140
-
141
-
142
-
143
-
144
-
145
-
146
-
 147
147 -
 148
148 -
 149
149 -
 150
150 -
 151
151 -
 152
152 -
 153
153 -
 154
154 -
 155
155 -
 156
156 -
 157
157 -
158
-
159
-
160
-
161
-
162
-
163
-
164
-
165
-
166
-
167
-
168
-
169
-
170
-
171
-
172
-
173
-
174
-
175
-
176
-
177
-
178
-
179
-
180
-
181
-
182
-
183
-
184
-
185
-
186
-
187
-
188
-
189
-
190
-
191
-
192
-
193
-
194
-
195
-
196
-
197
-
198
-
199
-
200
-
201
-
202
-
203
-
204
 |
 |