JVC LT-42WX70 Instructions - Page 155
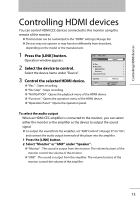
To select the audio output, Press the [LINK] button., Select Monitor or AMP under Speaker.
 |
View all JVC LT-42WX70 manuals
Add to My Manuals
Save this manual to your list of manuals |
Page 155 highlights
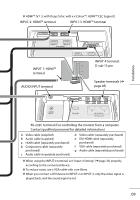
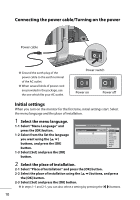
Controlling HDMI devices Controlling HDMI devices You can control HDMI CEC devices connected to this monitor using the remote of the monitor. ● This function can be customized in the "HDMI" settings (➔ page 36). ● Devices may not operate or may function differently from described, depending on the model or the manufacturer. 1 Press the [LINK] button. Operation window appears. 2 Select the device to control. Select the device name under "Device". Link >Recorder Device Rec. Rec.Stop NAVIGATION Function Operation Panel 3 Speaker Control the selected HDMI device. Exit ● "Rec." : Starts recording. ● "Rec.Stop" : Stops recording. ● "NAVIGATION" : Opens the playback menu of the HDMI device. ● "Function" : Opens the operation menu of the HDMI device. ● "Operation Panel" : Opens the operation panel. Input-1 Monitor Operate Select To select the audio output When an HDMI CEC amplifier is connected to the monitor, you can select either the monitor or the amplifier as the device to output the sound signal. ● To output the sound from the amplifier, set "AMP Control" (➔ page 37) to "On", and connect the audio output terminals of the player into the amplifier. 1 Press the [LINK] button. 2 Select "Monitor" or "AMP" under "Speaker". ● "Monitor" : The sound is output from the monitor. The volume buttons of the monitor control the volume of the monitor. ● "AMP" : The sound is output from the amplifier. The volume buttons of the monitor control the volume of the amplifier. 13
-
 1
1 -
2
-
3
-
4
-
5
-
6
-
7
-
8
-
9
-
10
-
11
-
12
-
13
-
14
-
15
-
16
-
17
-
18
-
19
-
20
-
21
-
22
-
23
-
24
-
25
-
26
-
27
-
28
-
29
-
30
-
31
-
32
-
33
-
34
-
35
-
36
-
37
-
38
-
39
-
40
-
41
-
42
-
43
-
44
-
45
-
46
-
47
-
48
-
49
-
50
-
51
-
52
-
53
-
54
-
55
-
56
-
57
-
58
-
59
-
60
-
61
-
62
-
63
-
64
-
65
-
66
-
67
-
68
-
69
-
70
-
71
-
72
-
73
-
74
-
75
-
76
-
77
-
78
-
79
-
80
-
81
-
82
-
83
-
84
-
85
-
86
-
87
-
88
-
89
-
90
-
91
-
92
-
93
-
94
-
95
-
96
-
97
-
98
-
99
-
100
-
101
-
102
-
103
-
104
-
105
-
106
-
107
-
108
-
109
-
110
-
111
-
112
-
113
-
114
-
115
-
116
-
117
-
118
-
119
-
120
-
121
-
122
-
123
-
124
-
125
-
126
-
127
-
128
-
129
-
130
-
131
-
132
-
133
-
134
-
135
-
136
-
137
-
138
-
139
-
140
-
141
-
142
-
143
-
144
-
145
-
146
-
147
-
148
-
149
-
 150
150 -
 151
151 -
 152
152 -
 153
153 -
 154
154 -
 155
155 -
 156
156 -
 157
157 -
 158
158 -
 159
159 -
 160
160 -
161
-
162
-
163
-
164
-
165
-
166
-
167
-
168
-
169
-
170
-
171
-
172
-
173
-
174
-
175
-
176
-
177
-
178
-
179
-
180
-
181
-
182
-
183
-
184
-
185
-
186
-
187
-
188
-
189
-
190
-
191
-
192
-
193
-
194
-
195
-
196
-
197
-
198
-
199
-
200
-
201
-
202
-
203
-
204
 |
 |