JVC SR-V101US Instruction Manual
JVC SR-V101US - S-vhs Videocassette Recorder Manual
 |
View all JVC SR-V101US manuals
Add to My Manuals
Save this manual to your list of manuals |
JVC SR-V101US manual content summary:
- JVC SR-V101US | Instruction Manual - Page 1
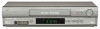
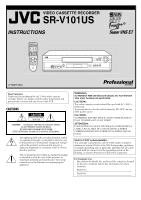
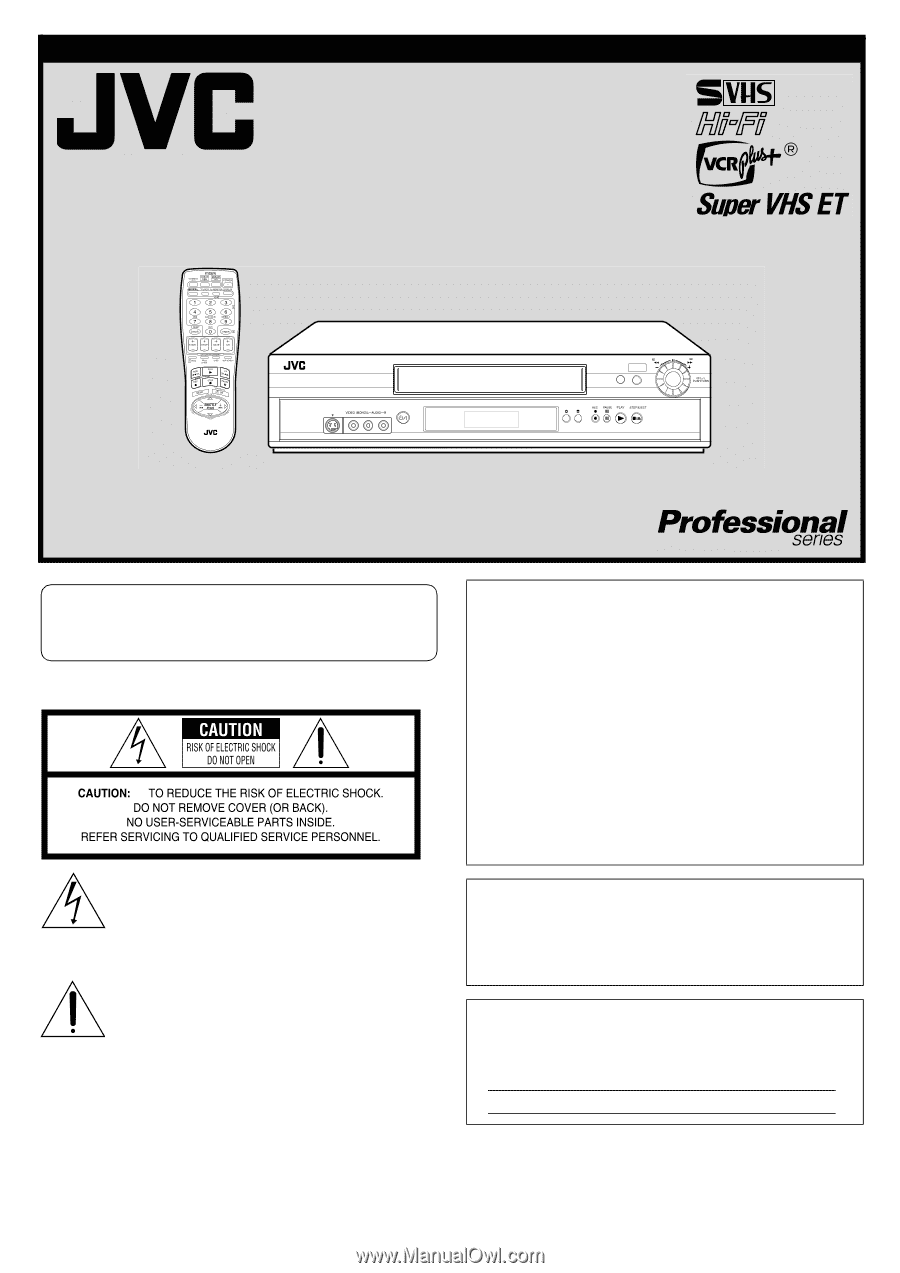
CASSETTE RECORDER SR-V101US INSTRUCTIONS S-VIDEO POWER REW FF 24HR QUICK REC LINK PROGRAM INSERT A.DUB LPT0887-001A Dear Customer, Thank you for purchasing the JVC S-VHS video cassette recorder. Before use, please read the safety information and precautions to ensure safe use of your new VCR - JVC SR-V101US | Instruction Manual - Page 2
TV technician for help. Declaration of Conformity Model Number: SR-V101US Trade Name: JVC Responsible Party: JVC Americas Corp. Address: 1700 Valley Road Wayne, N.J. 07470 Telephone Number: 973-317-5000 This device complies with Part 15 of FCC Rules. Operation is subject to the following - JVC SR-V101US | Instruction Manual - Page 3
be recorded on regular VHS cassettes*, both VHS and Super VHS signals can be recorded and played back using Super VHS cassettes. * By using the S-VHS ET function, it is possible to record and play back with S-VHS picture quality on VHS cassettes with this VCR. ATTENTION: To mobile phone user: Using - JVC SR-V101US | Instruction Manual - Page 4
20 Multi-Brand Remote Control 21 TV Brand Setting 21 Cable Box or DBS Receiver Brand Setting 21 Changing Remote Control Code 22 Editing 22 Editing with Another VCR 22 Audio Dubbing 23 Insert Editing and AV Dubbing 24 Specifications 25 Index 26 List of Terms 26 Troubleshooting 27 -4- - JVC SR-V101US | Instruction Manual - Page 5
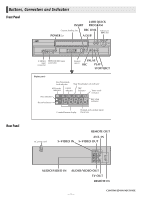
Stop Time/Mode Lock indicator VCR mode indicator S-VHS indicator TBC indicator Timer mode indicator Play indicator Record indicator REC LINK indicator Counter/Remain display Channel and auxiliary input/ Clock time Rear Panel AC power cord REMOTE OUT -5- REMOTE IN CONTINUED ON NEXT PAGE - JVC SR-V101US | Instruction Manual - Page 6
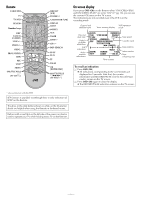
display If you press OSD (OK) on the Remote when "ON SCREEN (REC) and ON SCREEN (PLAY)" are set to "ON" (੬ pg. 18), you can see the current VCR status on the TV screen. The indications are not recorded even if the VCR is in the recording mode. Channel and auxiliary input Timer warning display - JVC SR-V101US | Instruction Manual - Page 7
Specifications" (੬ pg. 25). B Situate VCR Place the VCR on a stable, horizontal surface. C Connect VCR "Manual Clock recording. ● If you connect the TV and the VCR only using the RF connection, press TV/VCR on the Remote so that the VCR mode indicator ( ) lights on the display panel. NOTES: ● The VCR - JVC SR-V101US | Instruction Manual - Page 8
(MENU) TO END INITIAL SET CLOCK SET GUIDE CHANNEL SET SELECT WITH ( , ) AND ON CLOCK SET Press OK or SHUTTLE PLUS e on the Remote repeatedly to move the highlight bar to "AUTO CLOCK", then VCR's clock at the start and end of Daylight Saving Time.) Be sure to select the correct time zone manually - JVC SR-V101US | Instruction Manual - Page 9
and TV, and select the VCR channel (or AV mode). Number keys Setting channels manually - Manual Channel Set You can add the channels you want or delete the channels you do not want manually. A Access Main Menu screen, then Tuner Set screen Press MENU on the Remote. Press SHUTTLE PLUS rt to move the - JVC SR-V101US | Instruction Manual - Page 10
back a tape recorded in S-VHS mode or in S-VHS ET mode (੬ pg. 13). ● If "VIDEO CALIBRATION" is set to "ON" (੬ pg. 18), "VIDEO CALIBRATION" appears on the screen, and this VCR checks the tape condition during automatic tracking. During playback Stop playback Press STOP (8) on the Remote. OR Press - JVC SR-V101US | Instruction Manual - Page 11
below. On the Remote A Press SP/EP during playback to activate manual tracking. B recorded and you want to watch the third one, press REVIEW three times. ● The Instant Review function will also operate if the VCR is turned on. Skipping unwanted portions - Skip Search Press SKIP SEARCH on the Remote - JVC SR-V101US | Instruction Manual - Page 12
SEP mode, playback the tape with this deck. ● You can select tape speed in the stop mode or during recording pause mode. D Start recording On the VCR, press REC (7). Or on the Remote, while holding REC (7), press PLAY (4). NOTE: If "VIDEO CALIBRATION" is set to "ON" (੬ pg. 18) (default setting), the - JVC SR-V101US | Instruction Manual - Page 13
back a tape that has been recorded in S-VHS or S-VHS ET, the S-VHS indicator lights up on the display panel regardless of the "S-VHS ET" (੬ pg. 19) or "S-VHS MODE" (੬ pg. 19) setting. Series Playback and Recording Series Playback SR-V101US-1 To REMOTE OUT To REMOTE IN To S VIDEO OUT S-Video - JVC SR-V101US | Instruction Manual - Page 14
LINK PROGRAM INSERT A.DUB Using two sets (or more) of SR-V101US, a long recording will be possible (such as camcorder recording, another VCR playback or TV broadcast). Use the buttons and controls on the VCR's front panel for the Series Recording operations (except when using Mode Lock). - 14 - - JVC SR-V101US | Instruction Manual - Page 15
A/V input mode. Refer to the TV instruction manual. C Set recording VCR's input mode Set to "AUX". Press record onto another cassette. To stop recording Press STOP/EJECT (0) on the SR-V101US which is recording. To prohibit operations during Series Recording (Mode Lock) Press and hold OK on the Remote - JVC SR-V101US | Instruction Manual - Page 16
record safety tab intact. If not, set "REC SAFETY" to "OFF" (੬ pg. 19). The VCR turns on, and the counter is reset, automatically. A Press PROG. on the Remote TIME, SP/EP) PRESS (PROG.) TO END ● If the Guide Channel Set screen appears after pressing OK, press the Number keys, CH+/- or SHUTTLE PLUS - JVC SR-V101US | Instruction Manual - Page 17
VCR into timer recording standby mode. To clear the display, press CANCEL on the Remote. Checking tape position When you change the VCR operation mode from the stop mode to fast forward or rewind mode, or when you perform an B Index Search (੬ pg. 11) or Instant Review PICTURE CONTROL AUTO TIMER - JVC SR-V101US | Instruction Manual - Page 18
or tapes recorded on other VCRs, set this function either "ON" or "OFF" whichever gives you the best picture. Ⅵ PICTURE CONTROL - AUTO tape speed manually during timer programing. ● In order to ensure that the recording fits on the tape, this function may leave a slight non-recorded portion at the - JVC SR-V101US | Instruction Manual - Page 19
mode manually. Ⅵ S-VHS ET - ON/OFF When this function is set to "ON", you can record on VHS cassettes with S-VHS picture quality. Tapes recorded using this function can be played back on most S-VHS VCRs or VHS VCRs equipped with the S-VHS ET function or VHS VCR equipped with the SQPB (S-VHS QUASI - JVC SR-V101US | Instruction Manual - Page 20
INSERT A.DUB While the VCR is turned on, press and hold POWER 1 on the Remote for more than 10 seconds. The VCR turns off, "CL" INPUT".) B Set timer program on DBS receiver referring to its instruction manual. C Load a cassette with the record safety tab intact. D Press SP/EP to set the tape - JVC SR-V101US | Instruction Manual - Page 21
Remote Control This Remote can control some functions of remote controllable TVs, cable boxes or DBS (Direct Broadcast Satellite) receivers listed below. Without setting, you can control a JVC down TV, press one of the following buttons: POWER 1, TV/VCR, TV CH+/-, ^ (TV Muting), TV VOL+/-, and the - JVC SR-V101US | Instruction Manual - Page 22
the remote control code for the Remote, DO NOT perform steps B and C. Editing Editing with Another VCR You can use your VCR as the playback or recording VCR. You can use a camcorder as the playback VCR and your VCR as the recording VCR. Refer also to the other components' instruction manuals for - JVC SR-V101US | Instruction Manual - Page 23
. ● On this VCR, set "PICTURE CONTROL" to "EDIT" (੬ pg. 18). F Start playback Press PLAY (4) on the playback VCR. G Start recording Press REC (7) on the recording VCR. Various connection for editing tapes The following three methods can be used for editing tapes. ● VHS to S-VHS editing (VIDEO-VIDEO - JVC SR-V101US | Instruction Manual - Page 24
enters the Play mode. To stop editing any time during recording Press STOP (8) on the Remote or STOP/EJECT (0) on the VCR, then engage the Stop mode of the other component. NOTES: ● Be sure to select "AUTO" for "PICTURE CONTROL" (or "NORM" when "VIDEO CALIBRATION" is set to "OFF") after you finish - JVC SR-V101US | Instruction Manual - Page 25
differ. : Infrared remote control unit, "AA" battery x 2, S-video cable (4-pin), RF cable (F-type) Audio/Video cable BNC/RCA adapter x 2 Specifications shown are for SP mode unless specified otherwise. ● E. & O.E. Design and specifications subject to change without notice. Don't service the product - JVC SR-V101US | Instruction Manual - Page 26
12 Repeat Play 11 Repeat Recording 12 RF Connection 7 S Second Audio Recording 12 Semiauto Clock Set 8 Skip Search 11 S-VHS (Super VHS), S-VHS ET or VHS Recording Mode 13 S-VHS ET 19 S-VHS MODE 19 S-video Connection 7 T To control two VCRs with the same Remote 22 To recall an indication - JVC SR-V101US | Instruction Manual - Page 27
Troubleshooting Before requesting service, use this chart and see if you can repair the trouble yourself. Small problems are often easily corrected, and this can save you from the trouble of sending your VCR off for repair. Power SYMPTOM The power will not come on. POSSIBLE CAUSE ● The AC power - JVC SR-V101US | Instruction Manual - Page 28
COPYRIGHT © 2004 VICTOR COMPANY OF JAPAN, LTD. Printed in China 0104 ASR-PR-BJ SR-V101US
-
 1
1 -
 2
2 -
 3
3 -
 4
4 -
 5
5 -
 6
6 -
 7
7 -
8
-
9
-
10
-
11
-
12
-
13
-
14
-
15
-
16
-
17
-
18
-
19
-
20
-
21
-
22
-
23
-
24
-
25
-
26
-
27
-
28
 |
 |
VIDEO CASSETTE RECORDER
SR-V101US
INSTRUCTIONS
LPT0887-001A
REW
FF
REC LINK
24HR QUICK
PROGRAM
S-VIDEO
POWER
INSERT
A.DUB
CAUTIONS
Dear Customer,
Thank you for purchasing the JVC S-VHS video cassette
recorder. Before use, please read the safety information and
precautions to ensure safe use of your new VCR.
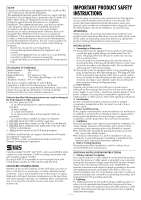
The lightning flash with arrowhead symbol, within
an equilateral triangle, is intended to alert the user
to the presence of uninsulated “dangerous voltage”
within the product’s enclosure that may be of
sufficient magnitude to constitute a risk of electric
shock to persons.
The exclamation point within an equilateral triangle
is intended to alert the user to the presence of
important operating and maintenance (servicing)
instructions in the literature accompanying the
appliance.
WARNING:
TO PREVENT FIRE OR SHOCK HAZARD, DO NOT EXPOSE
THIS UNIT TO RAIN OR MOISTURE.
CAUTION:
This video cassette recorder should be used with AC 120V
d
,
60Hz only.
To prevent electric shocks and fire hazards, DO NOT use any
other power source.
CAUTION:
TO PREVENT ELECTRIC SHOCK, MATCH WIDE BLADE OF
PLUG TO WIDE SLOT, FULLY INSERT.
ATTENTION:
POUR ÉVITER LES CHOCS ÉLECTRIQUES, INTRODUIRE LA
LAME LA PLUS LARGE DE LA FICHE DANS LA BORNE
CORRESPONDANTE DE LA PRISE ET POUSSER JUSQU’AU
FOND.
Note to CATV system installer:
This reminder is provided to call the CATV system installer’s
attention to Article 820-40 of the NEC that provides guidelines
for proper grounding and, in particular, specifies that the cable
ground shall be connected to the grounding system of the
building, as close to the point of cable entry as practical.
For Customer Use:
Enter below the Model No. and Serial No. which are located
on the rear of cabinet. Retain this information for future
reference.
Model No.
Serial No.