JVC TK-C215VP12U Instructions - Page 23
Mounting the camera unit, Fill the hole with sealing material, Mounting the camera unit to the base
 |
UPC - 046838027482
View all JVC TK-C215VP12U manuals
Add to My Manuals
Save this manual to your list of manuals |
Page 23 highlights
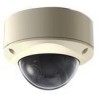
Mounting the camera unit Fill the piping hole and mounting hole with a sealing material, mount the camera unit to the base, and insert the silica gel. 1. Fill the hole with sealing material Fill the piping hole as well as the 2 mounting holes mounted with screws using a sealing material. 2. Mounting the camera unit to the base Press the 2 clips until a "click" sound is heard. Note: ● Mount such that the cables and fall prevention wire of the dome cover are not clamped. 3. Fastening the 2 fastening screws of the camera unit Tighten the 2 fastening screws of the camera unit using a screwdriver to fasten the camera. Sealing Material 2 Clip (x 2) Memo: ● Use GE silicon or its equivalents as the sealing material. Note: ● If the piping hole and the 2 mounting holes mounted with screws are not filled with sealing material completely, water or vapor may enter the holes causing the lens and dome cover to fog. Make sure that these holes are completely filled. 3 *TK-C215VP4U/E is used in the above illustration 23
-
 1
1 -
2
-
3
-
4
-
5
-
6
-
7
-
8
-
9
-
10
-
11
-
12
-
13
-
14
-
15
-
16
-
17
-
 18
18 -
 19
19 -
 20
20 -
 21
21 -
 22
22 -
 23
23 -
 24
24 -
 25
25 -
 26
26 -
 27
27 -
 28
28 -
29
-
30
-
31
-
32
-
33
-
34
-
35
-
36
-
37
-
38
-
39
-
40
 |
 |
