Kenwood DRV-A700W Operation Manual - Page 14
Parts Name and Functions
 |
View all Kenwood DRV-A700W manuals
Add to My Manuals
Save this manual to your list of manuals |
Page 14 highlights
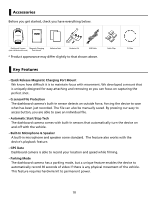
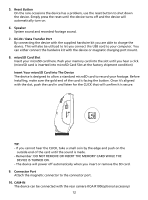
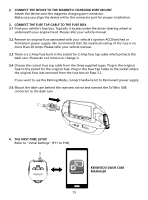
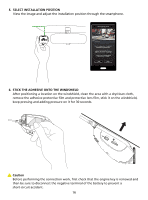
Parts Name and Functions 1 23 4 5 7 6 8 9 10 1. File Protect / Wireless Link Button File Protect Simply press the button to protect the current video file from overwriting. Note: - If the button is pressed within the first third of a video clip, the previous clip will also be protected. - If the button is pressed within the final third of a video clip, the next clip will also be protected (if recording continues). Wireless Link Press and hold the Wireless Link button on the device for 3 seconds to enter the Pairing mode. Wireless Pairing / Connected / Disconnected: Wireless Link Pairing chimes/sound (continuous tingling) Wireless Link Connected chimes / sound (tingling) Wireless Link Disconnected chimes / sound (reverse tingling) 2. Power / Screen Shot Button Power Press and hold the button for 3 seconds to turn the device on / off. Screen Shot While you are recording in video mode, press the button and you will be able to take a screenshot of the current frame. 3. OK Button Press to start or stop recording. Start / Stop recording: 1. Start recording (Long beep) 2. Stop recording (Short beep) 4. Status LED Indicator Red: Power On, Red (Flashing): Recording, Blue: Charging 11
-
 1
1 -
2
-
3
-
4
-
5
-
6
-
7
-
8
-
 9
9 -
 10
10 -
 11
11 -
 12
12 -
 13
13 -
 14
14 -
 15
15 -
 16
16 -
 17
17 -
 18
18 -
 19
19 -
20
-
21
-
22
-
23
-
24
-
25
-
26
-
27
-
28
-
29
-
30
-
31
-
32
-
33
-
34
-
35
-
36
-
37
-
38
-
39
-
40
-
41
-
42
-
43
-
44
-
45
-
46
-
47
-
48
-
49
-
50
-
51
-
52
-
53
 |
 |
