Kenwood DVT-6300-H Instruction Manual - Page 24
Let's put out some sound
 |
UPC - 019048155719
View all Kenwood DVT-6300-H manuals
Add to My Manuals
Save this manual to your list of manuals |
Page 24 highlights
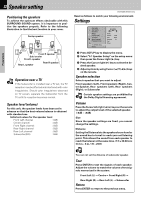
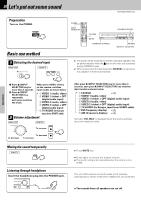
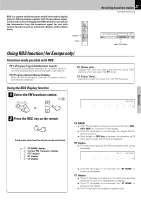
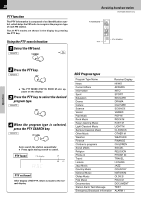
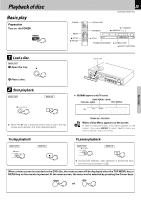
24 Let's put out some sound Preparation Turn on the POWER. Basic use method 1Selecting the desired input MAIN UNIT REMOTE DVR-6300 (EN/K,P,E,X) POWER INPUT SELECTOR VOLUME MUTE POWER/ON STANDBY VOLUME CONTROL PHONES 3/[INPUT SELECTOR] ÷ The power will be switched on and the respective operation will be performed also when the 0 key on the main unit is pressed during STANDBY mode. ÷ When a disc is set in the disc tray and the CD/DVD key is pressed, disc playback will start automatically. Operations 1 Press ‰/[INPUT When press VIDEO 1/2 key SELECTOR] key for on the remote, switches more than 3 seconds. input modes as shown below. 2 Press ‰/[INPUT SELECTOR] key repeatedly. each press switches the mode. 1 VIDEO 1 (audio, video) 2 VIDEO 1 (video) + OPT (digital audio input) 3 VIDEO 2 (audio, video) 4 VIDEO 2 (video) + OPT (digital audio input) 5 TV-AUDIO (for Europe, input from SCART cable) 2Volume adjustment MAIN UNIT REMOTE To increase To decrease To decrease To increase Muting the sound temporarily REMOTE Listening through headphone Insert the headphone plug into the PHONES jack. After press ‰/[INPUT SELECTOR] key for more than 3 seconds, each press ‰/[INPUT SELECTOR] key switches input modes as shown below. 1 CD/DVD ª 2 VIDEO 1 (audio, video) 3 VIDEO 1 (video) + OPT (digital audio input) 4 VIDEO 2 (audio, video) 5 VIDEO 2 (video) + OPT (digital audio input) 6 TV-AUDIO (for Europe, input from SCART cable) 7 FM (frequency display) ∞ 8 AM (frequency display) ∞ Normally "VOL MAX" is displayed when the volume settings set to the maximum value. ÷ Press MUTE key. ÷ Press again to resume the original volume. ÷ The sound muting is also cancelled when the volume is con- trolled. This unit offers various surround modes, but it switches automatically to stereo mode when headphones are connected. ÷ The sounds from all speakers are cut off.
-
 1
1 -
2
-
3
-
4
-
5
-
6
-
7
-
8
-
9
-
10
-
11
-
12
-
13
-
14
-
15
-
16
-
17
-
18
-
 19
19 -
 20
20 -
 21
21 -
 22
22 -
 23
23 -
 24
24 -
 25
25 -
 26
26 -
 27
27 -
 28
28 -
 29
29 -
30
-
31
-
32
-
33
-
34
-
35
-
36
-
37
-
38
-
39
-
40
-
41
-
42
-
43
-
44
-
45
-
46
-
47
-
48
 |
 |
