Kenwood VR-510 User Manual
Kenwood VR-510 Manual
 |
View all Kenwood VR-510 manuals
Add to My Manuals
Save this manual to your list of manuals |
Kenwood VR-510 manual content summary:
- Kenwood VR-510 | User Manual - Page 1
Preparation AUDIO VIDEO SURROUND RECEIVER VR-510 INSTRUCTION MANUAL KENWOOD CORPORATION About the supplied remote control Compared to standard remote controls, the remote control supplied with this receiver has several operation modes. These modes enable the remote control to control other audio/ - Kenwood VR-510 | User Manual - Page 2
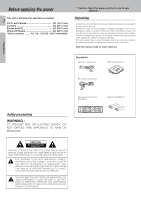
without delay. Only the consignee (the person or company receiving the unit) can file a claim against the carrier or ship the unit in the future. Keep this manual handy for future reference. Accessories FM indoor antenna (1) AM SERVICING) INSTRUCTIONS IN THE LITERATURE ACCOMPANYING THE APPLIANCE. - Kenwood VR-510 | User Manual - Page 3
modifications are expressly approved in the instruction manual. The user could lose the as practical. As an ENERGY STAR® Partner, Kenwood Corporation has determined that this product meets the ENERGY 16 Connecting the RF antenna, external IR Receiver and external IR Repeater 17 Connecting to the - Kenwood VR-510 | User Manual - Page 4
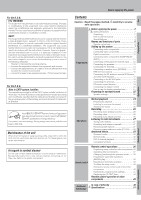
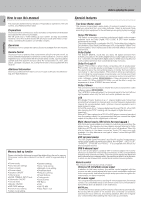
How to use this manual 4 This manual is divided into four sections: Preparations, Operations, Remote Control, and Additional Information. Preparations Shows you how to connect your audio and video components to the receiver and prepare the surround processor. We will guide you to make setting - Kenwood VR-510 | User Manual - Page 5
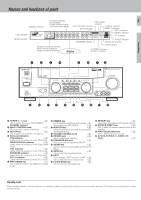
indicators Output channel indicators Display DSP indicator 3 STEREO indicator STEREO indicator STANDBY POWER ON/STANDBY PHONES AUDIO-VIDEO SURROUND RECEIVER VR-510 A SPEAKERS B MULTI CONTROL DOLBY DTS DIGITAL THX DSP MODE SET UP INPUT MODE DIMMER MONITOR SOUND LISTEN MODE SOURCE - Kenwood VR-510 | User Manual - Page 6
CH. VOL. CH. VOL. DIMMER SOUND TITLE/GUIDE MUTE BASS BOOST LISTEN M. TUNING SUB W. THX different on the receiver and on the remote control, the name of the remote control key in the manual is indicated in parentheses If you connect audio components from KENWOOD and other makers to the MD - Kenwood VR-510 | User Manual - Page 7
related system components, be sure to also refer to the instruction manuals supplied with the components you are connecting. Do not connect input to the analog mode. After completing connections and turning on the receiver, follow the steps below. INPUT SELECTOR INPUT MODE 1 Use the INPUT - Kenwood VR-510 | User Manual - Page 8
Graphic equalizer § OUT Cassette deck or MD recorder IN OUT CD player OUT Moving Coil (MC) cartridge record player cannot be used directly from the receiver unit. It can only be used when another equalizer amplifier is connected Record player When you connect the unit and the CD or MD player - Kenwood VR-510 | User Manual - Page 9
Preparations Connecting video components S-VIDEO S Video jacks PLAY IN REC OUT PLAY IN PLAY IN PLAY IN MONITOR OUT DVD VIDEO 1 VIDEO 1 VIDEO 2 VIDEO 3 R L L R S VIDEO PLAY IN REC OUT PLAY IN PLAY IN PLAY IN MONITOR OUT DVD VIDEO 1 VIDEO 1 VIDEO 2 VIDEO 3 B R L A R L C - Kenwood VR-510 | User Manual - Page 10
To connect an LD player with a DIGITAL RF OUT, connect the LD player to the KENWOOD RF digital demodulator (DEM-9991D). Next, connect the DIGITAL OUT jacks of the demodulator to the DIGITAL IN jacks of the receiver. Connect the video signal and analog audio signals to the VIDEO 2 or VIDEO 3 jacks - Kenwood VR-510 | User Manual - Page 11
Connecting video components (COMPONENT VIDEO) If you have connected the receiver to a video component with COMPONENT jacks, you can get a better picture quality than by connecting to the S-VIDEO jacks. Setting up the system 11 Preparations - Kenwood VR-510 | User Manual - Page 12
Connecting a DVD player (6-channel input) 12 If you have connected a DVD player to the receiver with digital connection, be sure to read the "Input mode settings" section carefully. 7 Setting up the system Preparations R L L R S VIDEO PLAY IN REC OUT PLAY IN - Kenwood VR-510 | User Manual - Page 13
Connecting the speakers Front Speakers A Right Left Center Speaker FRONT SPEAKERS CENTER SPEAKERS RED BLUE GREEN Setting up the system 13 Preparations R L L R S VIDEO PLAY IN REC OUT PLAY IN PLAY IN PLAY IN MONITOR OUT DVD VIDEO 1 VIDEO 1 VIDEO 2 VIDEO 3 B R L A R L C - Kenwood VR-510 | User Manual - Page 14
. Be sure to connect the speakers correctly. Speaker impedance After confirming the speaker impedance indications printed on the rear panel of the receiver, connect speakers with matching impedance ratings. Using speakers with a rated impedance other than that indicated on the rear panel of the - Kenwood VR-510 | User Manual - Page 15
1 VIDEO 1 VIDEO 2 VIDEO 3 B R L A R L C R L VIDEO ROOM B OUT FRONT SURROUND SUB WOOFER CENTER PRE OUT / ROOM B Front speakers Power amplifier L R Monitor TV ROOM A (Main System) ROOM B IR RECEIVER - Kenwood VR-510 | User Manual - Page 16
PRE OUT connections 16 This receiver has additional preout jacks. These can be used for various purposes, but will need to be connected to an external power amplifier as shown in - Kenwood VR-510 | User Manual - Page 17
. In addition, you can enjoy a wider remote control signal range by placing the RF antenna and IR receiver away from the receiver. KENWOOD components (except DVD player) : System control ) Other components: (Registering setup codes) IR REPEATER fl Setting up the system 17 Preparations IR REPEATER - Kenwood VR-510 | User Manual - Page 18
system Connecting the antennas AM loop antenna The supplied loop antenna is for use indoors. Place it as far as possible from the receiver, TV set, speaker cords and power cord, and adjust the direction for best reception. AM antenna terminal connections 1 Push lever. 2 Insert cord. 3 Release - Kenwood VR-510 | User Manual - Page 19
function in addition to the IR remote function. The VR-510 can receive the remote control commands even when they are installed in a position where the IR remote signal can hardly access, for example inside a cabinet. The receiver is not equipped with the RF remote bi-directional communication - Kenwood VR-510 | User Manual - Page 20
[SL16] [SL16] [XS] [XS8] [XR] [SL16] [XS] [XS8] Receiver Cassette deck or MD recorder CD player SYSTEM CONTROL cord [XS] Record player • In not connect system control cords to any components other than those specified by KENWOOD. It may cause a malfunction and damage your equipment. 3. Be sure - Kenwood VR-510 | User Manual - Page 21
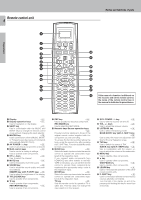
to the receiver. For equipment other than the receiver, an IR (Infrared) signal is sent. The remote control supplied with this receiver is also capable MOVIE TV SYS. POWER CH. VOL. CH. VOL. DIMMER SOUND TITLE/GUIDE MUTE BASS BOOST LISTEN M. TUNING SUB W. THX MENU RETURN /PAGE BAND - Kenwood VR-510 | User Manual - Page 22
OFF. If you have selected "NML" as the front speakers setting, 1 NML/THX : Center speaker setting mode to the receiver is ON. 2 OFF : Center speaker setting mode to the receiver is OFF. 7 Press the SET UP or display operation 2 [Next] key to accept the setting. • The surround speaker setting - Kenwood VR-510 | User Manual - Page 23
selects are OFF, the speaker level settings are reset. 2 Press the SET UP or display operation 2 [Next] key. • The test tone is turned off. The receiver enters the mode for inputing the bass peak level and the current peak level will be shown. • To obtain accurate output levels, it is recommended - Kenwood VR-510 | User Manual - Page 24
automatically. • When you use the PRE OUT jacks, set only SPEAKERS A to ON mode. Turning on the receiver 1 Turn on the power to the related components. 2 Turn on the power to this receiver by pressing POWER ( ) or SYS. POWER ( ) key. MUSIC MOVIE VOL. 1 Use the INPUT SELECTOR knob, MUSIC key - Kenwood VR-510 | User Manual - Page 25
boost) (Remote control only) You can adjust the sound quality when the receiver is in the PCM stereo and analog stereo modes. Press the F.SHIFT frequency emphasis setting. • This key does not function when the receiver is in the sound quality or ambience effects adjustment mode. Switching back - Kenwood VR-510 | User Manual - Page 26
manual of the double cassette deck. MONITOR function (analog sources only) You can connect a cassette deck or graphic equalizer to the MONITOR jacks of the receiver the justrecorded signal. For more information, refer to the instruction manual of the connected component. Recording video 1 Use the - Kenwood VR-510 | User Manual - Page 27
, set to "AUTO" (auto tuning). If the radio waves are weak and there is a lot of interference, switch to manual tuning. (With manual tuning, stereo broadcasts will be received in monaural.) 4 Use the MULTI CONTROL knob or TUNING 2/ 3 keys to select the station. Frequency display "ST." lights up - Kenwood VR-510 | User Manual - Page 28
to select the tuner as the source. 2 Use the 4/¢ keys to select the desired station. • Each time you press the key, another preset station is received in order. Pressing the ¢ key does the following: = 01=02=03= ...= ... 38=39=40 Pressing the 4 key does the following: 01+02+03+ ...+ ... 38+39 - Kenwood VR-510 | User Manual - Page 29
logic design, a matrix surround decoding and the decoding of stereo, full bandwidth surround outputs. The PRO LOGIC II modes programmed into this receiver are "MOVIE", " MUSIC" and "PRO LOGIC". The "MOVIE" mode of the PRO LOGIC II has preset characteristics to produce a calibrated, high-level - Kenwood VR-510 | User Manual - Page 30
Dolby 3 Stereo 30 Dolby 3 Stereo is available for systems that do not have surround speakers. When in the Dolby 3 Stereo mode, the surround information is redirected to the front left and right speakers. This mode is designed for use with Dolby Surround program sources, but can also improve sound - Kenwood VR-510 | User Manual - Page 31
spoiling the sound quality of the original signal. DVD 6-channel mode Using a DVD player or the like equipped with six (5.1) output channels and the receiver, you can enjoy multi-channel encoded DVD source material in all its splendor. Since the source signals are digital and each channel is input - Kenwood VR-510 | User Manual - Page 32
mode. The listening mode settings are stored separately for each input. If the input mode is set to digital auto ("AUTO SOUND" lights), the receiver selects the optimal listening mode automatically based on the type of input signal and the speaker settings. Each press of the LISTEN MODE (LISTEN - Kenwood VR-510 | User Manual - Page 33
as DTS CD, no sound is produced or, noise may be heard. To avoid this situation, make sure that you connect the component to the receiver's DVD/6ch. INPUT jacks through a surround processor which can decode the surround signal you want to listen to. Connecting a DVD player which can decode the - Kenwood VR-510 | User Manual - Page 34
Ambience effects Midnight mode (Dolby Digital mode only) 34 When watching movies at night you might not be able to raise the volume as loud as normal. Midnight mode compresses the dynamic range of previously specified parts of the Dolby Digital sound track (like scenes with sudden increases in - Kenwood VR-510 | User Manual - Page 35
dimmer adjustment The dimmer function lets you select the brightness of the receiver's display. You might find this useful if you darken your room MHz 3 STEREO MONITOR ST. kHz DOWN MIX DSP TUNED 96kHz LPCM playback The receiver is compatible with the 96kHz LPCM playback. To play a 96kHz DVD, set - Kenwood VR-510 | User Manual - Page 36
. • The selected input does not appear when you select "Delete". 7 Press the display operation 2 [Enter] key. • The maker selecting display appears. >Kenwood >Admidral Back Enter 8 Press the 5/∞ keys to select the maker you want to register. • Press the 5/∞ keys until the desired maker appears in - Kenwood VR-510 | User Manual - Page 37
• See "Remote control operation of other components" at the end of this manual for a list of keys available with each component. e The remote control the remote control at the remote sensor on the receiver when you want to operate KENWOOD components connected by system control cords. Otherwise, - Kenwood VR-510 | User Manual - Page 38
Changing (confirming) the operation mode 38 This operation lets you change the remote control operation mode without changing the input selector. You may find this useful when you want to control one component while using another. (For example, if you want to rewind the tape deck while listening to - Kenwood VR-510 | User Manual - Page 39
a macro that; turns on the TV, sets the TV to the appropriate input, selects the receiver's input selector to LD, and turns on the LD player. All you have to do is or TV key is pressed. When the MUSIC or MOVIE key is pressed the receiver's input also changes. 5 Press the MACRO key. • The macro is - Kenwood VR-510 | User Manual - Page 40
MACRO MUSIC AV. POWER MOVIE TV SYS. POWER CH TITLE/GUIDE RETURN/PAGE REC Numeric keys CH. VOL. CH. VOL. DIMMER SOUND TITLE/GUIDE MUTE BASS BOOST LISTEN M. TUNING SUB W. THX MENU RETURN unit. • The remote control is ready for receiving the remote control code. Waiting >Extend1 Clr Exit - Kenwood VR-510 | User Manual - Page 41
remote control unit. • "Complete" appears when finished. Complete >Extend1 • When it takes for more than 5 seconds or the remote control unit does not receive the remote control code well, "Error" appears in the display. In this case, re-operate from step 1. 6 The remote control code is stored on - Kenwood VR-510 | User Manual - Page 42
Displaying the CD TEXT data 42 When you connect a KENWOOD CD player (CD-425M, CD-4700M, CD4260M, DPF-J6030), you can display the CD TEXT data in the display of the remote control unit. Display - Kenwood VR-510 | User Manual - Page 43
Control SHIFT MACRO MUSIC AV POWER MOVIE TV SYS. POWER CH. (Channel ) Numeric keys F.SHIFT + 7 (AUDIO) CH. VOL. CH. VOL. DIMMER SOUND TITLE/GUIDE MUTE BASS BOOST LISTEN M. TUNING SUB W. THX MENU RETURN /PAGE BAND ENTER OSD /PAGE REC MODE REC AUTO/MONO F.SHIFT LEARN REPEAT 1 TV - Kenwood VR-510 | User Manual - Page 44
B), ENTER (Play B) REC (Recording) CD player operations SHIFT MACRO MUSIC AV. POWER MOVIE TV SYS. POWER CH. VOL. CH. VOL. DIMMER SOUND TITLE/GUIDE MUTE BASS BOOST LISTEN M. TUNING SUB W. THX MENU RETURN /PAGE BAND ENTER OSD /PAGE REC MODE REC AUTO/MONO F.SHIFT LEARN REPEAT 1 TV - Kenwood VR-510 | User Manual - Page 45
CH. (Channel ) F.SHIFT + 4 (TV SELECT) F.SHIFT + 7 (AUDIO) SHIFT MACRO MUSIC AV POWER MOVIE TV SYS. POWER CH. VOL. CH. VOL. DIMMER SOUND TITLE/GUIDE MUTE BASS BOOST LISTEN M. TUNING SUB W. THX MENU RETURN /PAGE BAND ENTER OSD /PAGE REC MODE REC AUTO/MONO F.SHIFT LEARN REPEAT 1 TV - Kenwood VR-510 | User Manual - Page 46
SHIFT + 1 (REPEAT) F.SHIFT + 2 (RANDOM) F.SHIFT + 5 (DISPLAY) SHIFT MACRO MUSIC AV. POWER MOVIE TV SYS. POWER CH. VOL. CH. VOL. DIMMER SOUND TITLE/GUIDE MUTE BASS BOOST LISTEN M. TUNING SUB W. THX MENU RETURN /PAGE BAND ENTER OSD /PAGE REC MODE REC AUTO/MONO F.SHIFT LEARN REPEAT - Kenwood VR-510 | User Manual - Page 47
operation of other components 47 * (Pause) $ (Skip down) # (Play) CH. (Fast forward) CH. (Rewind) GUIDE RETURN F.SHIFT + 1 (REPEAT) F.SHIFT + 2 (RANDOM) F.SHIFT + 5 (DISPLAY) F.SHIFT + 7 (AUDIO) DSS receiver operations SHIFT MACRO MUSIC AV. POWER MOVIE TV SYS. POWER CH. VOL. CH. VOL - Kenwood VR-510 | User Manual - Page 48
DOWN (∞) F.SHIFT + 7 (AUDIO) F.SHIFT + 8 (THEME) F.SHIFT + (+10) (INFO.) CH. VOL. CH. VOL. DIMMER SOUND TITLE/GUIDE MUTE BASS BOOST LISTEN M. TUNING SUB W. THX MENU RETURN /PAGE BAND ENTER OSD /PAGE REC MODE REC AUTO/MONO F.SHIFT LEARN REPEAT 1 TV SELECT 4 AUDIO 7 - Kenwood VR-510 | User Manual - Page 49
many possible causes for this problem, depending on the type of DVD player used. • Set the input mode to digital manual before starting playback of the software cannot be recorded. Tuner Symptom Radio stations cannot be received. Interference. Cause Remedy • No antenna is connected. • - Kenwood VR-510 | User Manual - Page 50
exhausted. • The remote control unit is too far away from the main system, controlling angle is too large, or there is an obstacle between the receiver and the remote. • The audio cords and system control cords are not connected properly. • No software is loaded in the source component. • An attempt - Kenwood VR-510 | User Manual - Page 51
W : 440 mm (17-5/16") H : 144 mm (5-11/16") D : 399 mm(15-11/16") Weight (Net 8.75 kg (19.3 lb) Additional Information Notes 1. KENWOOD follows a policy of continuous advancements in development. For this reason specifications may be changed without notice. 2. The full performance may not be - Kenwood VR-510 | User Manual - Page 52
For your records Record the serial number, found on the back of the unit, in the spaces designated on the warranty card, and in the space provided below. Refer to the model and serial numbers whenever you call upon your dealer for information or service on this product. Model Serial Number
-
 1
1 -
 2
2 -
 3
3 -
 4
4 -
 5
5 -
 6
6 -
 7
7 -
8
-
9
-
10
-
11
-
12
-
13
-
14
-
15
-
16
-
17
-
18
-
19
-
20
-
21
-
22
-
23
-
24
-
25
-
26
-
27
-
28
-
29
-
30
-
31
-
32
-
33
-
34
-
35
-
36
-
37
-
38
-
39
-
40
-
41
-
42
-
43
-
44
-
45
-
46
-
47
-
48
-
49
-
50
-
51
-
52
 |
 |

Operations
Preparation
Additional Information
Remote Control
AUDIO VIDEO SURROUND RECEIVER
VR-510
B60-4957-00 00 MA
(K, P)
0011
About the supplied remote control
Compared to standard remote controls, the remote control supplied with this receiver has several operation
modes. These modes enable the remote control to control other audio/video components. In order to
effectively use the remote control it is important to read the operating instructions and obtain a proper
understanding of the remote control and how to switch its operation modes (etc.).
Using the remote control without completely understanding its design and how to switch the operation modes
may result in incorrect operations.
INSTRUCTION MANUAL
KENWOOD CORPORATION