KitchenAid KODE900HSS Owners Manual - Page 12
SatinGlide™ Roll-Out Extension Racks, Bakeware
 |
View all KitchenAid KODE900HSS manuals
Add to My Manuals
Save this manual to your list of manuals |
Page 12 highlights
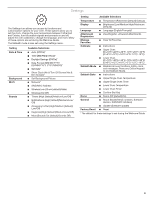
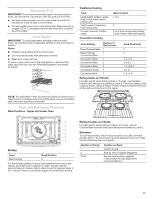
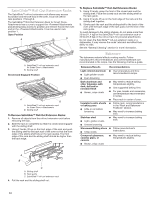
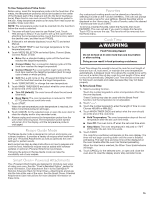
SatinGlide™ Roll-Out Extension Racks The SatinGlide™ roll-out extension rack allows easy access to position and remove food in the oven. It can be used in rack positions 1 through 6. The SatinGlide™ Roll-Out Extension Rack for Smart Oven+ Attachments has a curve to support the +Powered Attachments and allowing easy access to position and remove food in the oven and on the +Powered Attachments. It can be used in rack position 1. Open Position A B A. SatinGlide™ roll-out extension rack for Smart Oven+ Attachments B. Sliding shelf Closed and Engaged Position A B A. SatinGlide™ roll-out extension rack for Smart Oven+ Attachments B. Sliding shelf To Remove SatinGlide™ Roll-Out Extension Racks: 1. Remove all objects from the roll-out extension rack before removing the rack. 2. Slide the rack in completely so that it is closed and engaged with the sliding shelf. 3. Using 2 hands, lift up on the front edge of the rack and push the sliding shelf to the back wall of the oven so that the front edge of the sliding shelf sits on the rack guides. The front edge of the rack and the sliding shelf should be higher than the back edge. To Replace SatinGlide™ Roll-Out Extension Racks: 1. Using 2 hands, grasp the front of the closed rack and the sliding shelf. Place the closed rack and the sliding shelf on the rack guide. 2. Using 2 hands, lift up on the front edge of the rack and the sliding shelf together. 3. Slowly push the rack and the sliding shelf to the back of the oven until the back edge of the rack pulls over the end of the rack guide. To avoid damage to the sliding shelves, do not place more than 25 lbs (11.4 kg) on the SatinGlide™ roll-out extension rack or 35 lbs (15.9 kg) on the roll-out rack for powered attachments. Do not clean the SatinGlide™ roll-out extension racks in a dishwasher. It may remove the racks' lubricant and affect their ability to slide. See the "General Cleaning" section for more information. Bakeware The bakeware material affects cooking results. Follow manufacturer's recommendations and use the bakeware size recommended in the recipe. Use the following chart as a guide. Bakeware/Results Recommendations Light colored aluminum ■■ Use temperature and time ■■ Light golden crusts recommended in recipe. ■■ Even browning Dark aluminum and other bakeware with dark, dull and/or nonstick finish ■■ Brown, crisp crusts ■■ May need to reduce baking temperatures slightly. ■■ Use suggested baking time. ■■ For pies, breads and casseroles, use temperature recommended in recipe. ■■ Place rack in center of oven. Insulated cookie sheets or baking pans ■■ Little or no bottom browning ■■ Follow rack recommendations in the "Rack and Bakeware Positions" section. ■■ May need to increase baking time. Stainless steel ■■ Light, golden crusts ■■ May need to increase baking time. ■■ Uneven browning Stoneware/Baking stone ■■ Follow manufacturer's ■■ Crisp crusts instructions. Ovenproof glassware, ceramic glass, or ceramic ■■ May need to reduce baking temperatures slightly. ■■ Brown, crisp crusts A B C A. Sliding shelf B. Rack guide C. SatinGlide™ roll-out extension rack 4. Pull the rack and the sliding shelf out. 12
-
 1
1 -
2
-
3
-
4
-
5
-
6
-
 7
7 -
 8
8 -
 9
9 -
 10
10 -
 11
11 -
 12
12 -
 13
13 -
 14
14 -
 15
15 -
 16
16 -
 17
17 -
18
-
19
-
20
-
21
-
22
-
23
-
24
-
25
-
26
-
27
-
28
-
29
-
30
-
31
-
32
-
33
-
34
-
35
-
36
-
37
-
38
-
39
-
40
-
41
-
42
-
43
-
44
-
45
-
46
-
47
-
48
 |
 |
