Konica Minolta bizhub C360 bizhub C220/C280/C360 Box Operations User Guide - Page 118
Print - Application Public, Personal, or Group User Box
 |
View all Konica Minolta bizhub C360 manuals
Add to My Manuals
Save this manual to your list of manuals |
Page 118 highlights
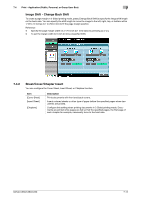
7.4 Print - Application (Public, Personal, or Group User Box) 7 7.4 Print - Application (Public, Personal, or Group User Box) 7.4.1 Page Margin The page margin is set to the left, right, or top of paper. It can assure a punching or stapling space. Page Margin Item [Margin Position] [Adjust Value] Description Select the margin position. [Auto Zoom]: A page margin position along the long side of the paper is selected if the original length is 11-11/16 inches (297 mm) or less. A page margin is created along the short side of the paper if the original length exceeds 11-11/16 inches (297 mm). [Top]: Select this setting to position a margin on the top. [Left]: Select this setting to position a margin on the left. [Right]: Select this setting to position a margin on the right. Specify the width of a page margin between 1/16 and 3/4 inches (0.1 and 20.0 mm). To set the margin width to 0 inch (0 mm), press [None]. Image Shift When a page margin is created, the image can be shifted according the position of the margin. You can specify the shift length to move the image to the left, right, top, or bottom within 1/16 to 10 inches (0.1 to 250.0 mm) to fit the page margin position. Reference - Specify the page margin width on a 1/16 inch (0.1 mm) basis by pressing [-] or [+]. - To set the margin width to 0 inch (0 mm), press [No Shift]. bizhub C360/C280/C220 7-13
-
 1
1 -
2
-
3
-
4
-
5
-
6
-
7
-
8
-
9
-
10
-
11
-
12
-
13
-
14
-
15
-
16
-
17
-
18
-
19
-
20
-
21
-
22
-
23
-
24
-
25
-
26
-
27
-
28
-
29
-
30
-
31
-
32
-
33
-
34
-
35
-
36
-
37
-
38
-
39
-
40
-
41
-
42
-
43
-
44
-
45
-
46
-
47
-
48
-
49
-
50
-
51
-
52
-
53
-
54
-
55
-
56
-
57
-
58
-
59
-
60
-
61
-
62
-
63
-
64
-
65
-
66
-
67
-
68
-
69
-
70
-
71
-
72
-
73
-
74
-
75
-
76
-
77
-
78
-
79
-
80
-
81
-
82
-
83
-
84
-
85
-
86
-
87
-
88
-
89
-
90
-
91
-
92
-
93
-
94
-
95
-
96
-
97
-
98
-
99
-
100
-
101
-
102
-
103
-
104
-
105
-
106
-
107
-
108
-
109
-
110
-
111
-
112
-
 113
113 -
 114
114 -
 115
115 -
 116
116 -
 117
117 -
 118
118 -
 119
119 -
 120
120 -
 121
121 -
 122
122 -
 123
123 -
124
-
125
-
126
-
127
-
128
-
129
-
130
-
131
-
132
-
133
-
134
-
135
-
136
-
137
-
138
-
139
-
140
-
141
-
142
-
143
-
144
-
145
-
146
-
147
-
148
-
149
-
150
-
151
-
152
-
153
-
154
-
155
-
156
-
157
-
158
-
159
-
160
-
161
-
162
-
163
-
164
-
165
-
166
-
167
-
168
-
169
-
170
-
171
-
172
-
173
-
174
-
175
-
176
-
177
-
178
-
179
-
180
-
181
-
182
-
183
-
184
-
185
-
186
-
187
-
188
-
189
-
190
-
191
-
192
-
193
-
194
-
195
-
196
-
197
-
198
-
199
-
200
-
201
-
202
-
203
-
204
-
205
-
206
-
207
-
208
-
209
-
210
-
211
-
212
-
213
-
214
-
215
-
216
-
217
-
218
-
219
-
220
-
221
-
222
-
223
-
224
-
225
-
226
-
227
-
228
-
229
-
230
-
231
-
232
-
233
-
234
-
235
-
236
-
237
-
238
-
239
-
240
-
241
-
242
-
243
-
244
-
245
-
246
-
247
-
248
-
249
-
250
-
251
-
252
-
253
-
254
-
255
-
256
-
257
-
258
-
259
-
260
-
261
-
262
-
263
-
264
-
265
-
266
-
267
-
268
-
269
-
270
-
271
-
272
-
273
-
274
-
275
-
276
-
277
-
278
-
279
-
280
-
281
-
282
-
283
-
284
-
285
-
286
-
287
-
288
-
289
-
290
-
291
-
292
 |
 |
