Konica Minolta bizhub C360 bizhub C220/C280/C360 Box Operations User Guide - Page 131
Stamp Repeat Type, Detail Settings, Position
 |
View all Konica Minolta bizhub C360 manuals
Add to My Manuals
Save this manual to your list of manuals |
Page 131 highlights
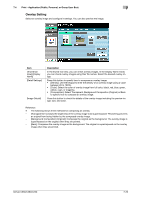
7.4 Print - Application (Public, Personal, or Group User Box) 7 Item [Detail Settings] [Position] Description Specify the color, density, and text size of stamp repeat to be printed. Select the angle or printing order of stamp repeat to be printed. Stamp Repeat Type Item [Registered Stamp] [Preset Stamp] [Date/Time] [Other] Description Press this button to apply the stamp images that were pre-registered with the utility software. • Use Copy Protection Utility to register stamps. For details, refer to the relevant utility software manual. • Registered stamps may require multiple areas depending on their contents. Press this button to apply a standard string such as Invalid Copy, Copy, or Private as a preset stamp. One stamp requires one area. Press this button to apply the date and time the document was registered. • [Date Format] requires one area. • [Time Format] requires one area. Press this button to specify the job number, serial number, and distribution control number the document was registered with. • [Job Number]: The job number for the print job is printed. A job number requires one area. • [Serial Number]: The serial number assigned to this machine is printed. The serial number requires one area. The serial number is assigned at the time of shipment of this machine. For details on settings, contact your service representative. • [Distribution Control Number]: The entered number of copies is printed. A distribution control number requires one area. Enter the distribution control number, and select "Number Only" or "Put zeros in front(total 8-digits)" as the output format. Detail Settings Press [Detail Settings] to specify the text color, density, and other items. Item [Text Color] [Density] [Text Size] [Pattern Overwrite] Description Select the text and background colors from black, magenta, or cyan. Select the density from the light, standard, or dark. Select the printing text size from Minimal, Standard, or Large. Select pattern printing from [Front (Overwrite)], [Transparent], or [Back]. Position In the Stamp Repeat setting screen, press [Position] to determine the print position of the stamp, for example, by angling the stamp or leaving a space. Configure the following settings. - Setting an angle of the stamp repeat within the area (+45 degrees/0 degrees/45 degrees) - Inserting a space between stamp repeats - Reordering printing order of stamp repeat - Deleting the stamp repeat or space Item [Change Pos./Delete] Description Select Stamp Repeat to be changed, and press [Change Position]/[Insert Space]/[Delete] to specify. bizhub C360/C280/C220 7-26
-
 1
1 -
2
-
3
-
4
-
5
-
6
-
7
-
8
-
9
-
10
-
11
-
12
-
13
-
14
-
15
-
16
-
17
-
18
-
19
-
20
-
21
-
22
-
23
-
24
-
25
-
26
-
27
-
28
-
29
-
30
-
31
-
32
-
33
-
34
-
35
-
36
-
37
-
38
-
39
-
40
-
41
-
42
-
43
-
44
-
45
-
46
-
47
-
48
-
49
-
50
-
51
-
52
-
53
-
54
-
55
-
56
-
57
-
58
-
59
-
60
-
61
-
62
-
63
-
64
-
65
-
66
-
67
-
68
-
69
-
70
-
71
-
72
-
73
-
74
-
75
-
76
-
77
-
78
-
79
-
80
-
81
-
82
-
83
-
84
-
85
-
86
-
87
-
88
-
89
-
90
-
91
-
92
-
93
-
94
-
95
-
96
-
97
-
98
-
99
-
100
-
101
-
102
-
103
-
104
-
105
-
106
-
107
-
108
-
109
-
110
-
111
-
112
-
113
-
114
-
115
-
116
-
117
-
118
-
119
-
120
-
121
-
122
-
123
-
124
-
125
-
 126
126 -
 127
127 -
 128
128 -
 129
129 -
 130
130 -
 131
131 -
 132
132 -
 133
133 -
 134
134 -
 135
135 -
 136
136 -
137
-
138
-
139
-
140
-
141
-
142
-
143
-
144
-
145
-
146
-
147
-
148
-
149
-
150
-
151
-
152
-
153
-
154
-
155
-
156
-
157
-
158
-
159
-
160
-
161
-
162
-
163
-
164
-
165
-
166
-
167
-
168
-
169
-
170
-
171
-
172
-
173
-
174
-
175
-
176
-
177
-
178
-
179
-
180
-
181
-
182
-
183
-
184
-
185
-
186
-
187
-
188
-
189
-
190
-
191
-
192
-
193
-
194
-
195
-
196
-
197
-
198
-
199
-
200
-
201
-
202
-
203
-
204
-
205
-
206
-
207
-
208
-
209
-
210
-
211
-
212
-
213
-
214
-
215
-
216
-
217
-
218
-
219
-
220
-
221
-
222
-
223
-
224
-
225
-
226
-
227
-
228
-
229
-
230
-
231
-
232
-
233
-
234
-
235
-
236
-
237
-
238
-
239
-
240
-
241
-
242
-
243
-
244
-
245
-
246
-
247
-
248
-
249
-
250
-
251
-
252
-
253
-
254
-
255
-
256
-
257
-
258
-
259
-
260
-
261
-
262
-
263
-
264
-
265
-
266
-
267
-
268
-
269
-
270
-
271
-
272
-
273
-
274
-
275
-
276
-
277
-
278
-
279
-
280
-
281
-
282
-
283
-
284
-
285
-
286
-
287
-
288
-
289
-
290
-
291
-
292
 |
 |
