Konica Minolta bizhub C754 Log Management Utility User Guide - Page 43
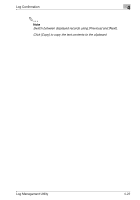
Click [Next].
 |
View all Konica Minolta bizhub C754 manuals
Add to My Manuals
Save this manual to your list of manuals |
Page 43 highlights
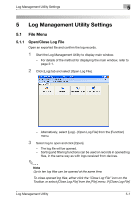
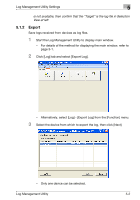
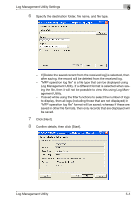
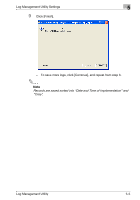
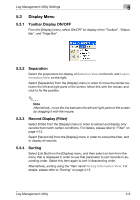
Log Management Utility Settings 5 6 Specify the destination folder, file name, and file type. - If [Delete the saved record from the received log] is selected, then after saving, the record will be deleted from the received log. - "MFP operation log file" is a file type that can be displayed using Log Management Utility. If a different format is selected when saving the file, then it will not be possible to view this using Log Management Utility. - If saved while using the filter functions to select the number of logs to display, then all logs (including those that are not displayed) in "MFP operation log file" format will be saved; whereas if these are saved in other file formats, then only records that are displayed will be saved. 7 Click [Next]. 8 Confirm details, then click [Start]. Log Management Utility 5-4
-
 1
1 -
2
-
3
-
4
-
5
-
6
-
7
-
8
-
9
-
10
-
11
-
12
-
13
-
14
-
15
-
16
-
17
-
18
-
19
-
20
-
21
-
22
-
23
-
24
-
25
-
26
-
27
-
28
-
29
-
30
-
31
-
32
-
33
-
34
-
35
-
36
-
37
-
 38
38 -
 39
39 -
 40
40 -
 41
41 -
 42
42 -
 43
43 -
 44
44 -
 45
45 -
 46
46 -
 47
47 -
 48
48 -
49
-
50
-
51
-
52
-
53
-
54
-
55
-
56
 |
 |
