Konica Minolta magicolor plus magicolor plus Captureboard C-12 Series Tool Box
Konica Minolta magicolor plus Manual
 |
View all Konica Minolta magicolor plus manuals
Add to My Manuals
Save this manual to your list of manuals |
Konica Minolta magicolor plus manual content summary:
- Konica Minolta magicolor plus | magicolor plus Captureboard C-12 Series Tool Box - Page 1
Captureboard C-12 Series Software Operation Manual We greatly appreciate your purchase of this PLUS Vision product. In order to take full advantage of the features of the software supplied with the Captureboard C-12, please read this software operation manual carefully before use. After reading - Konica Minolta magicolor plus | magicolor plus Captureboard C-12 Series Tool Box - Page 2
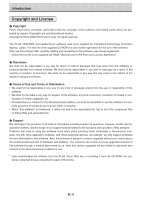
to change without notice. (3) Great care has been taken in the preparation of this manual; however, should any questionable points, errors, or omissions be apparent, please contact us. (4) Notwithstanding part (3), PLUS Vision Corp. will not be responsible for any claims or lost profits or other - Konica Minolta magicolor plus | magicolor plus Captureboard C-12 Series Tool Box - Page 3
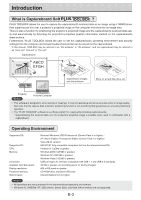
PLUS the captureboard. * In this manual, TOOLBOX may be referred to Supported PC: CPU: Memory: Connector: Available hard disk space: Display resolution: Peripheral devices: Web browser: Microsoft Windows 2000 Professional (Service Pack 4 or higher) / XP (Home Edition /Professional Edition Service - Konica Minolta magicolor plus | magicolor plus Captureboard C-12 Series Tool Box - Page 4
trouble reports, and other matters, and the scope of our support shall be limited to the functions and operation of this software. Problems the aforementioned conditions of use. * Upon downloading this software from the PLUS Vision Web site, or installing it from the CD-ROM, the customer is deemed - Konica Minolta magicolor plus | magicolor plus Captureboard C-12 Series Tool Box - Page 5
TOOLBOX", TWAIN driver and USB driver are installed simultaneously. ■ User's Manual When clicked, the User's manual (in PDF format) open. ■ Software Manual (this manual) When clicked, the PLUS TOOLBOX software's operating instructions (in PDF format) open. ■ Acrobat Reader This is an application - Konica Minolta magicolor plus | magicolor plus Captureboard C-12 Series Tool Box - Page 6
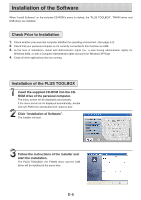
. 4. Close all other applications that are running. Installation of the PLUS TOOLBOX Insert the supplied CD-ROM into the CDROM drive of the Software". The installer will start. Follow the instructions of the installer and start the installation. The PLUS TOOLBOX, the TWAIN driver and the USB - Konica Minolta magicolor plus | magicolor plus Captureboard C-12 Series Tool Box - Page 7
USB driver is installed on the computer with the installer, but this does not complete association with the USB port. In order to use PLUS TOOLBOX, install using the procedure described below with the Captureboard connected. Preparation 1. Press the ON/Standby button of the Captureboard to turn on - Konica Minolta magicolor plus | magicolor plus Captureboard C-12 Series Tool Box - Page 8
"Add or Remove Programs or Applications" (this will differ depending on the OS) to display the "Add or Remove Programs Properties" screen. Select PLUS TOOLBOX from among the list displayed and click [Change / Remove] to display the Add or Remove wizard screen. Selecting the [Remove] radio button - Konica Minolta magicolor plus | magicolor plus Captureboard C-12 Series Tool Box - Page 9
" and "Security" tabs. Click a tab to switch to the corresponding screen. "Header/footer", "Copyboard Notice • To set the "Security" settings, contact you nearest PLUS Vision sales office, dealer or store. Hardware Setup: Set the Captureboard's operating environment here. See page E-20. E-9 - Konica Minolta magicolor plus | magicolor plus Captureboard C-12 Series Tool Box - Page 10
Menu Screen Names and Functions Capture Settings: These settings are used when creating superimposed images. See page E-18. (1) Select image for projection: Selects the number of the monitor that is connected to the projector. The default setting is "Display 1". This software automatically searches - Konica Minolta magicolor plus | magicolor plus Captureboard C-12 Series Tool Box - Page 11
Menu Screen Names and Functions ⑤ (Help) Click this to display the operating instructions. ⑥ (Minimize) Click this to minimize the menu screen, displaying it as an icon on the task bar. ⑦ (Close) Click this to exit the program. ⑧ ⑧ Device - Konica Minolta magicolor plus | magicolor plus Captureboard C-12 Series Tool Box - Page 12
having same ratio as the sheet surface" and "Image that is 3/4 size horizontally". (Available only with Model C-12W.) At time of saving, the the minimize icon of the main menu when it is displayed with window size also results in the superimposed image display screen being displayed as an icon on - Konica Minolta magicolor plus | magicolor plus Captureboard C-12 Series Tool Box - Page 13
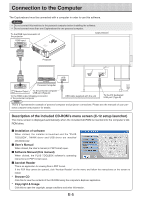
the personal computer and prepare the documents that will be projected with the projector. ② Adjust the size, display position, and other factors of the projector image. Please see your projector manual for information about operation. Note • A full screen display (in which the image is displayed to - Konica Minolta magicolor plus | magicolor plus Captureboard C-12 Series Tool Box - Page 14
captureboard. • The main menu can also be displayed by right-clicking the PLUS TOOLBOX icon in the system tray and choosing "Menu". Positioning Marks ć be captured. Please see "Effective Reading Size" in your Captureboard manual for details. • Animation cannot be captured as a personal computer - Konica Minolta magicolor plus | magicolor plus Captureboard C-12 Series Tool Box - Page 15
Basic Operation Click the (Scan) Button of the Menu Displays the projection image superimposed screen. Click [Yes] The sheet surface of the Captureboard will be scrolled, the capture will start and be completed. Then the hand written and drawn image will be transferred to the personal computer. In - Konica Minolta magicolor plus | magicolor plus Captureboard C-12 Series Tool Box - Page 16
main menu will close this Notice When other TWAIN compatible applications are used to capture the picture data, while PLUS TOOLBOX software is running, following procedure should be taken. When PLUS TOOLBOX is running or its icon appears on the Windows task bar, and the picture data is attempted to - Konica Minolta magicolor plus | magicolor plus Captureboard C-12 Series Tool Box - Page 17
) of the image projected by the projector is adjusted, it will be slightly smaller than the output screen from the personal computer screen. (The size of the image changes depending on the degree of distortion compensation.) This is a result of the compensation characteristics of the projector. As - Konica Minolta magicolor plus | magicolor plus Captureboard C-12 Series Tool Box - Page 18
Capture Settings These settings perform the selection of the monitor that is connected to the projector and the selection of the ○ mark color used for position detection. Click the (Settings) Icon of the Menu The settings screen will open. Select the Number of the Monitor that Is Connected to the - Konica Minolta magicolor plus | magicolor plus Captureboard C-12 Series Tool Box - Page 19
Capture Settings Finalizing Click [OK] to set. The main menu reappears if [Close] is clicked. E-19 - Konica Minolta magicolor plus | magicolor plus Captureboard C-12 Series Tool Box - Page 20
the aspect ratio for printed images. Original Image/Match Paper Size Sheet rear surface erase reminder function: Disable/Enable Setting for captureboard's power, start up the computer, then make the USB connections. The "PLUS TOOLBOX" main menu appears on the computer. Click the [Setup] button. The - Konica Minolta magicolor plus | magicolor plus Captureboard C-12 Series Tool Box - Page 21
connected. Paper Size Select whether to print on A4 or letter size paper. Note Only printer models specified by PLUS can be connected changed. Setting the time By factory default, the time is set to Japan Standard Time. PLUS TOOLBOX uses a 24-hour time display. Click to [▲] return, to [▼] advance. 1. - Konica Minolta magicolor plus | magicolor plus Captureboard C-12 Series Tool Box - Page 22
amount of image data as compared to the selection of High Resolution. High Resolution: Vertical and horizontal dimensions of the read image will be 1:1 size. This will result in an image that appears better than with the standard selection. File Format Select the format of the images stored on the - Konica Minolta magicolor plus | magicolor plus Captureboard C-12 Series Tool Box - Page 23
Creation and Editing of Headers/Footers This is the creation and editing of the headers/footers that print or display the company name, logo, or other information at the top and bottom of the printing paper or acquired image. The factory default is the registration of only the date/time stamp in the - Konica Minolta magicolor plus | magicolor plus Captureboard C-12 Series Tool Box - Page 24
This screen is used to input text and select items such as font type and size of the text. See "Text Editor Tool" below. Clicking the text input [OK is inserted, each one forms a box and is placed in an editing box. The size of this box can be changed, and the front-to-back order can be swapped. See - Konica Minolta magicolor plus | magicolor plus Captureboard C-12 Series Tool Box - Page 25
of Italic Each click toggles the selection between [Italic] and [Standard]. All the text will change inside the text input box. ● Change of Size and Swapping of Front-to-Back Order Selection of Objects * The term object indicates an image, text, division line, background, or date and time - Konica Minolta magicolor plus | magicolor plus Captureboard C-12 Series Tool Box - Page 26
No. 4 2008/ 10/3 09:34 Insertion of the Date and Time Text input PLUS Vision Corp. * To make a logo, create an image with the personal computer and a USB connection with the Captureboard: Click the [Setup] button of the "PLUS TOOLBOX" to open the setting screen, then click the [Header/Footer] tab - Konica Minolta magicolor plus | magicolor plus Captureboard C-12 Series Tool Box - Page 27
be placed at the upper left of the editing box. Adjust the position or size. See "Change of Size and Swapping of Front-to-Back Order" on Page E-25 ② Click (Add text is hidden, the text will be brought to the front. See "Change of Size and Swapping of Front-to-Back Order" on Page E-25 XX-0123 XX-0123 - Konica Minolta magicolor plus | magicolor plus Captureboard C-12 Series Tool Box - Page 28
Creation and Editing of Headers/Footers Step 3 (continued) ⑥ When creating a footer, click the footer editing box and move the dark blue frame. The footer will be created in the same area as the header. Saving on the Personal Computer Click (Save as). Displays the "Save as" screen of the personal - Konica Minolta magicolor plus | magicolor plus Captureboard C-12 Series Tool Box - Page 29
Creation and Editing of Headers/Footers Updating the Internal Header/Footer Information of the Captureboard Two ways of updating the information are available. One way is to transfer the information to the Captureboard by connecting the Captureboard and personal computer via a USB connection. The - Konica Minolta magicolor plus | magicolor plus Captureboard C-12 Series Tool Box - Page 30
Creation and Editing of Headers/Footers Updating from USB Memory ① Save the header/footer file in the USB memory. Do not save within a folder of the USB memory. When USB memory is inserted in the USB port of the Captureboard, the Captureboard will search for the .hfd file. If the file has been saved - Konica Minolta magicolor plus | magicolor plus Captureboard C-12 Series Tool Box - Page 31
Update the Captureboard's Internal Program Download the update program from the PLUS Vision website. Preparations: 1. Download the "Copyboard Firmware Update" program ("C-12_XX_XX.zip") from the PLUS Vision website. 2. Unzip the "C-12_XX_XX.zip" file and save the program file ("c12_XX_XX.mot"). 3. - Konica Minolta magicolor plus | magicolor plus Captureboard C-12 Series Tool Box - Page 32
be applied to your machine's USB memory, PC connection, and additional printing. Registration is required to obtain the software. For details, please refer to the PLUS Vision website. http://www.plus-vision.com/en/ © 2008, PLUS Vision Corp. 23-4619-08A
-
 1
1 -
 2
2 -
 3
3 -
 4
4 -
 5
5 -
 6
6 -
 7
7 -
8
-
9
-
10
-
11
-
12
-
13
-
14
-
15
-
16
-
17
-
18
-
19
-
20
-
21
-
22
-
23
-
24
-
25
-
26
-
27
-
28
-
29
-
30
-
31
-
32
 |
 |

Software Operation Manual
We greatly appreciate your purchase of this PLUS Vision product.
In order to take full advantage of the features of the
software supplied
with the Captureboard C-12, please read this software operation manual carefully before use.
After reading, be sure to keep the manual for future reference.
Captureboard C-12 Series