Konica Minolta magicolor plus magicolor plus Captureboard C-12 Series Tool Box - Page 25
Change of Size and Swapping of Front-to-Back Order, Open File button, Transfer button, Close button
 |
View all Konica Minolta magicolor plus manuals
Add to My Manuals
Save this manual to your list of manuals |
Page 25 highlights
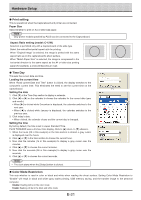
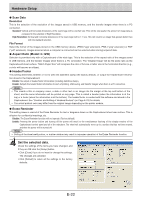
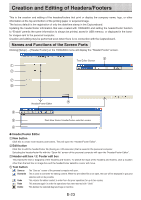
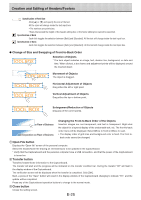
Creation and Editing of Headers/Footers Specification of Font Size Click [▲] or [▼] and specify the size of the text. All the sizes will change inside the text input box. • The numbers are point sizes. • Sizes that exceed the height of the header editing box or the footer editing box cannot be specified. Specification of Bold Each click toggles the selection between [Bold] and [Standard]. All the text will change inside the text input box. Specification of Italic Each click toggles the selection between [Italic] and [Standard]. All the text will change inside the text input box. ● Change of Size and Swapping of Front-to-Back Order Selection of Objects * The term object indicates an image, text, division line, background, or date and time. When clicked, a box frame and adjustment points will be displayed around the inserted object. Movement of Objects The object is dragged. Horizontal Adjustment of Objects Drag either the left or right point. Vertical Adjustment of Objects Drag either the top or bottom point. Enlargement/Reduction of Objects Drag any of the corner points. xxx Corporation xxx Place of Business xxx Corporation xxx Place of Business Changing the Front-to-Back Order of the Objects Insertion images are non-transparent, and text is transparent. Right-click the object for a layered display of the underneath text, etc. The front-to-back order menu will be displayed. Select [Move to front] or [Move to rear]. • The display order of grid lines and background color is fixed. The front-to- back order cannot be changed. ⑦ Open File button Displays the "Open file" screen of the personal computer. Select the header/footer file (having an .hfd extension) to be updated in the Captureboard. * Verify that the Captureboard and the personal computer have a USB connection, and that the power of the Captureboard is turned on. ⑧ Transfer button Transfers header/footer information to the Captureboard. The transfer will start and the progress will be indicated on the transfer condition bar. During the transfer "HF" will flash in the display window of the Captureboard. The verification screen will be displayed when the transfer is completed. Click [OK]. Next, a press of the "Save" button will result in the display window of the Captureboard changing to indicate "H1", and the update will be completed. Press any of the Captureboard operation buttons to change to the normal mode. ⑨ Close button Closes the setting screen. E-25
-
 1
1 -
2
-
3
-
4
-
5
-
6
-
7
-
8
-
9
-
10
-
11
-
12
-
13
-
14
-
15
-
16
-
17
-
18
-
19
-
 20
20 -
 21
21 -
 22
22 -
 23
23 -
 24
24 -
 25
25 -
 26
26 -
 27
27 -
 28
28 -
 29
29 -
 30
30 -
31
-
32
 |
 |
