Konica Minolta magicolor plus magicolor plus Captureboard C-12 Series Tool Box - Page 21
Time Day, Color Mode Restriction, Print setting, Loading the current time, Setting the date
 |
View all Konica Minolta magicolor plus manuals
Add to My Manuals
Save this manual to your list of manuals |
Page 21 highlights
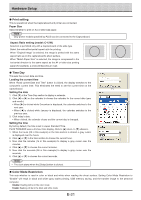
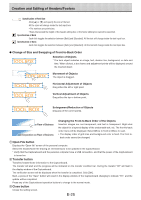
Hardware Setup ● Print setting This is operational when the Captureboard and printer are connected. Paper Size Select whether to print on A4 or letter size paper. Note Only printer models specified by PLUS can be connected to the Captureboard. Aspect Ratio setting (model: C-12W) Selection is permitted only with a Captureboard of the wide type. Select the vertical/horizontal aspect ratio for printing. When "Original Image" is selected, the image is printed with the same aspect ratio as on the captureboard's sheet surface. When "Match Paper Size" is selected, the image is compressed in the horizontal direction to the same aspect as the A4 or letter size printing paper (for example, a circle will become an oval). ● Time Day This sets the current date and time. Loading the current time When "Read current Date and Time" button is clicked, the display switches to the computer's current time. This eliminates the need to set the current time on the captureboard. Setting the date 1. Click [▼] at the Time Day section to display a calendar. 2. Click [◀] or [▶] on the calendar to choose the calendar for the current date (year and month). • When [▶] is clicked while December is displayed, the calendar switches to the next year. • When [◀] is clicked while January is displayed, the calendar switches to the previous year. 3. Click today's date. • When clicked, the calendar closes and the current day is changed. Setting the time By factory default, the time is set to Japan Standard Time. PLUS TOOLBOX uses a 24-hour time display. Click to [▲] return, to [▼] advance. 1. When the hours (20 in this example) in the time section is clicked, a gray cursor is displayed over the hours. 2. Click [▲] or [▼] in the time section to choose the current hour. 3. Now click the minutes (15 in this example) to display a gray cursor over the minutes. 4. Click [▲] or [▼] to choose the current minutes. 5. Now click the seconds (06 in this example) to display a gray cursor over the seconds. 6. Click [▲] or [▼] to choose the current seconds. Note • The clock starts when the [Setup] button is clicked. ● Color Mode Restriction This sets whether to read in color or black and white when reading the sheet surface. Setting Color Mode Restriction to "Enable" will result in black and white (gray scale) printing, USB memory saving, and the transfer image to the personal computer. Disable: Reading will be in the color mode. Enable: Reading will be in the black and white mode. E-21
-
 1
1 -
2
-
3
-
4
-
5
-
6
-
7
-
8
-
9
-
10
-
11
-
12
-
13
-
14
-
15
-
 16
16 -
 17
17 -
 18
18 -
 19
19 -
 20
20 -
 21
21 -
 22
22 -
 23
23 -
 24
24 -
 25
25 -
 26
26 -
27
-
28
-
29
-
30
-
31
-
32
 |
 |
