Kyocera FS-3140MFP FS-3140MFP Fax Operation Guide - Page 133
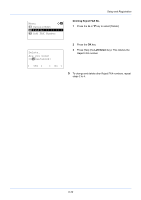
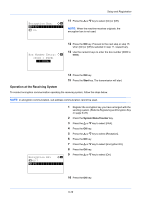
Setting Send Restriction, in Reject FAX No., select [Reject List].
 |
View all Kyocera FS-3140MFP manuals
Add to My Manuals
Save this manual to your list of manuals |
Page 133 highlights
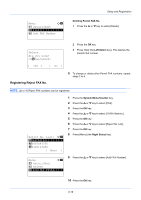
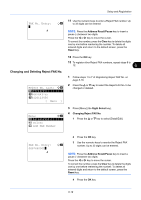
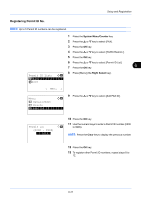
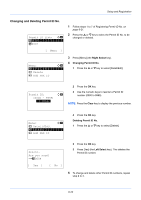
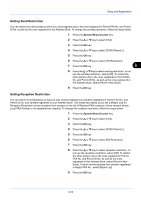
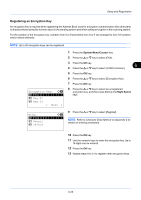
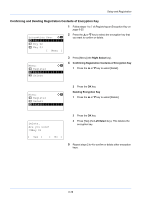
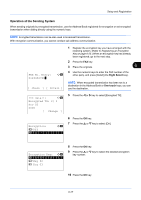
Setup and Registration Setting Send Restriction You can restrict the other parties to which you send originals only to the ones registered in Permit FAX No. and Permit ID No. as well as the ones registered in the Address Book. To change the sending restriction, follow the steps below. 1 Press the System Menu/Counter key. 2 Press the U or V key to select [FAX]. 3 Press the OK key. 4 Press the U or V key to select [TX/RX Restrict.]. 5 Press the OK key. 6 Press the U or V key to select [TX Restriction]. 7 Press the OK key. 6 8 Press the U or V key to select sending restriction. To not use the sending restriction, select [Off]. To restrict the other parties only to the ones registered in Permit FAX No. and Permit ID No. as well as the ones registered in the Address Book, select [Permit+Addr Book]. 9 Press the OK key. Setting Reception Restriction You can restrict incoming faxes so that you only receive originals from senders registered in Permit FAX No. and Permit ID No. and senders registered in your Address Book. This mode also allows you to set a [Reject List] for Reception Restriction so that reception from senders on the list of Rejected FAX numbers or from senders whose Local FAX Number is not registered are rejected. To change the reception restriction, follow the steps below. 1 Press the System Menu/Counter key. 2 Press the U or V key to select [FAX]. 3 Press the OK key. 4 Press the U or V key to select [TX/RX Restrict.]. 5 Press the OK key. 6 Press the U or V key to select [RX Restriction]. 7 Press the OK key. 8 Press the U or V key to select reception restriction. To not use the reception restriction, select [Off]. To restrict the other parties only to the ones registered in Permit FAX No. and Permit ID No. as well as the ones registered in the Address Book, select [Permit+Addr Book]. To block incoming faxes from senders registered in Reject FAX No., select [Reject List]. 9 Press the OK key. 6-23
-
 1
1 -
2
-
3
-
4
-
5
-
6
-
7
-
8
-
9
-
10
-
11
-
12
-
13
-
14
-
15
-
16
-
17
-
18
-
19
-
20
-
21
-
22
-
23
-
24
-
25
-
26
-
27
-
28
-
29
-
30
-
31
-
32
-
33
-
34
-
35
-
36
-
37
-
38
-
39
-
40
-
41
-
42
-
43
-
44
-
45
-
46
-
47
-
48
-
49
-
50
-
51
-
52
-
53
-
54
-
55
-
56
-
57
-
58
-
59
-
60
-
61
-
62
-
63
-
64
-
65
-
66
-
67
-
68
-
69
-
70
-
71
-
72
-
73
-
74
-
75
-
76
-
77
-
78
-
79
-
80
-
81
-
82
-
83
-
84
-
85
-
86
-
87
-
88
-
89
-
90
-
91
-
92
-
93
-
94
-
95
-
96
-
97
-
98
-
99
-
100
-
101
-
102
-
103
-
104
-
105
-
106
-
107
-
108
-
109
-
110
-
111
-
112
-
113
-
114
-
115
-
116
-
117
-
118
-
119
-
120
-
121
-
122
-
123
-
124
-
125
-
126
-
127
-
 128
128 -
 129
129 -
 130
130 -
 131
131 -
 132
132 -
 133
133 -
 134
134 -
 135
135 -
 136
136 -
 137
137 -
 138
138 -
139
-
140
-
141
-
142
-
143
-
144
-
145
-
146
-
147
-
148
-
149
-
150
-
151
-
152
-
153
-
154
-
155
-
156
-
157
-
158
-
159
-
160
-
161
-
162
-
163
-
164
-
165
-
166
-
167
-
168
-
169
-
170
-
171
-
172
-
173
-
174
-
175
-
176
-
177
-
178
 |
 |