Kyocera TASKalfa 3051ci TASKalfa 3051ci/3551ci/4551ci/5551ci Printer Driver Us - Page 80
Black and White Adjustment, Text and Graphics Effects
 |
View all Kyocera TASKalfa 3051ci manuals
Add to My Manuals
Save this manual to your list of manuals |
Page 80 highlights
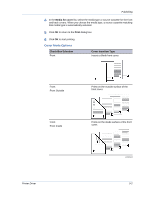
Imaging Select this option if the driver receives RGB data from the application. Quality priority Select this option if the driver receives full-color data from the application. In the Job tab, in the Job Storage (e-MPS) > Type list, if saving to Custom Box, it is only possible to print. It is not possible to copy external memory or change or send internal data. Black and White Adjustment Black and white adjustment settings change the brightness and contrast of graphics. These settings are useful if graphic images are printing too light, too gray, or too dark. Text remains unaffected. Adjusting Black and White Settings You can change the brightness and contrast of graphics. 1 In Imaging > Color, click the Black icon. 2 In the Adjustment list, select Custom. A preview image in the Adjustment Settings dialog box illustrates any brightness and contrast changes. 3 Drag the Brightness slider right to lighten, or left to darken the graphic images of the print job. You can also change brightness by entering a numeric value in the text box. The brightest setting is +100; the darkest is -100. Zero is the default mid-level setting. Adjusting brightness allows for the customization of graphic images if images are printing too light or too dark. 4 Drag the Contrast slider right or left to increase or decrease the proportion of light to dark in the graphic images of the print job. A high contrast setting decreases the grayscale spectrum, making light grays lighter and dark grays darker. A low contrast setting increases the grayscale spectrum, making light grays darker and dark grays lighter. You can also change contrast by entering a numeric value in the text box. The highest contrast setting is +100; the lowest is -100. Zero is the default mid-level setting. Adjusting contrast is useful if graphic images are printing too gray, or too black and white. Text remains unaffected. 5 Click OK to save the new black and white settings. Text and Graphics Effects Special settings are available for color or black and white printing. Print text as black This option prints all color text as black. It produces faster printing of color print jobs by reducing the amount of data sent to the printer. In black and white printing, it increases the detail for light-colored text printed. White text and image colors are unaffected. Available with all of the Color mode options. Print grays with black toner 8-12 User Guide
-
 1
1 -
2
-
3
-
4
-
5
-
6
-
7
-
8
-
9
-
10
-
11
-
12
-
13
-
14
-
15
-
16
-
17
-
18
-
19
-
20
-
21
-
22
-
23
-
24
-
25
-
26
-
27
-
28
-
29
-
30
-
31
-
32
-
33
-
34
-
35
-
36
-
37
-
38
-
39
-
40
-
41
-
42
-
43
-
44
-
45
-
46
-
47
-
48
-
49
-
50
-
51
-
52
-
53
-
54
-
55
-
56
-
57
-
58
-
59
-
60
-
61
-
62
-
63
-
64
-
65
-
66
-
67
-
68
-
69
-
70
-
71
-
72
-
73
-
74
-
 75
75 -
 76
76 -
 77
77 -
 78
78 -
 79
79 -
 80
80 -
 81
81 -
 82
82 -
 83
83 -
 84
84 -
 85
85 -
86
-
87
-
88
-
89
-
90
-
91
-
92
-
93
-
94
-
95
-
96
-
97
-
98
-
99
-
100
-
101
-
102
-
103
-
104
-
105
-
106
-
107
-
108
-
109
-
110
-
111
-
112
-
113
-
114
-
115
-
116
-
117
-
118
-
119
 |
 |
