Kyocera TASKalfa 4551ci TASKalfa 3051ci/3551ci/4551ci/5551ci Operation Guide R - Page 408

Color

Page 408 highlights

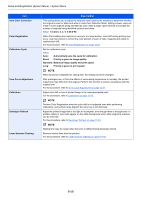
Setup and Registration (System Menu) > System Menu Item Auto Color Correction Color Registration Calibration Cycle Tone Curve Adjustment Calibration Developer Refresh Laser Scanner Cleaning Description This setting allows you to adjust the detection level used by the machine to determine whether the original is color or black and white in Auto Color Selection Mode. Setting a lower value will result in more originals being identified as color, while a larger value will tend to increase the number of originals being identified as black and white. Value: 1 (Color), 2, 3, 4, 5 (B & W) When first installing the machine or moving it to a new location, color drift during printing may occur. Use this function to correct the color position of each of cyan, magenta and yellow to resolve color drift. For the procedure, refer to Color Registration on page 10-39. Set the calibration cycle. Value: Auto: Automatically sets the cycle for calibration. Short: Priority is given to image quality. Standard: Balances image quality and print speed. Long: Priority is given to print speed. NOTE When [Custom] is displayed as setting item, the setting cannot be changed. After prolonged use, or from the effects of surrounding temperature or humidity, the printed output tone may differ from the original. Perform this function to ensure consistency with the original tone. For the procedure, refer to Tone Curve Adjustment on page 10-41. Adjust color drift or hue of printed image in the most appropriate color. For the procedure, refer to Calibration on page 10-42. NOTE Perform Color Registration when the color drift is not adjusted even after performing Calibration, and perform Gray Adjust if the color hue is not improved. Adjust the printed image that is too light or incomplete, even though there is enough toner. In addition, Black or color dots appear on the white background when white original is scanned can be removed. For the procedure, refer to Developer Refresh on page 10-43. NOTE Waiting time may be longer when the toner is refilled during developer refresh. Remove vertical lines from the printout. For the procedure, refer to Laser Scanner Cleaning on page 10-43. 8-58

  • 1
  • 2
  • 3
  • 4
  • 5
  • 6
  • 7
  • 8
  • 9
  • 10
  • 11
  • 12
  • 13
  • 14
  • 15
  • 16
  • 17
  • 18
  • 19
  • 20
  • 21
  • 22
  • 23
  • 24
  • 25
  • 26
  • 27
  • 28
  • 29
  • 30
  • 31
  • 32
  • 33
  • 34
  • 35
  • 36
  • 37
  • 38
  • 39
  • 40
  • 41
  • 42
  • 43
  • 44
  • 45
  • 46
  • 47
  • 48
  • 49
  • 50
  • 51
  • 52
  • 53
  • 54
  • 55
  • 56
  • 57
  • 58
  • 59
  • 60
  • 61
  • 62
  • 63
  • 64
  • 65
  • 66
  • 67
  • 68
  • 69
  • 70
  • 71
  • 72
  • 73
  • 74
  • 75
  • 76
  • 77
  • 78
  • 79
  • 80
  • 81
  • 82
  • 83
  • 84
  • 85
  • 86
  • 87
  • 88
  • 89
  • 90
  • 91
  • 92
  • 93
  • 94
  • 95
  • 96
  • 97
  • 98
  • 99
  • 100
  • 101
  • 102
  • 103
  • 104
  • 105
  • 106
  • 107
  • 108
  • 109
  • 110
  • 111
  • 112
  • 113
  • 114
  • 115
  • 116
  • 117
  • 118
  • 119
  • 120
  • 121
  • 122
  • 123
  • 124
  • 125
  • 126
  • 127
  • 128
  • 129
  • 130
  • 131
  • 132
  • 133
  • 134
  • 135
  • 136
  • 137
  • 138
  • 139
  • 140
  • 141
  • 142
  • 143
  • 144
  • 145
  • 146
  • 147
  • 148
  • 149
  • 150
  • 151
  • 152
  • 153
  • 154
  • 155
  • 156
  • 157
  • 158
  • 159
  • 160
  • 161
  • 162
  • 163
  • 164
  • 165
  • 166
  • 167
  • 168
  • 169
  • 170
  • 171
  • 172
  • 173
  • 174
  • 175
  • 176
  • 177
  • 178
  • 179
  • 180
  • 181
  • 182
  • 183
  • 184
  • 185
  • 186
  • 187
  • 188
  • 189
  • 190
  • 191
  • 192
  • 193
  • 194
  • 195
  • 196
  • 197
  • 198
  • 199
  • 200
  • 201
  • 202
  • 203
  • 204
  • 205
  • 206
  • 207
  • 208
  • 209
  • 210
  • 211
  • 212
  • 213
  • 214
  • 215
  • 216
  • 217
  • 218
  • 219
  • 220
  • 221
  • 222
  • 223
  • 224
  • 225
  • 226
  • 227
  • 228
  • 229
  • 230
  • 231
  • 232
  • 233
  • 234
  • 235
  • 236
  • 237
  • 238
  • 239
  • 240
  • 241
  • 242
  • 243
  • 244
  • 245
  • 246
  • 247
  • 248
  • 249
  • 250
  • 251
  • 252
  • 253
  • 254
  • 255
  • 256
  • 257
  • 258
  • 259
  • 260
  • 261
  • 262
  • 263
  • 264
  • 265
  • 266
  • 267
  • 268
  • 269
  • 270
  • 271
  • 272
  • 273
  • 274
  • 275
  • 276
  • 277
  • 278
  • 279
  • 280
  • 281
  • 282
  • 283
  • 284
  • 285
  • 286
  • 287
  • 288
  • 289
  • 290
  • 291
  • 292
  • 293
  • 294
  • 295
  • 296
  • 297
  • 298
  • 299
  • 300
  • 301
  • 302
  • 303
  • 304
  • 305
  • 306
  • 307
  • 308
  • 309
  • 310
  • 311
  • 312
  • 313
  • 314
  • 315
  • 316
  • 317
  • 318
  • 319
  • 320
  • 321
  • 322
  • 323
  • 324
  • 325
  • 326
  • 327
  • 328
  • 329
  • 330
  • 331
  • 332
  • 333
  • 334
  • 335
  • 336
  • 337
  • 338
  • 339
  • 340
  • 341
  • 342
  • 343
  • 344
  • 345
  • 346
  • 347
  • 348
  • 349
  • 350
  • 351
  • 352
  • 353
  • 354
  • 355
  • 356
  • 357
  • 358
  • 359
  • 360
  • 361
  • 362
  • 363
  • 364
  • 365
  • 366
  • 367
  • 368
  • 369
  • 370
  • 371
  • 372
  • 373
  • 374
  • 375
  • 376
  • 377
  • 378
  • 379
  • 380
  • 381
  • 382
  • 383
  • 384
  • 385
  • 386
  • 387
  • 388
  • 389
  • 390
  • 391
  • 392
  • 393
  • 394
  • 395
  • 396
  • 397
  • 398
  • 399
  • 400
  • 401
  • 402
  • 403
  • 404
  • 405
  • 406
  • 407
  • 408
  • 409
  • 410
  • 411
  • 412
  • 413
  • 414
  • 415
  • 416
  • 417
  • 418
  • 419
  • 420
  • 421
  • 422
  • 423
  • 424
  • 425
  • 426
  • 427
  • 428
  • 429
  • 430
  • 431
  • 432
  • 433
  • 434
  • 435
  • 436
  • 437
  • 438
  • 439
  • 440
  • 441
  • 442
  • 443
  • 444
  • 445
  • 446
  • 447
  • 448
  • 449
  • 450
  • 451
  • 452
  • 453
  • 454
  • 455
  • 456
  • 457
  • 458
  • 459
  • 460
  • 461
  • 462
  • 463
  • 464
  • 465
  • 466
  • 467
  • 468
  • 469
  • 470
  • 471
  • 472
  • 473
  • 474
  • 475
  • 476
  • 477
  • 478
  • 479
  • 480
  • 481
  • 482
  • 483
  • 484
  • 485
  • 486
  • 487
  • 488
  • 489
  • 490
  • 491
  • 492
  • 493
  • 494
  • 495
  • 496
  • 497
  • 498
  • 499
  • 500
  • 501
  • 502
  • 503
  • 504
  • 505
  • 506
  • 507
  • 508
  • 509
  • 510
  • 511
  • 512
  • 513
  • 514
  • 515
  • 516
  • 517
  • 518
  • 519
  • 520
  • 521
  • 522
  • 523
  • 524
  • 525
  • 526
  • 527
  • 528
  • 529
  • 530
  • 531
  • 532
  • 533
  • 534
  • 535
  • 536
  • 537
  • 538
  • 539
  • 540
  • 541
  • 542
  • 543
  • 544
  • 545
  • 546
  • 547
  • 548
  • 549
  • 550
  • 551
  • 552
  • 553
  • 554
  • 555
  • 556
  • 557
  • 558
  • 559
  • 560
  • 561
  • 562
  • 563
  • 564
  • 565
  • 566
  • 567
  • 568
  • 569
  • 570
  • 571
  • 572
  • 573
  • 574
  • 575
  • 576
  • 577
  • 578

8-58
Setup and Registration (System Menu) > System Menu
Item
Description
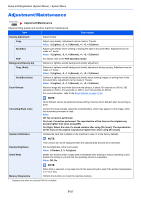
Auto Color Correction
This setting allows you to adjust the detection level used by the machine to determine whether
the original is color or black and white in Auto Color Selection Mode. Setting a lower value will
result in more originals being identified as color, while a larger value will tend to increase the
number of originals being identified as black and white.
Value
: 1 (Color), 2, 3, 4, 5 (B & W)
Color Registration
When first installing the machine or moving it to a new location, color drift during printing may
occur. Use this function to correct the color position of each of cyan, magenta and yellow to
resolve color drift.
For the procedure, refer to
Color Registration
on page 10-39
.
Calibration Cycle
Set the calibration cycle.
Value:
Auto:
Automatically sets the cycle for calibration.
Short:
Priority is given to image quality.
Standard: Balances image quality and print speed.
Long:
Priority is given to print speed.
NOTE
When [Custom] is displayed as setting item, the setting cannot be changed.
Tone Curve Adjustment
After prolonged use, or from the effects of surrounding temperature or humidity, the printed
output tone may differ from the original. Perform this function to ensure consistency with the
original tone.
For the procedure, refer to
Tone Curve Adjustment
on page 10-41
.
Calibration
Adjust color drift or hue of printed image in the most appropriate color.
For the procedure, refer to
Calibration
on page 10-42
.
NOTE
Perform Color Registration when the color drift is not adjusted even after performing
Calibration, and perform Gray Adjust if the color hue is not improved.
Developer Refresh
Adjust the printed image that is too light or incomplete, even though there is enough toner. In
addition, Black or color dots appear on the white background when white original is scanned
can be removed.
For the procedure, refer to
Developer Refresh
on page 10-43
.
NOTE
Waiting time may be longer when the toner is refilled during developer refresh.
Laser Scanner Cleaning
Remove vertical lines from the printout.
For the procedure, refer to
Laser Scanner Cleaning
on page 10-43
.