LG 37LD320H User Manual - Page 222
Installing Batteries in Installer, Remote, xxLD340H, INSTALLER, INSTALLER SEQ, UPN 000-000-000-000
 |
View all LG 37LD320H manuals
Add to My Manuals
Save this manual to your list of manuals |
Page 222 highlights
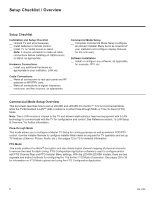
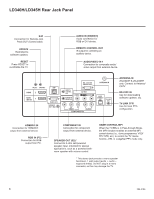
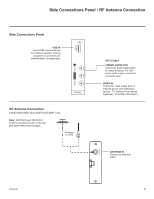
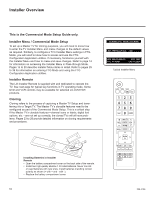
Installer Overview This is the Commercial Mode Setup Guide only. Installer Menu / Commercial Mode Setup To set up a Master TV for cloning purposes, you will need to know how to enter the TV Installer Menu and make changes to the default values as required. Similarly, to configure a TV's Installer Menu settings in FTG Mode, you will need to know how to access and use the FTG Configuration Application utilities. If necessary, familiarize yourself with the Installer Menu and how to make and save changes. Refer to page 14 for information on accessing the Installer Menu in Pass-through Mode. Pages 15 to 20 describe Installer Menu items in detail. Refer to pages 29 to 39 for information on entering FTG Mode and using the FTG Configuration Application utilities. Installer Remote The LG Installer Remote is supplied with and dedicated to operate the TV. See next page for typical key functions in TV operating mode. Some DVD and VCR controls may be available for selected LG DVD/VCR products. Cloning Cloning refers to the process of capturing a Master TV Setup and transferring it to a Target TV. The Master TV's clonable features need to be configured as part of the Commercial Mode Setup. This is a critical step. If the Master TV's clonable features-channel icons or labels, digital font options, etc.-are not set up correctly, the cloned TVs will all have problems. Pages 23 to 28 provide detailed information on cloning requirements and procedures. + AAA AAA + Installing Batteries in Installer Remote • Open the battery compartment cover on the back side of the remote. • Install two high-quality alkaline 1.5V AAA batteries. Never mix old or used batteries with new ones. Install batteries matching correct polarity as shown (+ with + and - with -). • Replace the battery compartment cover. xxLD340H PTC INSTALLER MENU 000 INSTALLER SEQ 000 UPN 000-000-000-000 ASIC 20E7 PTC V1.00.001 CPU V3.25.00 Typical Installer Menu ALARM TIMER INPUT TV 123 456 789 0 FLASHBK VOL INFO i PORTAL MUTE P CH A G E MENU GUIDE CC ENTER RETURN SAP EXIT RATIO EJECT 10 206-4186
-
 1
1 -
2
-
3
-
4
-
5
-
6
-
7
-
8
-
9
-
10
-
11
-
12
-
13
-
14
-
15
-
16
-
17
-
18
-
19
-
20
-
21
-
22
-
23
-
24
-
25
-
26
-
27
-
28
-
29
-
30
-
31
-
32
-
33
-
34
-
35
-
36
-
37
-
38
-
39
-
40
-
41
-
42
-
43
-
44
-
45
-
46
-
47
-
48
-
49
-
50
-
51
-
52
-
53
-
54
-
55
-
56
-
57
-
58
-
59
-
60
-
61
-
62
-
63
-
64
-
65
-
66
-
67
-
68
-
69
-
70
-
71
-
72
-
73
-
74
-
75
-
76
-
77
-
78
-
79
-
80
-
81
-
82
-
83
-
84
-
85
-
86
-
87
-
88
-
89
-
90
-
91
-
92
-
93
-
94
-
95
-
96
-
97
-
98
-
99
-
100
-
101
-
102
-
103
-
104
-
105
-
106
-
107
-
108
-
109
-
110
-
111
-
112
-
113
-
114
-
115
-
116
-
117
-
118
-
119
-
120
-
121
-
122
-
123
-
124
-
125
-
126
-
127
-
128
-
129
-
130
-
131
-
132
-
133
-
134
-
135
-
136
-
137
-
138
-
139
-
140
-
141
-
142
-
143
-
144
-
145
-
146
-
147
-
148
-
149
-
150
-
151
-
152
-
153
-
154
-
155
-
156
-
157
-
158
-
159
-
160
-
161
-
162
-
163
-
164
-
165
-
166
-
167
-
168
-
169
-
170
-
171
-
172
-
173
-
174
-
175
-
176
-
177
-
178
-
179
-
180
-
181
-
182
-
183
-
184
-
185
-
186
-
187
-
188
-
189
-
190
-
191
-
192
-
193
-
194
-
195
-
196
-
197
-
198
-
199
-
200
-
201
-
202
-
203
-
204
-
205
-
206
-
207
-
208
-
209
-
210
-
211
-
212
-
213
-
214
-
215
-
216
-
 217
217 -
 218
218 -
 219
219 -
 220
220 -
 221
221 -
 222
222 -
 223
223 -
 224
224 -
 225
225 -
 226
226 -
 227
227 -
228
-
229
-
230
-
231
-
232
-
233
-
234
-
235
-
236
-
237
-
238
-
239
-
240
-
241
-
242
-
243
-
244
-
245
-
246
-
247
-
248
-
249
-
250
-
251
-
252
-
253
-
254
-
255
-
256
-
257
-
258
-
259
-
260
-
261
-
262
-
263
-
264
-
265
-
266
-
267
 |
 |
